There are many ways to make a compost heap container. You can make a really simple version using three pallets secured with stakes driven into the ground and wire to hold them together. Four stakes and some chicken wire makes a great bin for leafmould – line this with cardboard and you can use it for compost.

Well established compost heap
Geen pvc coated chicken wire is an eye-pleasing alternative to traditional galvanised chicken wire. We’re going to tell you how to make a very versatile container using a number of wooden frames that stack together.
Size and Position of a Compost Bin
The bigger your compost heap, the better chance it has to generate heat and work well. Too big though, and you won’t ever fill it up enough to use. You need to have at least two heaps working in conjunction with one another – one that you’re filling and one that’s ‘cooking’. Make sure you locate the bins in a place that’s easy to get to so that you can remove the compost, but don’t place them too near the house – the inevitable flies will drive you mad!
Materials to Build a Compost Bin
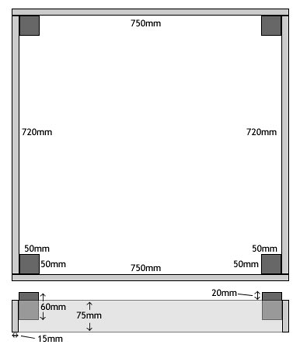
The amount of wood you require will depend on how big you’re planning to make your container, but we’ll base these instructions on a 75cm x 75cm x 75cm container. Make sure your wood is treated, otherwise it will quickly rot through with the damp compost against it.
Compost bin plan
Our container is made from up to ten wooden frames that stack on top of one another – this way you can build up the container as you add to it, and remove layers as the contents starts to rot down. Removing layers will enable you to access the finished compost much easier, and means that you can use the frames to start your new compost heap.
For each layer of the container you will need four planks to make the sides, four blocks of wood to hold the sides together, and screws or nails to fix it all together.
The planks should be around 75mm wide and at least 15mm thick; you need two planks at 720mm long and two at 750mm long – the longer pieces will overlap the shorter ones when you put the frame together so that it ends up square (see large diagram above).
The blocks should be about 50mm x 50mm, and 60mm long. You can either use scraps of wood you have lying around for this, or buy a length of 50mm x 50mm (2” x 2”) and cut it into sections.
If you are using scrap wood you have lying around, it doesn’t matter if the sizes aren’t exact as long as you make sure that each section of the frame is the same size that they fit together – the blocks will be offset so that each frame fits over the last and is held in place by the blocks.
Use screws or nails about 36mm long; you need 6 for each plank (3 at each end), and a pilot drill is helpful to make sure the wood doesn’t split.
- 20, 75mm wide x 720mm long x 15mm deep planks
- 20, 75mm wide x 750mm long x 15mm deep planks
- 40, 50mm wide x 50mm long x 60mm heigh blocks
- 240, 36mm long screws or nails
- Tape measure
- Cordless drill/driver
- Pilot drill (if using screws)
- Hammer (if using nails)
- Saw (to cut planks and blocks to height if needed)
Putting the Compost Bin Container Together
Start with one of the shorter planks and one of the blocks – lay the plank on the block, so that the end of the plank is flush with the side of the block, but the block extends 20mm above the top of the plank. Use a pilot drill to make three holes through the plank into the block, and screw it into place.
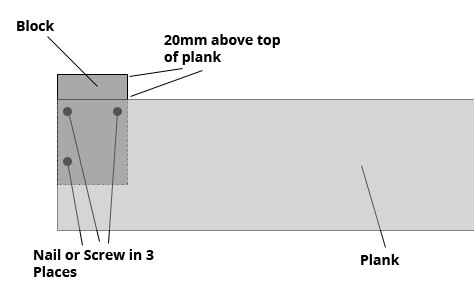
Fix the post to the plank using screws or nails at one end and then repeat for the other end of the plank
Once you have fixed one block to one plank repeat this at the other end of the plank, then do the same with the other short planks that you have. You should end up with 20 shorter planks with all the blocks attached.
Now, take one of your short planks (with blocks attached), and one of the long planks. Sit the long plank against the block so that it also covers the end of the shorter plank, drill and screw into place.
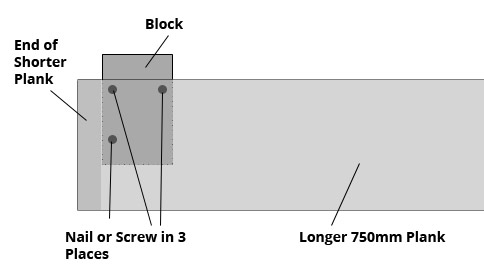
Fix one of the longer planks to the block and overlap the end of the shorter plank already fixed in position
Screw the other end of the long plank to the second short plank-and-blocks piece, so that you have three sides of the frame.
Now hold the last long plank up to form the last side, make sure the corners fit squarely over both the blocks and the ends of the short planks, and screw the last piece into place to complete one of your frames.(see large diagram above)
Make as many frames as you need to get started – you can always make up more in the future if you decide you need to extend your compost bin. Regular maintenance with wood treatment will ensure your compost bin will last for years
Now you’ve made your compost bin there are lots of books available with information on how to make and use the end product. Additionally, more information on best composting practice, materials to use etc… can be found over at the Royal Horticultural Society site.
There are many different types of compost bin available. This video shows another way to build a compost bin using some recycled materials.