You may think that hanging a door is a fairly tricky job if you are not a carpenter but with a little knowledge and time it’s certainly a job that you can do yourself.
In this how to guide you will learn how to hang a door like a professional carpenter, read on below to find out how.
Different Types of Door
The first thing to think about is the type of door you need to hang as this will determine what type of door you need to buy as there are 2 different types:
Internal Doors
Nearly always hollow unless it’s a fire door or solid internal door, internal doors are much lighter than their external counterparts.
They are generally made of 2 panels either side, fixed to a timber frame with card board honeycomb packing as a filling.
If solid, they are generally made of pine or a similar softwood.
In terms of styling, they are normally the familiar 4 or 6 panels in design, or today may be cottage style or something a little more contemporary.
As they are hollow and lightweight softwood, internal doors are also fairly cheap, starting at around the £25 mark.
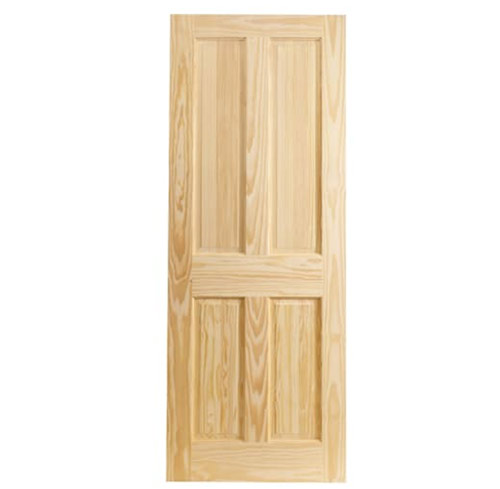
Pine softwood internal door
External doors
As they need to resist all the elements that get thrown at them, external doors are always solid and normally made of hardwood so that they last as long as possible.
Again they can come in a panelled design or can be flush or again something more stylish and contemporary.
They normally also feature at least some glazing to allow light in and also allow you to view any visitors.
Due to the fact they are solid and normally hardwood they are also a lot more expensive than internal doors, starting at around £150.
As timber doors, especially external require regular maintenance, many these days opt to go for composite or UPVC front doors.
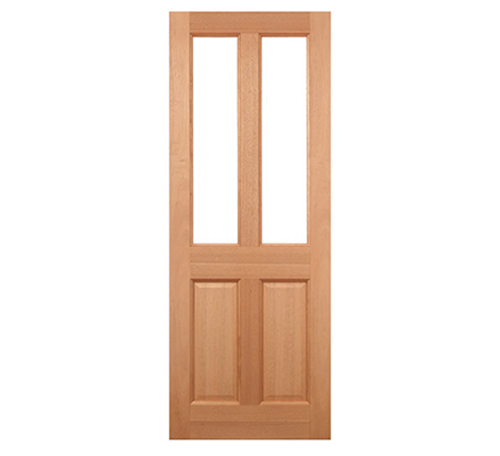
External hardwood door
In the majority of cases you will be hanging an internal door, as, as mentioned, most external doors these days tend to be UPVC or composite, so this instantly makes the job a little easier due to the fact they are much lighter and easier to handle.
As mentioned above, when it comes to internal door design they tend to be either "flush doors" or "panelled doors".
This simply means that the door is divided into panels with two side rails, a top and bottom rail and a mid-rail.
A flush door, as you might imagine is simply flat on both sides with no recesses.
When it comes to sizes, internal doors (and external for that matter) come in a range of standard sizes so that they fit certain sized door frames. As there are quite a few, these are covered below, but when it comes to internal door thicknesses, these are as follows:
- 1&3 eighths of an inch or 35mm
- 1 & 3 quarters of an inch or 45mm
- 2 inches or 50mm
For extreme or very odd sizes or those which cannot be matched or made up, it is possible to buy "door blanks". These are oversize, solid, flush doors which can be cut down to any size and fit.
As we have briefly touched on above, internal doors are mostly available as "hollow" lightweight doors and also as fire-check doors.
With fire doors, they should always be fitted to the kitchen and internal garage door and if you have a loft conversion, it will most likely be stipulated by Building Control that they need to be fitted throughout.
To ensure they meet the construction requirements, when closed, the fire will take either 1/2 or 3/4 of an hour to burn through, depending on the door used and whether its 30 minute or 45 minute fire resistant.

45 minute internal fire door
Intumescent strips can also be fitted into doors and frames. These are strips which swell up at the first sense of heat and stop smoke from getting through any gaps. You will also, on the construction of a loft conversion, need to install automatic door closers to arrest the spread of any fire.

Intumiscent door strip
If you are wishing to find information and legislation regarding Fire Doors and closer’s you may want to view our Fire Doors and Closer’s Project.
When it comes to styling, in most cases internal doors are chosen so that they match existing doors or complement the overall style and design of the interior. This is also the case for any furniture that’s fitted e.g. handles, locks etc.
Quite frankly there is a dizzying amount of styles of both doors and door furniture on the market today so there will almost certainly be something to match any style.
Standard Internal Door Sizes
As we have mentioned above, there are quite a few standard internal door sizes that are made to fit standard sized door frames and in most cases these should fit with the minimum of trimming and shaping in most modern homes.
However, it is possible to get other door sizes "off the shelf" so always enquire, but generally speaking these are the most common door sizes and even so it is unlikely that you will get anything other than those below in DIY stores. You may need to go to a builders merchants for other sizes.
| 525mm x 2040mm | Metric size door for metric frame |
| 626mm x 2040mm | Metric size door for metric frame |
| 726mm x 2040mm | Metric size door for metric frame |
| 826mm x 2040mm | Metric size door for metric frame |
| 926mm x 2040mm | Metric size door for metric frame |
| 610mm x 1981mm | 2ft x 6ft 6 inches |
| 686mm x 1981mm | 2ft 3 in. x 6ft. 6 in. |
| 762mm x 1981mm | 2ft. 6in. x 6ft. 6in. |
| 838mm x 1981mm | 2ft. 9in. x 6ft. 6in. |
Choosing the Right Door
When looking to purchase a door to hang, it’s essential that you get the right type. This doesn’t just mean the right size or style, but the right one for where it’s to be fitted.
The obvious first point is whether it’s been fitted internally or externally. As said, if external it will need to be solid so it’s secure and preferably hardwood so that it’s as resistant as possible to the elements.
If internal, it will ideally need to match any other doors and also if fitted to kitchen or internal garage doorways, will most likely need to be fire rated.
You will also have to take note of which way the door will open. In most cases, internal doors open into the room and also away from the wall that the light switch is mounted on so that it can be easily accessed.
In some cases if the door is designed to fit a certain way round then you’ll need to ensure the hinge side of the door is such that it allows the right face of the door to face the right way and for it to open the right way.
Finally whichever way around the door is to be fitted, you’ll need to make sure that there’s enough material to trim to fit the door and also ensure it remains sturdy and isn’t weakened by having to cut too much away.
Measuring up for Replacement Doors
One of the most important aspects of hanging a door, is accurately measuring up the frame it’s going to be fitted to so that you know the correct size of door you need to purchase.
When fitting a door, the door is fitted to the frame, not the other way around so you will need to measure up the frame to know exactly what size door to go for.
There are several areas to measure to do this correctly:
- Measure Width: Measure the width of the frame in 4 or 5 places, equally spaced up the frame. If fairly new the measurements should be equal all the way up. Older frames can bow inwards or outwards and this will be indicated by the fact measurements are different
- Measure Height: Take 3 measurements from the floor to the head of the door frame. Again if fairly modern they should all be the same, if older they may be different indicating a bowed frame head or un-level floor
- Check Frame Square: Using a frame square, check that each corner is exactly 90°
- Check Floor Level: Using a spirit level, check the level of the floor. If it’s out of level you will need to cut the door to an angle so that it matches
Once you have taken your measurements you will then know exactly what size door you need to buy.
Remember, your door will need to be big enough to fit to the greatest dimensions of the frame.
Different Parts of a Door
Despite the fact that there are different types of door, pretty much all have the same core parts and in order to fit your door properly, it’s important to know what these are:
- Top rail
- Mid rail
- Bottom rail
- Left and right upright stiles
Aside from the above core parts there are also many others but these will depend on what type of door you are dealing with.
As mentioned, when it comes to internal doors, it should be stated on the top of the top rail of the door which side the lock block is and from this you can determine which side the hinges go.

The parts of a standard door
Preparing to Hang a Door
Before actually hanging a door there are a number of jobs that need to be done.
Firstly, as we have stated in the measuring section above, you need to check the measurements of the door and frame and make sure it will fit. While you’re doing this, check the frame and make sure it’s square.
Some older houses will have moved dramatically and one of the first things that twists and bends is the door frames.
As we have mentioned, a door should always be fitted to the frame, never the other way around and if you find that the frame is particularly warped or twisted then it may be best to rip it out and install a new one.
You should always endeavour to start with a square frame and cut the door down to suit.
Next, ensure that your door is allowed to acclimatise correctly to the room it’s being fitted in. This means placing it flat on the floor in the room for at least 3 days. This will allow it to shrink or expand according to the environmental conditions of the room.
Although we’re not cutting the door quite yet, before you get to this stage it’s essential to remember that any cuts you make, especially to the stiles needs to be done the same on both sides so that everything remains equal.
Finally, a big mistake some people make when hanging a door is to start fitting furniture (handles, hinges etc.) before the door is cut to size and hung. This should always be done after it’s been installed.
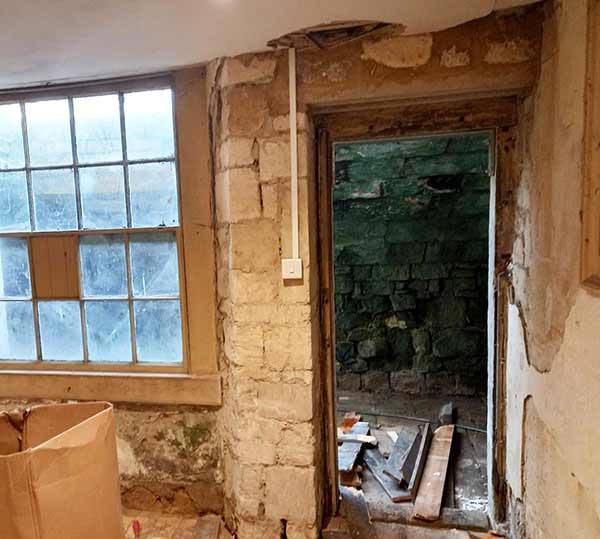
Very old and warped door frame
Where Should the Hinges go?
One point that we haven’t covered as yet is exactly where the hinges should be placed on a door. It is essential that they are situated in the right place to ensure that the door is adequately supported and won’t drop over time.
Although there are different opinions on the web as to exactly where these locations are and for what doors they should be used, the following locations should cover most instances:
- Top Hinge: Around 125mm to 150mm down from the top of the door
- Bottom Hinge: Around 200mm to 230mm up form the base of the door
- Centre Hinge (if needed): This should be in the dead centre of the door. Generally only required with heavier doors
Additionally, with very heavy doors such as fire doors, a extra hinge is also fitted to the top of the door. As the majority of force is downward force, an extra hinge at the top creates extra stability, preventing any drop or additional wear on the top hinge. This is generally fitted around 50mm down from the top hinge.
To work out how many hinges you are likely to need, use the following rule of thumb information:
- Up to 1525mm or 60 inches in height = 2 hinges
- Over 1525mm to 20000mm – 60 – 80 inches = 3 hinges
- 2000mm to 2500mm – 80 inches to 100 inches = 4 hinges
- 2500mm to 2780mm – 100 – 110 inches = 5 hinges
- Over 2780mm or 110 inches = 6 hinges
Tools and Products Needed for Hanging a Door
To successfully hang a door you will need the following tools and products:
- Your chosen door
- Decent carpenters square
- Sharp hand saw
- Circular saw
- Long straight edge of spirit level
- At least 2 decent clamps
- Pen or pencil
- Tape measure
- Sharp chisels or palm router
- Hammer/mallet
- Suitable hinges
- Drill/driver
- Door holder or method of clamping door
- Work bench Workmates to place door for cutting
- Manual or electric plane
- Sander or sandpaper
- Screwdrivers or wooden wedge to hold door up while fitting
- Selection of drill bits/3mm pilot drill
- Mortice gauge
- New door frame or timber to repair if needed
How to Hang a Door
For the purposes of this example we are going to be hanging a brand new door into an existing frame but hanging it the opposite way around so will also need to cut in the door hinges on the opposing side of the frame.
Step 1 – Check Door is Right Way Around
The very first job before anything is to check you have the door the right way round and right way up.
Check for lock block information on hollow doors for the right way up, should be marked on the side or top of door which side it is. If not, tap the edge of the center rail of the door. The lock block should sound more solid than the side without.
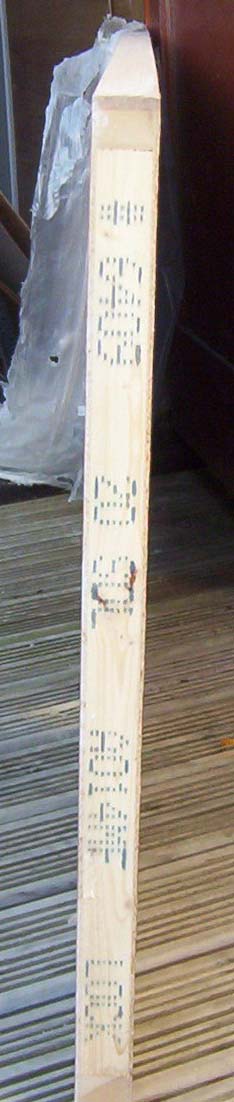
Lock Sign on side of door
Additionally, with 4 or 6 panel doors, the bottom stile is thicker than the top.
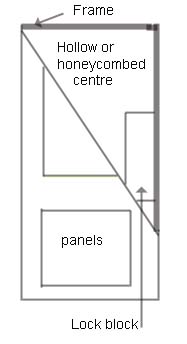
Honeycomb door cross section
You will also need to make sure that you know which way the door is to swing when it opens, e.g. inwards or outwards and mark the side of the hinge edge of the door so that you know where you are cutting in the hinges. Most doors will open into the room.
Finally, if you are hanging a new door, try to hang it so that it doesn’t cover the light switch so that you have to walk around the door to turn the light on as this is a pain.
Step 2 – Check the Frame
Once you have positioned the door the next job then is to check the frame to see how square it is. If a modern property it should be pretty much spot on, however if an older property then it may not be.
Using a spirit level, hold it against the flat inner edge and also one of the outer edges of each upright stile. This will tell you weather it’s leaning inwards or outwards or tilting backwards or forwards.
Also, hold the level against the underside of the head of the frame to see if this is tilting up or down and then check the level of the floor to see how level it is.
Finally using a carpenters square check and see if each corner is at 90°. This will indicate if the frame is leaning to either side.
You can also check this by measuring 3 or 4 places up the stiles and also 3 or so points from the frame head to the floor.
Once you have done the above you will then know the state of the frame. If there are only slight variations then it’s probably not worth changing. However, if it’s badly warped or bowed across any side then it’s probably worth ripping it out and starting again.
If you do need to, then checkout our fitting a door frame project here for full tips and information.
In some cases, especially with older properties you may find the frame is fine, but just too big. In this case it’s possible to simply re-line the interior of the frame to make it smaller. This is the case for us in the example below.
Simply cut or plane timbers to a suitable size so that once installed, they make the frame roughly the size of one of the standard door sizes above.
Step 3 – Size up Your Door to the Frame
To get the door to fit the frame it is first necessary to "offer it up" and mark it where cuts need to be made.
As you can see in the images below, as the frame was a non-standard size we needed to add timber to it to pack it out so the door would fit. This was cut to size and screwed to the existing frame.
As mentioned, if the frame isn’t correct then it should be pulled out and a new one fitted, but in instances like this where adding a simple piece of timber can be done, it saves a lot of work and expense.
The door was placed in position up against the new frame so that it was totally flush with the frame and the inside of the frame was marked on the door with a pencil. You will probably need a hand with this with someone holding the door against the frame.
Also while doing this use a spirit level to ensure that the door is level. This will ensure that once cut, it will fit square in the frame.
Step 4 – Cutting Your Door to Fit
There are 2 different ways to cut the door to size once marked, using a hand saw or using a circular saw. To ensure all of your cuts are square it’s best to use a circular saw.
the best way to do this is to flip the circular saw over and measure from the side of the blade to the edge of the base plate of the saw.
Measure and mark in from your cut line the distance measured above and make a mark. Do this again and then position a straight edge or spirit level on the marks and clamp it solid.
You can then use this as a straight edge to run your saw along and get an accurate and more importantly square cut.
Repeat this for any other cuts that need to be made.
If you only have a hand saw you can use the same technique to keep the blade straight, however you will need to make sure the edge of the blade stays completely flat against the straight edge.
Checkout our cutting timber project for tips on how to get a straight and true cut.
Some further tips to think about when cutting timber is not to forget the thickness of the saw blade that has a thickness of about 3mm including the set of the teeth.
If you cut along your marked line, the door will be 3mm smaller than you intended. This may not sound a lot, but should you cut marginally inside the line, you are talking about a difference of 5mm and this is the difference between a good job and a shoddy one. Remember always leave the line.
Whenever you mark a piece of timber, the line you have drawn it the exact size you want the wood. If you cut or plane the line off, your work will be smaller than you intended.
Cut the work along the side of the line, just leaving the line in place. With the line still visible you cannot be wrong. You can always plane a little more off, but you can’t stick it back on!
People think it is so easy to grab a saw and start a piece of carpentry but even cutting a straight, square line is a problem until you have mastered it.
Step 5 – Fitting Hinges to Your Door
Having sorted the frame and cut the door to the correct size we have now got to hang it. This can be done on a variety of hinges but for most doors it is the standard butt hinge that is used.
There is no regulation as to where these hinges should go with regard to the position on the door or frame but we like to place the hinges as stated in the information above, around 125mm down from the top and about 230mm up from the base.
Measure and mark the hinge edge of the door with these measurements and then ensure that it is placed around the right way for the hinges so that it opens the right way.
Place the hinge below the top mark and above the bottom and open it up, again ensuring it’s the right way around. Position it so it’s at right angles and laying it on the side of the door to be hung. A lot of DIY web sites will tell you to mark round the hinge with a hobby knife.
Do not do this it is dangerous and almost impossible to cut along the grain neatly. Mark with a pencil and then scribe the long edges with a mortice gauge if you need to.
Using a sharp chisel (or if you have and can use a palm router set to the correct depth), cut as shown below, tapping firmly with a mallet to avoid breaking the chisel head. Remember the pencil line is outside the hinge so you need to cut inside this line. Once again, leave the line!
Chisel out the surplus and make sure your hinge fits neatly and is not "proud" of the timber. Neither should it be set too far in as this will cause the door to bind. The hinge should be set in just enough to be flush with the edge of the door.
Practice this cut on an offcut of wood for a while this will benefit you greatly if you have a number of doors to hang.
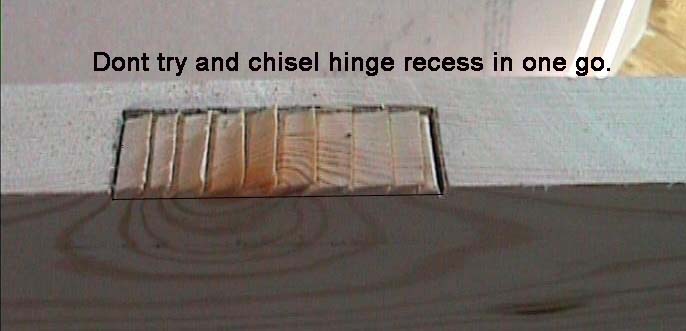
Cutting out hinge recess
Step 6 – Drill and Screw the Hinges to the Door
Once correctly cut out, place your hinges back in place and using a pen or pencil, mark each fixing hole.
Drill pilot holes at each marking for your hinge screws, making sure they are in the centre of the hinge holes. A screw which is against the edge of the hole will push the hinge over and out of line.
Once holes have been drilled, using the hinges supplied with the kit or if none, 8x 40mm wood screws should suffice, screw through each fixing hole, holding each hinge firmly in place.
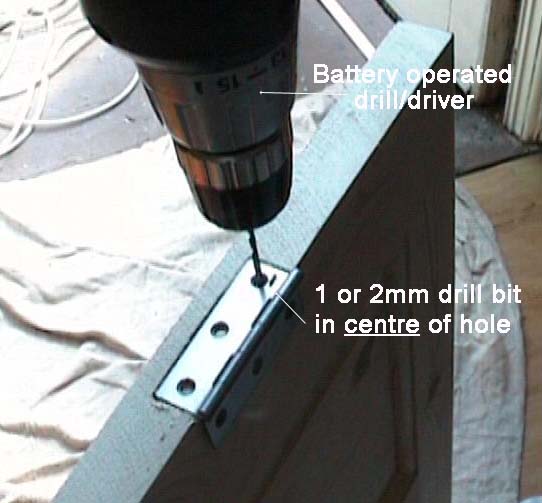
Drill driver screwing hinges down
Step 7 – Check for a Uniform Gap Around Your Door
When the hinges are cut in, stand the door in the opening and use wood wedges or screwdrivers to position it absolutely. Check all round for the gap to be uniform. As you can see in the images below we have used chisels.
In years gone by the carpenters apprentice was made to carry an old penny, this was used to make sure the gap all-round the door was the precise width.
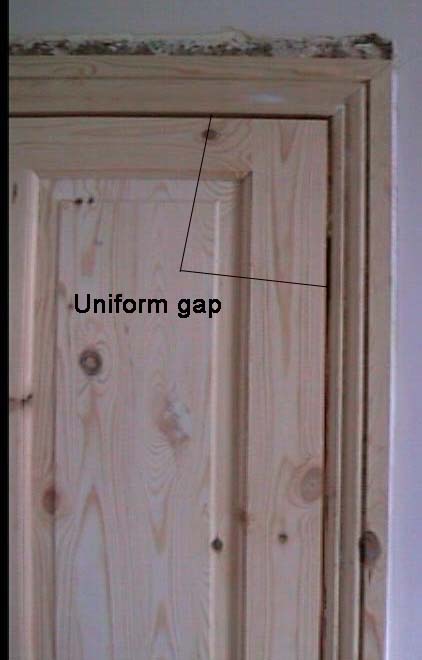
View of uniform gap surrounding newly fitted door
Make sure you have enough depth under the door if you are going to lay carpets later.
Position door precisely in frame
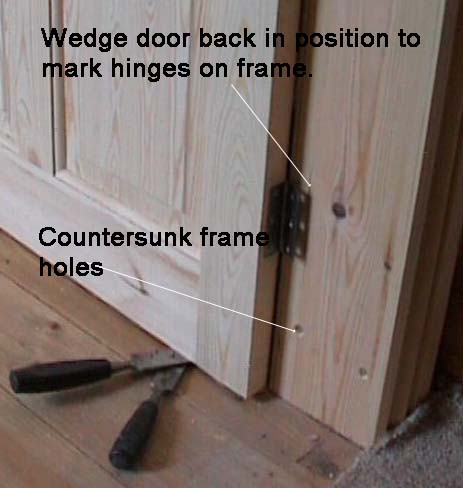
Step 8 – Mark the Position of the Hinges on the Frame
With the door in the correct place and the hinges correctly screwed to the door you can mark the position of the hinges on the edge of the frame as in the image below. Mark all the way around the hinge.
Another method to achieve the same is to use the mortice gauge which should already be set to the hinge width, and the carpenters square, and you can mark the full position of the hinge on the frame.
One final method is to remove one of the hinges and then place it on the marks made on the frame.
Ensure the hinge is the right way around and then draw around it using your pen or pencil.
Whichever method used, once marked the timber can then be chiselled or routed out.
Door hinge position on door frame and marked
Fixing the Hinges to the Frame
With the hinges now cut out in the door frame you can then set about screwing the hinges up and securing the whole door in place.
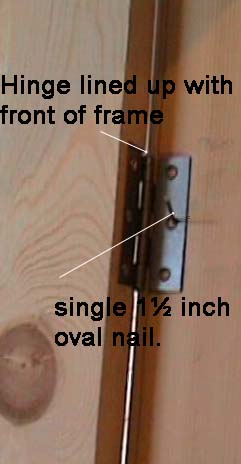
With the door open, wedge it in position once again using wedges, screwdrivers etc. and, if you are on your own, you may find it easier to keep the top of the door in place by pinning the top hinge temporarily in place as seen in the image above using a small nail.
This ensures the door does not move as you screw the hinges in as any movement at all will pull the whole door out of square.
When screwing up, it’s generally better to start at the top to take some of the weight off the door. Once the top hinge is secured, it’s then much easier to accurately position and screw the bottom hinge.
Screw a screw into every fixing hole of the hinge and once done, you have now successfully hung your door. The last jobs now are to fit the door stop and the furniture.
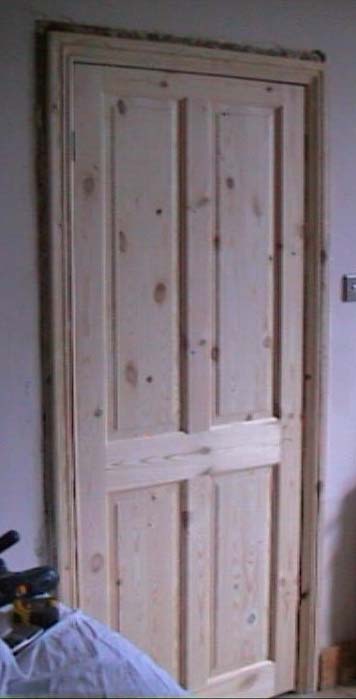
Finished job of a door fitted to frame
Fixing the Doorstop, Lock and Furniture
Your door should now swing easily back and forth nicely and be sitting fully square in the frame.
Our particular door frame needed a new door stop which is the last thing to go on (see image below). This is simply pinned to the frame up against the door when it’s in a closed position.
Using a helping hand, ensure the door is closed and it’s face is totally flush with the outer edge of the frame and then using a pencil, mark down the edge of the door on the frame in a few places either side and also along the head.
Next, measure the internal width and height of the frame and cut some door stop timber to length (generally either 8 or 12mm x 32mm timber).
Tap some lost head nails into each section, 2 for the head and 3 either side and position each on the marks on the frame and hammer them into position, using a spirit level to ensure each is totally upright.
Test close the door and every part of it should touch the door stop. Once this is the case, add more nails to secure it fully in place.
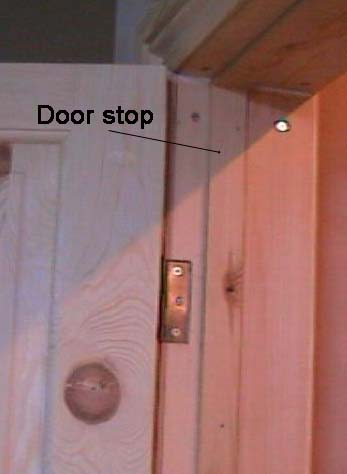
Doorstop Fitted to door frame
Finally, any door furniture can then be fixed in place such as door handles, locks, bolts and the likes.
Again, this needs to be done correctly to get the best job possible. For full information on this, see the following projects:
- How to fit a door handle
- How to fit a door chain
- How to fit a door bolt
- How to fit a cat flap
- How to fit door numbers
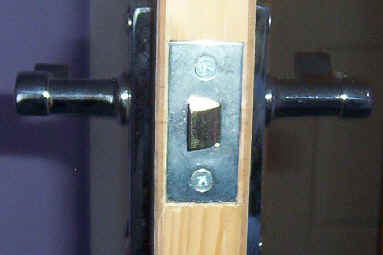
Lock fitted to newly installed door
Filling old Hinge Recesses and Tidying up
The final job after fitting any door furniture is then to tidy up and then do any finishing such as painting and the similar.
If the new door was being hung on the opposite side to the old one, the old hinge recesses will need to be filled in, sanded off and then painted to hide them.
This is easily done with either filler applied in a couple of layers over the recesses, or you can try your carpentry skills at cutting a timber block down, gluing and pinning it in place (punching the heads of the pins down with a nail punch) and sanding it down to finish flush with the frame. This is called "scarfing".
Whichever method you go for, just make sure any and all gaps are filled so that when painted, the repair should be completely invisible.
If you are fairly new to DIY, hanging a door may seem like a job way beyond your current skill set, however, as long as you take your time and follow the instructions above, it’s certainly one that you can do yourself and still get a professional finish.