Decking has risen dramatically in popularity due (we believe) to a large extent, to its versatility. A raised deck does not create half as many problems, or half as much work, as a raised patio. Decks can curve with ease, and blend in beautifully with other wooden features in the garden such as trees and fences.
Decking is still however, carpentry and some skill is required to get it right!
This project deals with designing and building garden decking, specifically a straight–forward raised deck. The images show this deck to be raised quite a lot but the same principle applies even if it’s only raised a few inches.
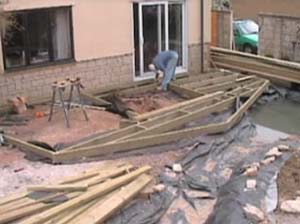
Building a decking frame to support the deck boards
Once a deck has been installed it will need to be maintained correctly to ensure it stays in great condition all year round. If it isn’t then it can fail in a matter of years and even become dangerous!
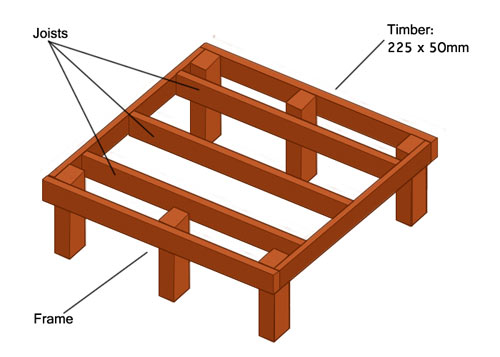
Components of a decking frame
If you already have a patio or terrace, and you wish to turn it into a deck, the frame shown above can simply be built directly onto the patio, providing the patio is solid and firm. If you are laying decking over a patio it’s a good idea to lay the frame in line with the fall of the patio so water cannot lay up against the timbers.
It is vital you draw out your decking plan first. This will enable you to work out exactly where you need to put posts for support and how much timber you need. The bigger the timber, the greater the distance between the posts you can allow.
If you are using frame and joist timbers of 225 x 50mm there should be no more than 2m between the posts that are holding up the frame. However you can allow 4m between ends of the frame providing the joists are no more than 450mm apart. This means that if you are using 225 x 50mm timbers, then a frame 4m x 4m can be built (12ft x 12ft) using just eight posts.
We would always recommend using 100mm square posts. The diagram above shows a deck 4m long by 1.8m wide (not to scale). The one below shows the decking boards being attached to the timber frame using screws.
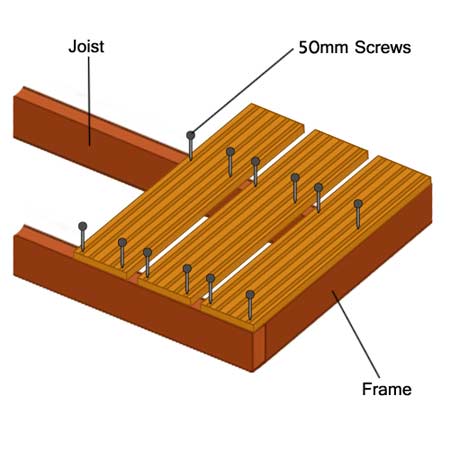
Deck boards are screwed to a deck frame
The easiest way to work out the exact position for posts is to build the frame first. This can be laid on the ground and the post positions marked. The picture below has a white line showing where the frame is, under the decking boards.
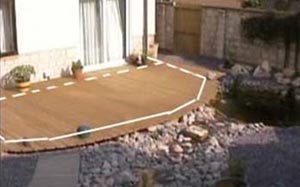
Building a deck – the white line shows the position of the deck frame underneath the deck
When you are sure you have the posts in the correct position they can be positioned in the ground just as shown in our concreting fence posts project.
Hopefully you will realise when using our Do It Yourself projects and video tutorials, that when the basic principles of many "key" jobs are mastered, common sense can tell you how to do a job. It will certainly not give you the skills to do it, they only come with practice!
The timbers forming the deck are simply proprietary timbers with grooves already cut into them. These grooves should always be laid to a slight fall to help water run off the deck.
All decking frames and timbers should be screwed rather than nailed. Timber moves a great deal with expansion and contraction and this movement can work nails loose in no time.
All timber used should be treated with a good quality timber preservative including the bare ends left when you make a cut.
All cut timbers should be taken to the tip NOT BURNED. Timber which has been treated with preservative can split and spit in a fire, throwing ashes and splinters many feet.
Spend some time thinking about where to site your deck, to get the best use out of it for your own preferences and requirements.
If you plan it as a shaded area, remember this may lead to damp in the timbers and the growth of lichen and algae if it will not see any sunshine for months on end.
If you like to lay out in the sun, make sure you site it in the area that gets sun for the most time, or for the time you are most likely to have time to sit there. This may not be near the house at all.
You can protect you deck from the build up of slime–causing bacteria, and moulds by using a deck treatment liquid or wood preserver, available from pretty much all DIY stores. Try to use one that kills off any lichens or algae and soaks down well into the timber.
Decks over 300mm from the ground may require a handrail. The posts for the rail can be bolted to the side of the frame. If you are digging to place posts in concrete then take care, as you may be near drains etc. in your garden.
Very large decks and decks raised more than 600mm, may need planning permission as they may affect your neighbours. Check the situation with the Building Control Department of your local Council.
There is no reason why the decking timbers cannot overshoot the frame by a sensible amount. This amount you can work out for yourselves by standing on the boards.
Using this feature enables you to cut the decking boards to a shape which blends into your garden and if you plan this shape first, you can make your frame to suit.
The picture below shows that we curved the edges of this deck in Somerset, plus one edge of the decking extends out a little way over a garden pond. The deck timbers were allowed to extend beyond the deck by about 400mm allowing plenty of room for a curve to be cut.
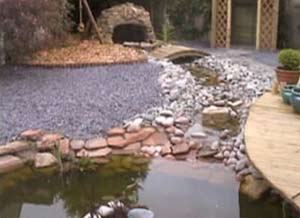
The deck edges have been curved and extends over the garden pond
Basic Decking – Looking After Your Decking
To Keep your deck in great condition for years to come it need a little annual maintenance:
- Check for splinters, protruding nails, rot and mould. Do not allow the wood to become black or green before you treat it, otherwise it can stain the wood permanently. The moulds become embedded in the wood fibres and not even pressure washing will remove them
- Treat the deck in Spring and Autumn using a good quality wood preservative or wood treatment. This will prevent moulds and fungi from colonising the wood, preventing rot. It will also and protect against insect attack
- Check any exposed end grain timber for signs of rot where wood has been cut and left open, as this is the most vulnerable part of timber that has been factory treated. Also check for rot on any timbers that are in contact with the ground or under ground, especially if they are sitting in an area that is damp, or where water gathers. You can treat vulnerable areas with a suitable decking treatment or oil or exterior timber treatment
- To maintain the natural colour and lustre of your decking, apply a good quality Decking Oil
You should exclude children and pets from areas that you are treating with chemicals. You should also make sure you do not allow these chemicals to come into contact with garden foliage or your garden pond if you have one.
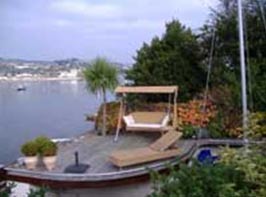
The right garden furniture can really make your deck fabulous
Decking And Wooden Deck Furniture – What Do You Want It To Look Like?
Garden Furniture
One of the issues with using wood and other natural materials in the garden is that it does need care to make sure it is protected from the weather and it doesn’t rot.
Garden furniture should be covered or ideally moved inside in bad weather and over the winter months. Padding and cushions on garden furniture should be kept clean and dry to keep it looking good, and to prevent mould and mildew building up on fabrics and filling materials.
Natural wood furniture should be treated with oil in the spring and autumn to keep it looking good and to help protect it from the elements.
There are also some great modern materials that look like wicker or woven fabric but are made of metals, resins and plastics that are resistant to fading in the sun, and do not rot or suffer from insect or mould attack.
These designs are obviously low–maintenance and long lasting, so they are becoming ever more popular. There is a huge range of different types of furniture to suit any style and budget
Decking Problems and Deck Choices
Decking has a particular problem with regards to weathering and the way that affects its appearance. Just like patios and paths the decking gets dirty, but being made of timber it can also oxidise (turn grey) and possibly rot.
The way that decking reacts to sunlight and rain depends upon the timber that it is made of, the preservative treatment used and the way it is fixed together.
Here are some of the problems with decking – and how to overcome them:
Softwood Decking
Softwood decking is often made using fast–growing pine. Softwoods are lightweight, renewable resources, which is cheaper than hardwoods, but less durable. You can either buy it pre–treated (usually green in colour) or you can buy untreated timber and treat it yourself.
Softwood will turn grey over time, unless oiled regularly to keep it in top, insect and rot free condition. Again, a decent decking oil or exterior wood treatment should be used.
Hardwood Decking
Hardwood decking can be made from woods that you will have heard of, such as Oak, Cedar or Teak, or newly popular Iroko, but there are other species such as Ipe, Balau, Garapa and Cumaru, and no doubt others as we need to source woods from more sustainable plantations.
Hardwoods are denser, heavier, and more expensive, but they are much more durable. If they are good quality they are much less susceptible to rot or insect attack. However they will still go grey if not oiled regularly.
Fungi and Mould Growth on Decking
Mould and fungi are nature’s way of getting rid of dead wood in forests. In woodland fallen trees need to decompose to make way for new plants, but that is not want we want to happen to our deck! You can treat all wood types in Spring and Autumn using a wood treatment or preserver to suppress growth of moulds and fungi.
Damp and Rot on Decking
If any areas of the deck or the deck fixings are resting on the ground or are in an area where water pools around them then you should take precautionary measures to protect them from rot. This applies to the decking itself but also to the structural supports, deck frame, posts and handrails etc.
If they are made of softwood treat them using decking oil or a good quality timber treatment such as Cuprinol 5 Star Wood Treatment or Everbuild Lumberjack wood treatment where they are in contact with the ground or are vulnerable to rainwater pooling.
Smooth or Ridged Decking Planks
The surface finish you choose will depend on the look you want for your deck. Consider whether you want smooth or grooved finishes. Grooved finishes are more slip resistant when wet, but they are harder on bare feet.
Deck Fixings
Nails or screws, joints and plates can all act as moisture traps and damage the timber, allowing rot, moulds and insects to gain a foothold. Careful assembly and design can eliminate many of these problems, but additional treatment with a decent timber preservative is essential, particularly with softwoods.
We always recommend fitting decking planks with screws rather than nails, as it gives a better finish and it allows you to lift boards again if you need to gain access to the area underneath. This is especially useful if you have laid cables or piping under the deck.
Sustainability
Whichever wood you use for your decking make sure it comes from a sustainable resource – it should carry a FSA label, and in any case any good Timber merchant, Builder merchant or DIY supplier should be able to vouch for the source of their timber, so ask the question.
Decking Preservative
Decking cannot be protected in the same way as garden furniture, so to preserve it, it should be cleaned and treated with special deck preserver or decking oil at least once a year, to ensure it stays looking good, and continues to be water repellent.
You can choose various colour finishes for decking stains and varnishes including clear finishes. Just be careful not to get the wood preservative onto plants or into fish ponds.
Constructing a decking area can really make an out door space come alive, but to ensure it lasts it has to firstly be constructed correctly and secondly properly maintained all year round.