Damp and condensation can be caused by a number of different things, which can make it tricky diagnosing damp issues, the causes of damp and condensation and effectively implementing the right damp treatment to ensure a successful fix.
Thankfully, there are a number of different visual indicators for the different causes of damp and condensation problems which can help you a great deal in diagnosing damp problems and fixing them. We will discuss each one below.
Damp is a Problem That Every Homeowner Should Take Seriously
When you have a damp house this can really affect your quality of life. Not only are you reminded every day of the issue by the mould and mildew growth on walls, rotting skirting boards or windows, tide marks on the walls or unsightly stains but in the case of mould this can also affect your health. The Property Care Association list condensation and damp as primary reasons for property dilapidation.
The spores produced by mould have been linked by health professionals to a number of disorders such as allergic reactions and breathing issues.
Damp encourages mould growth which can harm your health
In light of these facts, although some may regard a damp house as a minor inconvenience, it can be quite serious and the long term damage to the infrastructure of your property can be very, very costly e.g. replacement roofing timbers, replastering of entire rooms and possible subsidence. So if you do have any damp or cold areas on your walls or ceiling, now is the time to identify causes of damp and get them fixed!
Find out if Your Damp Area is Actually Damp Using a Meter
Before you go about implementing a damp treatment you first need to confirm that your damp area is actually damp – you can do this using either the back of your hand or for a more accurate reading, a damp meter.
Hygrometers are also a handy tool to have. These are meters that measure the level of moisture in the air – they can be used inside your house to determine whether this is the cause of any condensation issues you may be experiencing.
You can detect whether there are areas on your wall that are colder than others by using a wall temperature gun. If there is a temperature difference, this indicates that there are cold spots on your wall – of course, patches of your wall can be cold and damp at the same time – damp wall areas lose heat three times faster than dry walls.

Use a damp meter to find out if your damp patch is actually damp
There could be a variety of causes for your damp issues and one way to get to the root or potentially roots (if there is more than one issue causing the damage) of the problem is to look at the visual damage itself and work backwards.
Each different visual effect of damp has it’s own set of causes, and if we can identify these then we stand a good chance of getting them fixed and solving the problem.
Below you will find the most common visual signs of damp and their general causes:
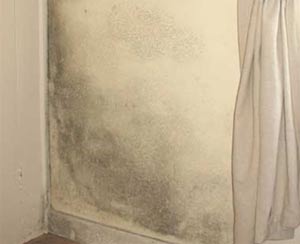
Black Mould and Black Spot Mould Growth – Condensation
Issue With Black Spot Mould
The most common cause of black mould in homes is condensation build up. When moisture in the warm air within a room comes into contact with a wall or surface that’s cold or the air itself cools, then it can no longer hold the moisture in it and the water will condense out, usually onto a surface.
This excess water on your wall or ceiling’s surface can then form damp. This can in turn make your condensation issue worse, as the damper a surface gets the colder it will get, as it will lose heat faster.
This means that water is more likely to condense out from the air onto it, making the area more and more saturated.
These conditions are an ideal breeding ground for mould. You may also notice that mould formation is occurring in areas where there is very little movement in the air.
Well ventilated areas ensure that no cold air is allowed to rest in one place for too long where it will keep the area in question at a lower temperature than the rest of the room, reducing the likelihood of condensation occurring.
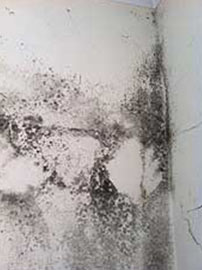
Condensation can cause black mould growth, among other things
Fix for Black Spot Mould
The easiest thing you can do to solve the immediate issues is to remove the mould from your walls using an Anti-Mould cleaner.
Next, you can wipe away any moisture from any affected areas such as window frames and walls to stop the problem getting any worse. Make sure that you wring out and dry any clothes you’ve used outside, as drying inside will introduce more moisture back into the air.
You should find and solve the cause of the condensation before doing any further repairs to make sure that the mould won’t reappear in your repaired surface.
Once you’ve solved the cause of your condensation, ideally you should strip the plaster back entirely, clean the wall with the anti–mould cleaner and replaster.
If you’re painting the wall, you can make absolutely sure that the mould doesn’t return by using an anti–mould emulsion, or adding an anti–mould additive to your wallpaper paste.
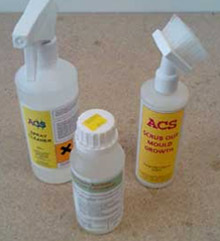
Use some mould cleaner to remove the mould from your walls
If the air in your house contains a lot of moisture, reduce it or try to keep your house a bit warmer
Using the hygrometer we mentioned earlier, test the moisture content of the air in the room that has the mould in it.
If the moisture content is high, it may well be that this is all that’s causing your condensation.
There are many different steps that you can take to reduce the level of moisture in the air in your house – we’ll discuss some here:
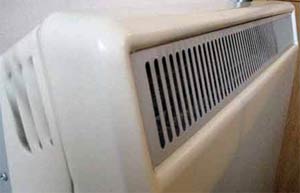
Add Some Ventilation and Some Draught Proofing
In terms of a more long term solution to condensation caused by overly moist air, ventilation and draught proofing are key!
If possible install trickle vents on into your windows and leave at least one open at all times. These are relatively easy to install – see our Trickle Vents project for more information on how to do this.
If it is not possible to install trickle vents leave a small window open slightly as often as you can.
Inspect your rooms for any air bricks and ventilators – have they been blocked up or covered over? If you find that some have then get them uncovered as this is probably not helping in terms of air flow around your rooms.
If you have a chimney that is not currently in use, this can contribute to your condensation issues if it is not ventilated properly.
Your chimney stack should not either be open or capped entirely – an open chimney will let rainwater in and a capped chimney traps cold air in the chimney void, creating cold spots on the chimney breast.
Instead, you should ideally fit a chimney cowl to your chimney pots (these are effectively caps with an opening that allows air, but not rain, to enter) or remove the pots altogether and instead fit a paving slab on top of the chimney stack, raised up by bricks to allow air to flow into the chimney but again keep the rain out.
If your fireplace is bricked up you should also have an airbrick inserted into the wall in front of the empty fireplace space. Ideally it should be installed 30cm above ground level.
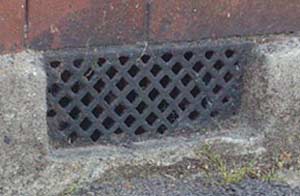
Uncover or install air bricks to increase the ventilation in your room
Another solution is adding draught proofing and insulation. Draught proofing and insulation will help to keep your house (and its walls) a bit warmer at all times, which means that water is less likely to condense out of the air in your space.
When it comes to insulation, the loft is a good place to start. Insulating your loft and loft hatch correctly can be one of the most cost effective jobs you can do to retain more heat in your house and it can have quite an impact on your heating bills.
Ensure that you use the correct thickness of insulation (for your joists) and the correct draught proofing fittings for your loft hatch ( more information on this can be found on the Energy Saving Trust website and information on potential grants for these improvements can be found on our sister site Be Energy Smart).
Draught proofing windows and doors can also go a long way in reducing condensation and quite a few other issues.
Draughts that are allowed to enter a property due to poorly fitting windows and doors can keep that area at a lower temperature that the rest or a room and due to this condensation can form .
With this in mind ensure that any draughts are blocked up correctly with appropriate draught proofing materials (NOTE: ensure that trickle vents are fitted to windows so that ventilation is under your control as you will still need some ventilation to ensure air circulation).
Draught proof your windows and doors to reduce condensation
Add Some Cavity Wall Insulation
Cavity wall insulation can be very effective in preventing heat loss and ensuring that rooms are maintained at a decent temperature, reducing the likelihood of condensation.
You will initially have to check whether you have a cavity wall (seek assistance from a professional if you are not sure) – any properties built after the 1930’s should have one.
There are many companies installing cavity wall insulation but please do your research and homework before commissioning anyone to do the work.
A shoddy cavity insulation job can cause untold additional issues and cost a fortune to put right.
You can find accredited cavity wall insulation installers who can give you a 25 year guarantee on the work on the Cavity Insulation Guarantee Agency’s (CIGA)’s website.
Insulate your cavity walls to minimise condensation
Set Your Heating so That it’s got a Higher Minimum Level in Colder Months
Heating can also help in the damp house battle! OFTEC offer some very good advice regarding heating in all forms
During the colder parts of the year try to leave consistent low level background heating on in your home, in all rooms, even if there is no one there.
This will ensure that all rooms stay at a certain temperature, reducing the likelihood that the air will get cold enough for condensation to occur.
You may think that this will be expensive but with today’s modern heating systems it can actually work out cheaper.
If your heating system is trying to heat your home from cold it will have to work a lot harder and for a longer period than it would if it simply has to top up your heating to the required temperature.
In the absence of a more modern and efficient heating system you may also want to consider a thermostatically controlled heater, but try and stay away from bottled gas or paraffin heaters as these are guilty of pouring huge amounts of moisture into the air which will make your condensation problem worse.
Having the heating on consistently will minimise condensation
Adjust Your Cooking and Washing Habits
There are also certain daily tasks that increase the moisture content in the air such as cooking, showering and drying clothes.
When cooking try to keep doors closed and lids on pans to minimise the level of water vapour in the air.
If possible (weather prevailing) try to dry all of your clothes outside, as drying clothing inside can pour a huge amount of moisture into the air.
In the event that this is not possible try to keep your washing drying in a specific room e.g. a bathroom, keep the door closed and a window open.
Also ensure that your tumble dryer vent pipes vent externally either through a window or purpose built wall attachment.
When showering or bathing, again keep bathroom/shower room doors closed and a window in the bathroom slightly ajar. If you have an extractor fan in your bathroom ensure that this is switched on and that its filter is clear of any mould or dust.
Rearrange Your Furniture
In respect to furniture you want to ensure that air can circulate as freely as possible around items within a room, as if cold air becomes still, the water in it is more likely to condense out of it.
Don’t push wardrobes, dressers, sofas etc. right up against walls – leave at least a couple of inches as an air gap. This will help to prevent any cold air and condensation developing. Believe it or not condensation can even cause mould in full wardrobes and cupboards!
If your air doesn’t contain that much moisture, try and remove any cold spots
It may be that wherever in your house that condensation has settled on is cold, and that is the reason that the condensation is occurring.
As we’ve just mentioned, you can reduce the coldness of your windows and doors by draught proofing them, but what about cold areas on your wall? These come into being for a number of reasons.
You can check that your wall area is cold by using a heat measuring gun as mentioned earlier – simply hold it against the area you think is cold and another area of wall and see whether there is a difference in temperature. The reasons that an area of your wall is cold may be:
Rusty/Dirty Wall Ties
During the building process, mortar can fall on your wall ties – these are metal ties that tie the two walls of your cavity wall together and support them.
If they get loaded up with mortar and other debris and any moisture collects on the internal side of the external wall, the dirty tie provides it with a direct route to the internal wall, where it can make your wall cold (and damp).
Similarly, the ties can rust over time – this causes them to expand, which can crack the mortar they’re joined to, allowing cold air to enter the cavity via the external walls and make the corresponding areas on the internal walls cold.
This can encourage water in the air inside your house to condense on this spot, creating damp. You can detect whether there are any wall ties near your cold spots using a metal detector – if there are, you can remove the brick nearest to it and another one if it will be useful (never remove more than two without consulting a qualified building professional).
We’ve got a guide to how to do this in our How to Remove a Brick project.
If when you remove your bricks you find that your wall tie does have debris on it, you can remove the debris and replace the bricks, or if the tie is rusty you will need to replace it – information on how to do this can be found in our How to Replace a Wall Tie project.
Debris in Your Cavity Wall
If you have a cavity wall, this needs to be clear of any debris or other objects – sometimes rubbish and debris is left in the cavity when the wall is being built and it is then left to sit in the wall permanently.
This debris allows any moisture that enters your outside facing walls to travel to your inner walls, where it can manifest as damp.
You can check if there is debris in your cavity by removing a brick or two (do not remove more than two bricks without consulting a professional) from the area of outside wall that corresponds to your damp affected internal wall area.
You can remove the bricks using the instructions in our How to Remove a Brick project mentioned above.
Once you have removed the bricks, use a light to look inside the cavity for any debris, and remove any large objects you see by hand wearing some thick gloves in case some of the debris is sharp. You can remove dust etc. with an old vacuum cleaner.
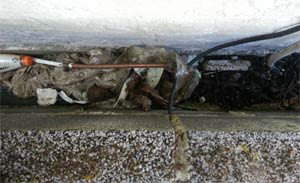
Debris in your cavity is a common cause of cold spots and condensation
A Poor Cavity Wall Insulation Job/no Cavity Wall Insulation
A poor cavity insulation job can mean that there are gaps or holes in the insulation in your walls. This creates cold spots quite literally because those wall areas are not as well insulated as the surrounding wall areas.
If you think this might be the cause of your problem, you will need to get an accredited cavity wall insulation installer (find your local qualified installers on the CIGA website mentioned above) to take a look and determine if this is the case.
This issue isn’t easy to fix – you may well have to remove all of your own insulation and install a completely new set rather than trying to top it up in the wall areas where it is lacking.
Cracks in Your Mortar/Broken Bricks
General wear and tear can gradually crack the mortar, or pointing around your brickwork – this can allow cold air and moisture to enter your cavity through your external wall and make your internal wall damp and cold.
The face of your bricks can also splinter off over time in a process known as spalling – this is when the face of the brickwork gets wet from the rain or snow and then the wet bricks freeze.
In this situation, the water freezes and expands, splintering the face of the brickwork off. Again, this can make the wall more susceptible to allowing rainwater to enter the cavity through the wall, and in the case of spalling this can mean that the splintering happens over and over again, gradually wearing the brick away.
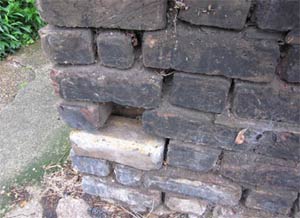
Missing or broken mortar can allow water into your wall, causing damp
If the pointing around your bricks is cracked or missing, you will need to replace it, either yourself (see our Repointing Brickwork project) or by getting a tradesman to do it.
In the case of spalling or broken brickwork, you will need to replace the bricks – again, you can use the Replacing a Brick project linked above for guidance on how to do this.
To stop the spalling happening again, you can apply a brick waterproofer.
Your External Walls are Being Exposed to High Volumes of Water
It may be that your walls are perfectly sound but that they’re being exposed to such high volumes of water that a significant quantity is entering your house through your external walls.
The solution to this is to apply a good brick waterproofer to your brickwork. Ensure you use one that’s breathable, so you can apply it knowing that the water that’s already in your bricks can escape.
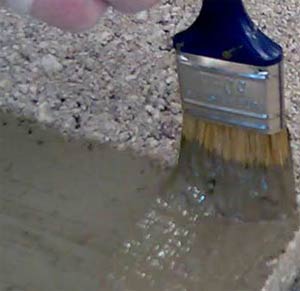
Apply a breathable waterproofer to protect your bricks or masonry from damp
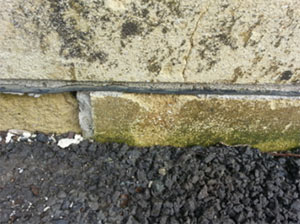
Damp or Rotting Skirting, Damp Stain or Tide Line (no more than 1.4m above skirting)
Issue With Rotting Skirting, Damp Stain or Tide Line
If you are experiencing any of this type of visual damage then the likelihood is that you have an issue with your damp proof course or DPC.
This is a layer of waterproof material that sits in the brickwork across your house about 6 inches up from ground level to prevent rising damp from rising up into your walls.
Quite a few older properties (19th century and before) were constructed without a damp proof course. This was mainly because the natural ventilation in the property (windows and doors) would provide enough air flow to prevent significant moisture build up.
As houses became more airtight due to better fitting doors and windows and more effective insulation, the amount of natural ventilation was significantly reduced and water rising from the ground could not be ventilated away as it once was.
Rising damp can leave a tide mark above your skirting board
In the early days of DPC’s stone slabs and slate were the materials of choice and were layered between or beneath brick courses around 6 inches above ground level to provide a barrier to prevent damp rising up from the ground any further.
Damp rises up in this way due to the porous nature of bricks and blocks which means that water can travel upwards inside the brickwork by capillary action.
The moisture in the walls can also draw salts to the surface of the walls, which can absorb moisture from the air inside your house and cause further moisture to accumulate.
The salts themselves can be quite large and therefore destroy the integrity of your plaster when they are drawn to the surface of your walls, meaning that often they blown your plaster in the affected areas.
Today more modern materials are used such as polythene, felt, bitumen or in some cases, an engineering brick (a very densely constructed brick that prevents water absorption). These then provide an impervious barrier preventing moisture and salts from going any further.
A sound Damp Proof Course will protect your property from rising damp
Failure of a DPC can occur in various different ways. The damp proof course itself can fail, e.g. slate and felt can become brittle and crack, polythene can be split etc. or in most cases the entire damp course itself is instead bridged.
Bridging occurs when the DPC is effectively bypassed by an object that is connected both above and below the DPC, providing ground water with a direct route around it.
The most common occurrences of this are when a garden, grass area, path or set of steps or in some cases a porch or conservatory is constructed and butts up against the external wall.
This then provides water and moisture in the ground a direct path around the current DPC and up into your walls.
If your property features a cavity then bridging can also occur here. During construction rubbish and debris such as mortar can fall down into the void and build up to a point that it extends over and above the damp proof course.
When this happens moisture can then creep up through the debris and on up into the wall without having to cross the DPC.
Most of today’s modern building materials are focused around waterproofing e.g. engineering bricks, treated timbers, gypsum plaster etc.
When you take the nature of these materials into account you can then see why, once the moisture is present in a wall, it can be a tough job to get it out as the waterproofing within the materials effectively holds it in the wall.
Couple that with the fact that there is less natural air flow within a modern property and you’ve got problems!
Fix for Rotting Skirting, Damp Stain or Tide Line
As you may imagine the only way to establish whether a broken or bridged DPC is the cause of your problems is to investigate each possibility.
Firstly inspect the external walls of your property and examine your pdc closely. Look at the condition of the materials used – are they cracked, brittle, split, do you even have one?
In the event that you do find that your DPC is in poor condition you have a few choices.
You can replace it like for like, e.g. digging out bricks/blocks and replacing the DPC with the same material.
As you may imagine this can be a costly and time consuming process and will really need to be carried out by a professional with the correct knowledge.
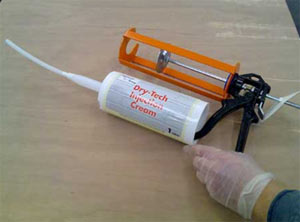
The second choice is significantly easier. There are quite a few chemical/cream DPC products available today and these can even be installed on a DIY level.
The basic premise is to drill holes in both external and internal walls at roughly 125mm centres and then either inject (if using a skeleton gun) or pump (using an injection machine) the DPC chemical cream in until saturation occurs.
The chemical cream is absorbed by the bricks and spreads within the brickwork to form a waterproof chemical layer. Once dried, you will then have a layer of waterproof bricks creating your new moisture barrier.
As mentioned there are quite a few of these products available today such as Permaguard and Twistfix.
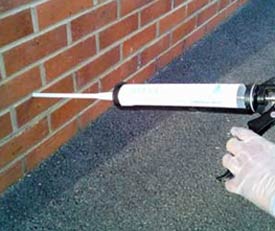
Inject a new DPC easily yourself using a chemical DPC cream
If you find that you do indeed have a damp proof course and it is in good condition then your issue may be bridging.
Again, examine your DPC and see if there is a good clearance (6 inches) between it and the ground level, if not then you will need to dig back any grass, garden, pathway or other obstruction and give some clearance between the obstruction and your external wall.
You may find that the obstruction is being caused by something a little more permanent than some grass or a pathway – it may be a set of steps or even a porch or conservatory.
As mentioned, the best course of action is to remove the offending object but this may not be possible, especially in the case of a conservatory!
In this instance you can use one of the previously mentioned products to create a new DPC above the obstruction.
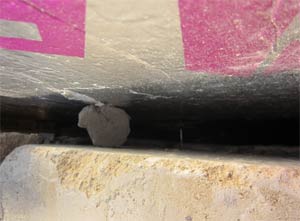
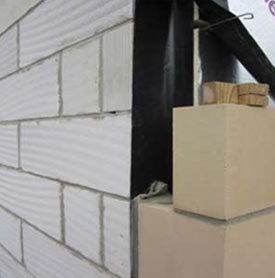
When no evidence of an external bridge is found, your issue may be within the cavity itself. In order to confirm this there is really only one course of action and that is to inspect the cavity.
On the external wall exactly opposite the affected area on the internal wall remove one or two bricks at ground level (do not remove more than two).
This may sound quite drastic but is relatively easy – as mentioned earlier, our How to Remove a Brick project has the instructions for how to do this.

Remove one or two bricks from your wall to examine the cavity for debris
Once you have removed your bricks use a mobile phone or camera to take some shots of the inside of the cavity and then inspect them.
If you find any debris this will need to be removed so using your hands (wear some heavy gloves as there may be sharp objects in there) and a scraper for harder to reach objects, remove it. Once any rubbish has been removed, replace your bricks using suitable mortar.
Remove any debris you find in the cavity manually wearing thick gloves
One final point to make is that the issues you are experiencing may be nothing to do with your own property and may be down to work that has been carried out on a neighbouring property.
With this in mind it’s worth asking your neighbour(s) if they have had anything done to the ground floor of their property such as filling a basement or crawl space below the ground level floor or have had any concreting or screeding carried out as this may very well have taken their floor level above your DPC, bridging it and allowing moisture a route around and up into your rooms.
As with the condensation issue above you will probably be left with some damp damage to the surface of your internal walls so this will also need to be dealt with.
In the majority of cases any plaster will need to be removed from the affected area and the wall will need to be allowed to dry out thoroughly before replastering and redecorating to ensure no future reappearance.
If the damp has caused mould or white salts to appear on your walls, there are a number of products that can be used to make absolutely sure that they won’t reappear.
Salt neutraliser can either be added to your replastering plaster, or painted onto the bare wall, and you can also buy an anti-mould cleaner and anti-mould emulsion to apply to your replastered wall before you repaint.
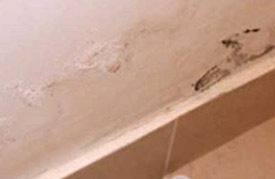
Damp Patches and/or White Salts on Walls and Beneath Lifting Wallpaper or Flaking Paint, Found on Higher up Parts of Your Wall
Issue With Patches and/or White Salts
When damp patches and/or white salts are present across your wall rather than just in the lower area just above the skirting board, this is a sign that you have likely suffered or are suffering from some form of penetrating dampness which probably means that you may have a defect in the external fabric of your property.
Salts that are confined to the lower area of your wall probably indicate rising dampness, which you can read about above.
Water that is allowed to enter your house can wash salts that are present in most building materials out into the surface of your walls, and when the water dries out and evaporates, a white salty residue is left behind.
The salts are whitish and can be quite large, erupting through the wall’s surface and blowing your plaster off the wall.
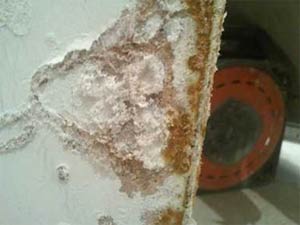
Damp can wash salt crystals out of your walls and deposit them on the surface
It’s also a good point to note that in some cases these salts can be hygroscopic, meaning that they attract moisture from the air. The build up of moisture then creates damp patches.
You can tell if your salts are hygroscopic by whether they get damp and then dry out periodically.
This is the salts attracting moisture from the air when the air is moist enough. Hygroscopic salts are salts that accumulate in chimney breasts when fuel is burnt.
If the chimney breast gets damp, these salts can get washed to the surface of the chimney breast or the surrounding wall area where they appear as smooth white residue and attract moisture.
Hygroscopic salts accumulate in chimney breasts and attract water
If you have crunchy salt crystals on your wall rather than hygroscopic salt residue, it is likely that you have penetrating dampness in some form.
In this instance to find the cause of the penetrating dampness you will need to check your walls for cracks in mortar, your cavity for debris in the wall and any rusty or dirty wall ties, your roof for broken tiles and flashing and your guttering for splits, cracks and leaking joints.
An easy check to start with is the condition of your brickwork and mortar.
Take a look at the external wall opposite to the affected area on your internal wall, and check the bricks for any cracked bricks or mortar.
If there is cracked mortar, you may have some subsidence so do get this checked out by a professional before attempting to fix it.
If your mortar is cracked you should also use a metal detector to find where your wall ties are. If there is a tie near the cracked mortar, this may have rusted and caused the mortar to crack, as when the ties rust they also expand.
Ties can also accumulate debris over time or during the building process, which gives water entering your external wall a direct route to your internal wall.
To check your wall ties you will need to remove a brick or two (never remove more than two without consulting a building surveyor or qualified tradesman) to get a better look at the state of the ties.
You can find instructions on how to remove the bricks in our How to Remove a Brick project mentioned above.
If your ties have debris on them you can remove it; if they are rusty you will need to replace them using the instructions in our How to Replace a Wall Tie project.
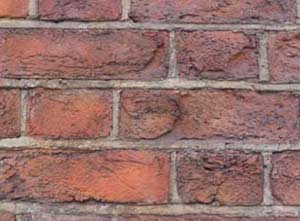
Check your brickwork for any cracks could be allowing damp in
In respect to checking your roof and chimney, ideally these checks will need to be done at source e.g. on the roof or at the guttering or wall level which will involve climbing to a height.
If you are not comfortable doing this then please don’t as and mistakes could be very costly to yourself!
Instead hire or borrow a decent pair of binoculars or if you have a friend with a drone and camera and carry out an inspection from the safety of solid ground.
Check your roof for broken flashing and broken or missing roof tiles as well as checking the mortar in your chimney brickwork if you have a chimney.
To inspect your guttering correctly, ideally this should be done during wet weather so that you can easily spot any leaks.
Fix for Patches and/or White Salts
If you find any splits, cracks or damage then you will need to get it fixed. Cracked mortar can be hacked out using a suitable raking tool or small chisel and then replaced with new (take a look at our How to Replace a Brick project for more on how to do this) and the same goes for roof tiles – any cracked or damaged tiles should be replaced with new. There is quite a good YouTube video on roof tile repair by Russ Richards that runs through the basics.
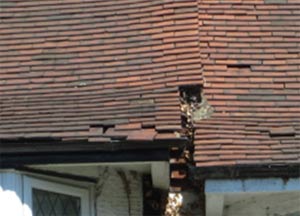
Replace any broken or missing roof tiles as these may be causing your problems
If your flashing is broken you will have to either repair or replace it – replacing it is the best option but is expensive as lead is so expensive.
A cheaper alternative is to repair the breaks with flashing tape – this is a waterproof tape specially designed to repair flashing. More information on how to repair your flashing using tape is available in our Repairing Lead Flashing project.
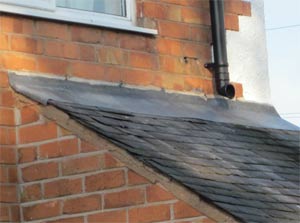
Replace any flashing that is cracked or missing
When it comes to guttering most items are quite easy to remove and replace as in effect they are "snapped" together.
There can be quite a few individual parts to a guttering system and a rundown these can be found in our Plastic Gutters project.
When leaking guttering joints are present this can sometimes be due to a broken or missing bracket, as during heavy downpours, the weight of the water in the guttering can cause the joints to fail.
In this case you should replace or add a bracket to support some of the load and take it off the joint.
In some cases you can use silicone to seal over holes and splits in your guttering but this should really only be used as a temporary measure and not a permanent fix – it’s best to do the job properly!
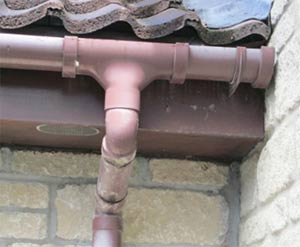
Replace any cracked pieces of guttering to reduce your walls’ exposure to damp
It may be that your external walls are actually sound but that they are exposed to such a high level of rainfall that they just become damp to a level that causes problems on your internal walls.
If this is the case you will need to paint a waterproofer. Make sure the one you go with is breathable as you want the water that’s already in your bricks to be able to escape.
With the root cause of the penetrating damp sorted it’s now time to deal with the resultant visual damage.
Most decorated and plastered surfaces do not fair too well with salts especially plaster.
The salts can themselves burst through even the best rendered backing and once they have penetrated the plaster they then emerge through the decorated surface.
The best and most effective fix (but as is always the case the most costly and time consuming) is to remove all of the plaster from the damaged area and about 400mm beyond in all directions (to ensure no salts are left), dry out the walls’ surface and then apply a salt neutraliser.
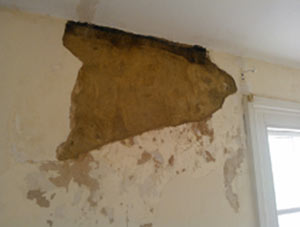
If you have salts present in your walls you will need to strip the plaster off
Once you have applied the neutraliser and allowed to dry (following manufacturer’s guidelines) you can then replaster.
Your plaster may already contain a salt neutraliser, making it unnecessary to apply it to the wall as well, and you can get salt neutralisers you can add to the plaster as well.
A newly plaster surface should be left to dry out completely before any decoration is added as if it isn’t then any decorated layer will eventually come off.
Drying can take as much as 2 – 3 months so be aware of this, but once dried you can then go ahead and add the decoration of your choice.
NOTE: When heavy salts are present the salt neutraliser alone may not be enough to prevent any further build up. In this case you may need to add a mesh membrane over your walls’ surface before you replaster. The membrane will ensure that no further salt can cross into your plaster.
Damp around Chimney Breast, Yellowy Brown Stains Appearing and Disappearing)
Issue With Damp around Chimney Breast
This issue is quite similar to the one outlined above and shares some quite similar characteristics (in terms of salts being involved) but with a few subtle differences when it comes to the area around a chimney.
The act of burning fuels releases minerals and tars that have been absorbed by the fuels materials as they have developed in the ground over many years. The particles released when the fuels are burnt then come to rest on the inside of chimney void.
Over a period of time (and when water or moisture is allowed to collect in the chimney void) minerals and tars can seep or be washed through the chimney breast and onto the surface of your inner walls.
You might be thinking that this sounds exactly like the issue outlined above but when tars and other fossil fuel extracts are involved they often leave a yellowy brownish stain.
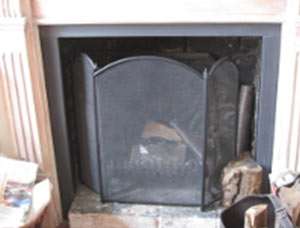
Burning fuel can create tars which stain your walls
You may also find that this particular issue gets better or worse depending on the weather in that during times of extreme moisture or high humidity, effected areas become more apparent and when warmer and drier the issue seems to disappear.
This can be an indication that the minerals or salts present in your walls are hygroscopic.
This means that they are moisture attracting and can draw moisture present in the air in your room, producing, in some cases, additional damp.
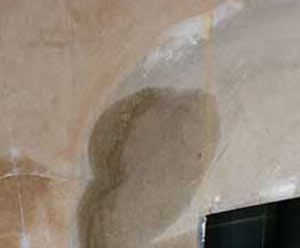
Hygroscopic salts cause damp patches that appear temporarily
In some instances the presence of hygroscopic salts can be due to previous building usage so it’s worth checking out if your property has any history.
Salt presence can be very common in buildings used previously as butchers or coal storage.
Fix for Damp around Chimney Breast
Firstly you will have to establish if you have a penetrating moisture issue e.g. have you got a leak around your chimney breast producing visible marks or stains or drawing salts through the wall? Check your roof tiles, flashings, mortar joints etc.
In the event that you do find anything this will need to be repaired. Once repaired allow the area to dry out thoroughly for as long as needed and then you can assess any damage to internal surfaces.
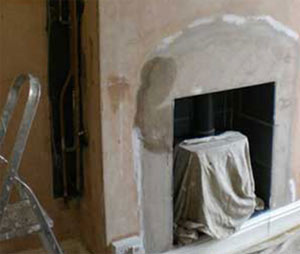
In some cases if you have gotten to the issue quickly and the salts have not had time to embed themselves in your wall’s surface then the plaster can be saved but if any decoration is already started to flake off and the plaster is crumbling then you will need to hack it all off, drastic as that may sound, it’s the best solution.
Once you have removed all the plaster and allowed the area to dry out totally, apply a salt neutraliser (some examples of these mentioned above) to the area and allow this to penetrate.
Once thoroughly treated you can then replaster and redecorate but please let your newly plastered surface dry out totally before you do so.
New plaster can take as much as a few months to totally dry before it is able to support paint or wallpaper.
Isolated Damp Spots on Walls
Issue With Isolated Damp Spots
If you have an isolated spot, the cause is likely to be one of two things. Either you have penetrating damp, likely caused by a fault in the external fabric of your home (if this is the case, take a look at our Salts section above for how to identify the cause of your penetrating damp and solve it) or you have a leak somewhere in your home.
Fix for Isolated Damp Spots
First and foremost you will have to establish whether you have a water leak below your property.
Your local water authority can assist you with this as you can ask them to run a check on your water main pipe and also those of your neighbouring properties (including those that are up hill).
This should be a free service and they will be able to tell you if there is a pressure leak anywhere indicating a water leak.
They should also be able to test the water for you to determine its source (e.g. whether its mains water, sewage water, waste from domestic drainage or naturally occurring ground water).
In in the case that it does turn out to be a mains leak then a fix will have to be arranged through the water authority (as you can imagine this could turn out to be a bit of a task depending on their terms and also depending on the authority in question therefore we regrettably cannot offer any further information).
You can also run some tests yourself – start with your foul drainage firstly by locating your drainage man hole cover and lifting the lid.
Run a tap to determine which channel is yours and once you know this for sure block the channel up with a bung (these can be hired from your local hire store).
Now fill a sink with water and mark the level and leave overnight. If the level has dropped this is a good sign that you have a leak. NOTE: Do not forget to remove the bung!!!
With a potential leak identified the next task is to find out exactly where that leak is and the best way of doing so is to employ the services of a drainage surveyor as they will have specialist equipment and cameras that can be inserted into the drain to pin point the exact location of the damaged section of pipework.
You will also want to test your surface drainage and this can be done by purchasing some drainage dye (available from most builder’s merchants or DIY stores, also ensure that it is non-toxic).
Place the contents of the bag (following manufacturer’s instructions) into each of your available drains and then fill them up with water.
When it gets dark inspect as much of the external of your property as possible and look for evidence of the dye as it glows in the dark. If you find the dye in places that it should not be then you can then trace it back to the source of the leak.
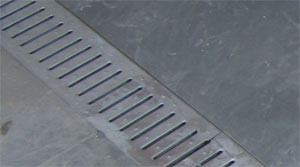
Add dye to your surface drain to detect any leaks in your system
Damp Floors
Issue With Damp Floors
The causes of damp floor problems can vary depending on the severity of the problem e.g. the floor may be slightly moist to the touch or you may literally have a puddle of water.
A good place to start in establishing a cause is to inspect the outside of your property, your dpc and also any properties surrounding you.
Do you have large amounts of water resting against your external walls? Is your dpc damaged? Do you live on a slope with properties above you?
Fix for Damp Floors
If it looks like your damp proof course is damaged, you will need to replace it with a new one using a chemical DPC cream that you inject into pre-drilled holes in your external and internal walls. More information on this can be found above in our fix for Rising Damp.
Inject a chemical DPC cream into your walls to install a new Damp Proof Course
It may also be the case that you have a water leak below your property and this is penetrating through the soil below your house and up into your floor or a neighbouring property is suffering from a leak and this is spilling over into your property.
Again, use the checks described above to detect a leak below your house to check if your damp floor is being caused by a leak.
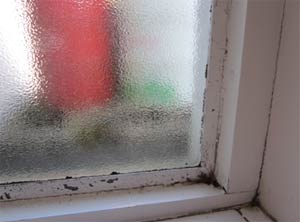
Damp Area Around Window and Door Frames
Issue With Damp Around Windows and Doors
If the area around your windows or doors is damp, mouldy or cold to the touch, this may indicate that the wall area has a water problem.
This issue may have been caused by gaps being present between the frame and the rest of your wall.
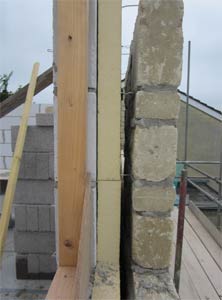
If your window or door was installed in a cavity wall, the damp may be present because you didn’t have a vertical DPC fitted when your window or door was installed.
A vertical DPC is a vertical version of the horizontal DPC used to stop damp rising up walls. It is a waterproof layer that sits vertically between two walls.
When a window or door is fitted in a cavity wall, the two walls must be brought together around the window or door frame to secure it.
This is known as closing the cavity. Adding a vertical DPC between these ‘closed’ walls around the frame stops water that has entered the external wall from reaching the internal wall where it can cause problems.
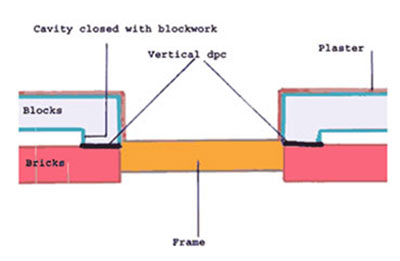
A vertical DPC stops damp from crossing a closed cavity around a window or door frame
Fix for Damp Around Windows and Doors
If the damp around your windows or doors is caused by gaps between the frame and the wall you will have to seal these.
Make sure that you install a trickle vent in any windows to make sure that there is still some ventilation.
If you think that your problems is being caused by the lack of a vertical DPC, it’s a tricky job and one that may well require a tradesman, but you need to retroactively fit a vertical DPC around your window or door to stop the damp traveling in through your outside walls.
You can also get vertical DPC’s with polystyrene insulation attached to insulate the wall area as well, a great idea for reducing the chances of a cold spot developing which can attract condensation.
Fit a vertical DPC around your windows or doors if you don’t already have them fitted
It can sometimes be very tricky to diagnose damp and the causes of damp issues but once you get to the bottom of it, this will help to ensure your home is safe and dry.