Fixing to lath and plaster walls has always been a tricky problem and one that has always puzzled first time DIY’ers, however there are several solutions to this conundrum which we run through below.
What is Lath and Plaster?
Lath and plaster is a type of traditional wall finish, similar to plaster, that was first used around the 1700’s all the way up to the mid 18th century. It uses thin strips of timber spaced and fixed an inch or so apart that’s then fixed to a stud work frame that provides a surface for plaster to be applied to.
Lath and plaster was used as a wall finish long before plasterboard took over from the centuries old Wattle and Daub finish.
Wattle was the name for twigs and branches that were interwoven between the upright timber posts that formed the framework of a dwelling.
Daub was the name given to the various forms of mud, clay, lime, manure or other locally available, easily workable fillers that could be applied and smoothed onto the wattle. The daub was pushed, usually by hand, into the web of branches to forming a weatherproof surface, protecting the inside of the dwelling.
Lath and plaster is an extension of the wattle and daub idea and was used long after the invention of plasterboard by Augustino Sackett in approximately 1888. Plasterboard took a while to catch on and was introduced to the UK in 1917. It became widely used and started to replace lath and plaster by the 1930’s.
As mentioned, to create a lath and plaster finish, the plaster is pushed onto and into the timber laths, which have been nailed to upright studs. The gaps between the laths allow the plaster to be pushed in, where is spills out behind each lath and once set, clings there forming a flat and solid surface.
Despite this however, most lath and plaster walls and ceilings in homes in this country are at least 60 years old and due to this are well past their “sell by” date. As the laths are very flexible they allow the wall to move, and as the plaster has degraded it often crumbles behind and in between the laths.
When this happens, holes can easily form and the surface becomes very unstable and often becomes powdery to the touch. A section of a lathed wall with plaster removed. Image coutesy of Museum Resources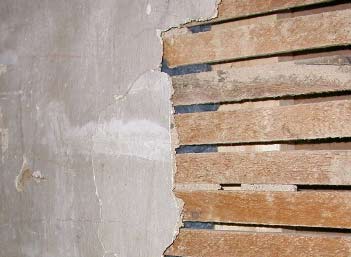
The Problem of Fixing to Lath and Plaster
The major problem when fixing to lath and plaster is the fact that there isn’t anything strong to fix to. The plaster is thin and has no holding strength and the same goes for the laths that support it, so fixing in to either isn’t an option.
Even with the volume of fixings that are available today, as far as we are aware, no fixing is available for a good, solid, reliable fix to lathe and plaster.
Many years of experience has taught us not to take chances with wall plugs, toggles and other types plasterboard fixings, they simply don’t work and when the slightest bit of force is applied, they pull out the wall.
The only solid fixing therefore is to replace some of the lath and plaster with a solid surface to fix to or provide a solid fixing behind it. This inevitably involves making a hole in the wall to access two studs to fix across or between.
If you are just fixing to a plaster board surface then see our project on fixing to plasterboard for exactly how to do this.
Methods of Fixing to Lath and Plaster
There are 3 methods for fixing to a lath and plaster wall and ensuring you create a good, solid mounting point and that is to fix a batten to the front of the studs, cut into the laths, fix a batten between studs and plaster over it and finally to fix directly to available upright studs.
Fixing to Front of Studs
This is arguably the best method and will allow you to get it in place quickly and also provide a full range of fixing options.
Essentially it involves cutting away plaster and removing any laths that are roughly the size of a piece of batten that is then firmly fixed across the front face of 2 or more studs. The batten is then painted or decorated and any damage to the plaster around it is rectified and covered.
As the batten is securely screwed to the studs it then offers a solid fixing point across its entire length. Batten fixed across front of studs between plaster laths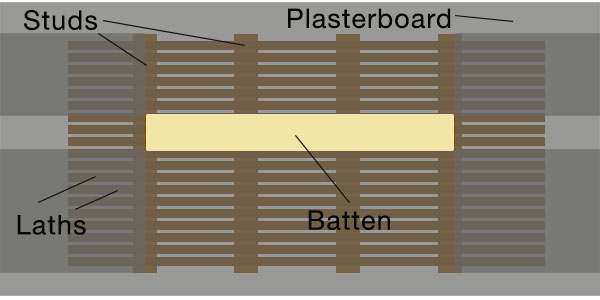
Fixing Between Studs
This methods offers probably the most professional solution as the batten is fixed between the upright studs and is then plastered over to hide it, leaving no evidence it’s actually there.
First 2 or 3 studs are located and the plaster and lath is then cut away to create a hole. Battens are then cut and fixed between the studs and the whole lot is then covered and plastered over to hide it.
Once plastered over you are then left with a nice secure point to fix to across the width of the batten or battens that is nicely hidden and retains the look of the rest of the wall. Batten fixed between studs in lath and plaster wall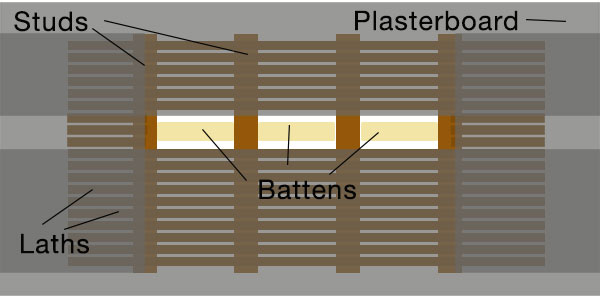
Fixing Directly to Studs
This is probably the easiest method and involves firstly locating one or two studs in the wall (depending on the size of object being fixed) and then once you’ve found them you then simply screw your item or items to or across them.
This is a very easy and straight forward solution, as long as you can successfully locate the studs in the wall. Fixing directly to a stud in the wall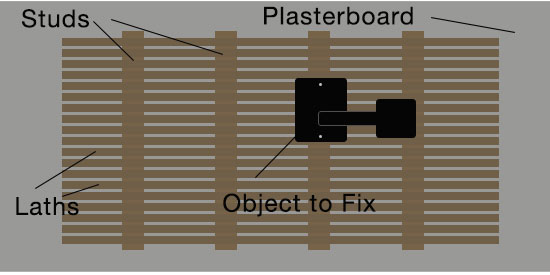
How to Find Studs
To enable you to fix to, across or between the studs in a lath and plaster wall you first need to be able to find them and this can be done in 4 different ways including using a stud finder, a magnet, tapping the wall or using a drill or bradawl.
- Stud Finder: The go-to tool for locating things in walls. Simply run it over the surface of a wall and it will beep or flash when it locates a stud. However, there are many different types available on the market today and some are definitley better than others, so be aware and do your homework before you purchase one
- Strong Magnet: In a similar way that the stud detector works, when run over the surface of a wall, a magnet will pin itself to the wall when it encounters a nail or screw that’s holding the laths in place on the studs. When you know where the laths are fixed you know where the stud is
- Tapping Wall: When tapped with your knuckles a lath and plaster wall will sound hollow, but when you hit a stud it will sound more solid. Simply tap the wall until you get a solid sound and this will tell you where the stud is. However be aware of other objects in the wall such as pipes etc. as these can be mistaken for studs
- Drill/Bradawl: Using a small drill or bradawl, simply drill or create small holes across a walls surface until you hit a stud. A bit of a hit and miss method and you will also have to fill any and all holes once you’re done and also be aware of pipes and cables in the wall as you could easily hit one

Stud detector used to locate studs in a wall
Tools and Product Needed for Fixing to Lath and Plaster Walls
To successfully fix to a lath and plaster wall you will need the following tools and products:
- Timber batten of chosen width and length (3 x 2 or 4 x 2 and around 1.8 – 2.4m long)
- Handsaw or chop saw
- Drill and selection of drill bits
- Jig saw or plasterboard saw
- Stud detector, strong magnet, bradawl etc.
- Hammer
- Bolster
- 8x 70mm screws
- Plasterboard (if needed)
- Plasterboard screws
- Scrim tape
- Plaster and associated tools for mixing etc.
- Beading or external trim (if needed)
- Tape measure
How to Fix to Lath and Plaster Walls
Now that you know what fixing methods are available and how you should go about locating any studs in a lath and plaster wall, it’s now time to look at exactly how you fix securely to them.
Cut Batten into Existing Laths and Plaster
Depending on the size and number of objects that need to be fixed will dictate exactly how many studs you will need to expose and the length and size of batten used. Typically a 3 x 2 inch batten should work for most situations.
Step 1 – Find Studs
The first job before anything else is to locate a pair or pairs of studs to fix to. First, measure the width of the item you’re fixing in place so that you know how wide you’re timber batten needs to be and how many studs it will need to span.
Once you know, use one of the above methods to locate them and mark their position on the walls surface. Measure from the floor up and mark the height that you’re item needs to be fixed and adjust the earlier mark to reflect this.
Repeat the last step for any further studs and then use a spirit level to level across them all, adjusting if needed. Draw a line through all the marks and you will now know exactly where your timber is going to be installed.
Step 2 – Remove Plaster and Laths
Holding the timber so that its horizontal centre is on the line marked above, get a second pair of hands to hold it in place and draw around it’s perimeter, marking it on the wall.
Using a plasterboard saw or jigsaw, cut out your hole and cut the laths back onto the timber studs, being careful not to cut through the actual studs. The plaster and laths are usually about 1 inch thick and a batten size of 3 inches by 2 inch PAR or PSE should suffice for most items you may want to fix.
These are timber merchants abbreviations for Planed All Round and Planed, Square Edge which both mean the timber has been planed to a finish and is not in the “rough sawn” state.
You can increase the depth of the timber by as much as you like by using a deeper piece of timber to fix items like coat hooks and microwave brackets which you would not ordinarily be able to fix to a lath and plaster wall.
When cutting away laths and plaster, if you can, cut the hole as closely to the size of the batten as possible so that it fits nicely between those that are left as in the image below. Use a nice sharp chisel to cut any laths across the studs so you create a clean and sharp cut. Cross Section of Stud and Lath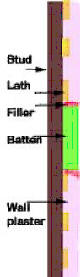
Step 3 – Fix Batten to Studs
Take the timber batten and drill 2 pilot holes at either end across the face and then position it up to the upright studs in the wall in the hole that you have just created.
Before you fix the batten it is a good idea to paint the edges with an undiluted solution of PVA adhesive and bang a few 20mm galvanised staples in along the edges.
Level it up using a spirit level and then screw it firmly in place using 8x 70mm screws.
Once screwed up, test to ensure that it’s solid and sturdy and will provide a firm fixing surface. Lath and plaster wall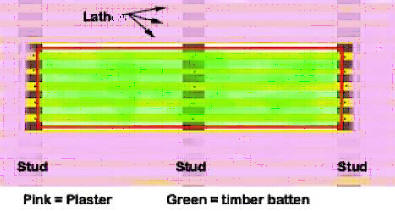
Step 4 – Repair Damage
When the batten is fixed you can then fill around the perimeter with either plaster, polyfilla or flexible filler from a tube. The choice of filler will depend on the size of gap there is.
If the gap is very slight then a flexible filler will finish it off nicely plus ensure there is some flexibility to prevent cracking.
If you plaster or fill right up to it, as things move over time due to expansion and contraction it will crack and will spoil the finish. However the effects of this will be reduced by the PVA as it will allow it to stick to the edges of the batten and the staples will give it reinforcement.
Hopefully, whatever it is you need to fix to the wall will cover the batten e.g. a TV, but if not you can paint to match the surrounding walls.
However if not, and given that its unlikely your painting match will be “seamless”, sometimes it’s a good idea, instead of trying to disguise the batten, to make a feature out of it by painting it an entirely different colour.
Additionally, instead of trying to fill or plaster right up to the edge, which as we’ve said will inevitably crack, it might be a good idea to fix some beading around it. Not only will this hide the joints it will also give it a little character.
Step 5 – Fix Item
With the batten now in place and any repair work completed the final job is to fix what ever needs fixing to the lath and plaster in place.
As we have outlined, where possible, try and fix your item so that it covers the batten but if this isn’t possible, hopefully the fact that you’ve decorated it accordingly will ensure it blends seamlessly with your chosen styling.
Fix Batten Between Existing Studs
This is a little more involved and will result in quite a bit of damage that needs to be repaired after you have finish but in the long run will give you a solid and secure fixing that’s neatly hidden inside the wall.
Step 1 – Locate Studs in Wall and Cut Out
The first job is to measure the item you’re fixing to see how wide it is and how many studs you’re likely going to need to cover.
Once you know, use one of the methods outlined above for finding studs and locate the required number of studs in the wall. Mark each one as you find it. Next, measure from the floor up the required height that you are going to want to fix your items and then run a spirit level over the marks and adjust if needed. Your batten needs to be fixed level.
Once fully level, use a pen of pencil to draw a line across the marks. Make the line a little longer than needed so that you can use it to level the battens when their in place.
Cut your chosen batten to the correct length and then position on the wall level with the line drawn above and then using a second pair of hands to hold the timber, draw around it marking your cutting area on the wall.
Next, cut out the timber batten shape on the wall using either a jigsaw or plasterboard saw. To get the jigsaw started, drill a large hole in one corner, enough to get the jigsaw blade in.
Steadily cut around the perimeter markings, stopping each time you hit a stud as you don’t want to cut through that.
Once the outline is cut, use the hammer and bolster to knock the plaster off and then the laths. Once done you should then be left with a hole the rough size of your timber batten.
Step 2 – Fix Battens Between Studs
Using a tape measure, measure the distance between each pair of studs (if there’s more than 1 set) and cut timber battens to size (1mm over so it’s a nice tight fit).
Using a 3mm drill bit, drill 2 diagonal pilot holes at either end and then get each into place between the studs, ensuring it’s totally level using the spirit level and the marks that should still be left on the wall.
To be able to access the pilot holes and get a screw screwed firmly into each pilot hole you may need to remove some additional laths.
Once screwed in place you can also add an additional screw diagonally through the front face for an even more secure fix.
Step 3 – Repair Damage and Plaster
Once your timber batten is in place between the studs, the final construction part of this method is done and all that’s left to do now is to repair any damage and fix your item up.
To cover in the hole that was created, measure and cut a piece of plasterboard the size of the hole created and screw it over the hole using plasterboard screws. Ensure it’s a decent tight fit.
Ensure you mark on the existing walls surface the centre of your new batten on either side (so you remember where it is) and then cover all of the joints with scrim tape.
Mix up a batch skim plaster and then plaster over the whole repair area, ensuring your finish is flat and smooth with the surrounding walls surfaces.
Plastering is a tricky job if you’ve never done it before so for a full run down on how it’s done, see our skim plastering project here.
Depending on how warm or ventilated your room space is will depend on how long your plaster takes to dry out. In an ideal environment it can take 2 weeks for your plaster to thoroughly dry and up to a 4 weeks if it’s not.
Only when it’s dry can it be painted or decorated, and if painting, you first need to apply a mist coat to ensure it bonds correctly to the new bare plaster.
Step 4 – Fix Item in Place
Once the plaster is dry and you have completed decorating, the final remaining job is to then fix your chosen item in place.
Once fixed up, ensure that you remove any markings that were left to depict where the batten sits in the wall.
Fix to Existing Studs
This is the quickest and most straight forward method of fixing to a lath and plaster surface and will allow you to fix your object in place in a matter of minutes
Step 1 – Locate Studs
Firstly, measure the width of the item you are need to fix in place and once done, this will tell you whether you can simply fix to one stud or whether you are going to need to find 2 or more studs that you will then need to fix across the face of.
Using your chosen method, slowly and steadily pass it over the walls surface until you fix a stud. Using a pencil, mark it’s position on the wall and then locate any further required studs and mark their position also.
Next, measure the desired height up from the floor that the item needs to be fixed and adjust the mark made above to this point. Repeat this for any other studs and then hold a spirit level across the marks to ensure it’s level. If not, adjust markings so that it is.
Using a drill and small drill bit, drill small pilot holes where your marks are.
Step 2 – Fix Item to Stud(s)
Hold the item you’re fixing over the pilot hole or indeed holes and then using a suitable sized screw, usually around an 8x 40 or 50mm, screw the item to the surface.
When screwing up, don’t go too mad. As it’s likely that the plaster has degraded a lot, if you screw the item up too tight or too fast then it will likely crush or pull the item into the plaster damaging it so try to avoid this.
Once screwed up, check it is firmly in place and you’re then done.
Fixing to lath and plaster walls isn’t an easy job depending on the item that you have to fix and can involve some fairly extensive work. However, once a solution is in place you will then have a solid point to fix to for items such as shelves, TV brackets and the similar.