Fitting a panel fence is not difficult as long as the right preparation is done before you start.
If the ground you plan to put your fence panels on is reasonably flat then this is the project for you – read on. If the ground slopes then you will need to see our project on stepped fencing.
You will need to decide on the type of fencing you want. This will depend largely on what you want the end result to look like, but it will also depend on your budget, planning permissions, and any security issues you are trying to overcome.
We have a great deal of information here on all aspects of fencing so you may also want to see our projects on chain link fencing and also see our project on close board (arris rail) fencing.
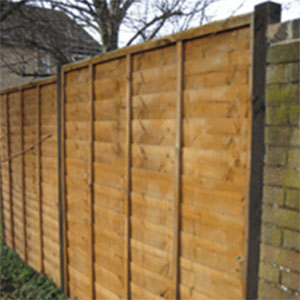
Complete run of fencing
Erecting a panel fence isn’t as simple as digging some holes, dropping in some fence panels and then screwing some panels to the posts, there is a fair bit more involved in order to get a good finish.
Bearing this in mind, unless you are already familiar with all the aspects involved in panel fenecing, you may also want to read through teh following projects:
- How to mix concrete: which includes a concrete calculator to help you get the right Concrete Mix Ratio, will explain what sand to use and much sand to cement you need for fence posts
- Concreting fence posts: which explains how to put up fence posts perfectly straight and vertical, how to line up fence posts so they are in line and ready to fix your fence panels to, What size fence posts to use for your fence, how deep to dig a hole for fence posts and the differences between setting timber fence posts and concrete fence posts
- Cutting down fence panels: Find out the best way to cut a fence panel down to size to keep it strong and neat-looking. You are likely no need to reduce the width of a fence panel in order to make the fence panels fit your garden so check out this project first so you feel confident to do that before you start fencing
What Tools and Materials are Needed for Panel Fencing?
To ensure you have the best chance of getting a great finish, it’s important to use the correct tools, these are as follows:
- Fence posts
- Fence panels
- Decent hammer or even a nail gun, and nails, or screwdriver and exterior screws
- Angle brackets (these are optional)
- A decent digging spade, or even a post hole digger, or a fence post auger (if the ground you’re working in is soft enough)
- Spirit level and also a post level
- Scrap lengths of battens or other timber (for creating a line and supporting the fence posts while the concrete sets)
- String line or masons line to create a line to follow
- Concrete, Postcrete or other brand of quick-setting fence post concrete
- Aggregate to add to the bottom of each post hole
- Decent wood preserver for treating posts and panels and a decent brush to treat it – to treat the bottom of each fence post
- Builders bucket or watering can or preferably a hose pipe
Get Ready to Start Fencing
You need to know what materials you will need so you can order or collect all your fencing at one go and not be frustrated by running out halfway through the job.
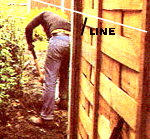
First you need to establish the exact line of your fence. If there is no fence in place then you should consult the title deeds of the house to be sure you are putting the fence on your land and not encroaching on neighbouring properties. You don’t want a border dispute after you have just spent time, money and effort on erecting perfect fencing!
Fix a string line between two points to enable you to keep your fence panels straight. The easiest way to do this is to hammer stakes into the ground and tie string between them. This will give you a straight line to work to when you are setting out your posts.
To create angles or curves you will need more stakes to get the shape you want.
Using a coloured masons line such as red, pink, orange or neon colours will make your line easier to see, and less likely to sag as they are made of nylon.

Using a line level to keep your fence posts inline
Now you have your line for your fencing marked out, stand back and take a look at it. Does it look right by eye? Are there any obstacles in the way?
For example, if your proposed fence runs near trees remember they will have roots which may be difficult to dig through, so can you alter the course of your fence or at least be sure to plan your fence post holes to be as far away from tree roots as possible (or any obstacles).
Next you can measure the length of your proposed fence and work out many fence panels and how many fence posts you need.
If there is an existing fence in place you can follow the line of that fence as a guide to the new one. You should still put up a string line though to guide you when you are putting up your new fence panels.
If your existing fence is a panel fence you can count the number of panels and posts to know how many you need for your new fence.
Can I use the Existing Fence Posts?
If you are replacing a fence, or fence panel because it is damaged then you can leave in any fence posts that are undamaged and still solid and stable.
If they are not showing any signs of rot (particularly near the ground) and you can lean on them without them moving, then by all means leave them in place and reuse them.
Usually, however, if a fence is in poor condition the fence posts will be too. A fence is only as stable as the posts in the ground, so it is a false economy to fix good fence panels to poor fence posts.
If all (or most) of the fence posts are damaged, rotten or wobbly then we recommend that you cut the fence posts off at ground level using a reciprocating saw (we have a range of reciprocating saws in our toolstore here) and leave the concrete bases in place.
Removing a fence post and the concrete base is heavy and difficult work, but if you stagger the fence posts at mid-distance between the original fence posts you will not have to take out the old concrete.
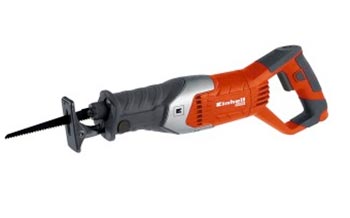
Reciprocating saw
If some posts are ok and others are not, consider whether you prefer to remove all the posts and start again leaving the concrete bases in place (as above) or dig out the posts that are in poor condition.
What Size Fence Panels are There?
The standard size of fence panels is 6 foot wide (despite the UK using metric measurements we still use feet for our fence panels!). standard heights are six foot (sold as 6×6 fence panels) five foot (sold as 6×5 fence panels), four foot (sold as 6×4 fence panels) and 3 foot (yes you guessed it – sold as 6×3 fence panels).
You can get bespoke or made-to-measure fence panels but they tend to be much more expensive, and we would recommend that you consider close board fencing if you are going to need to go down this route.
What’s the Best way to Install Panel Fencing?
We always erect our panelled fences one panel at a time. This way we can guarantee each panel will fit exactly.
We have watched fencing contractors come in one day, dig about 30 holes and concrete in 30 posts only to find, on their return, that a few of the measurements were slightly out and a couple of the posts were not fully upright leaving the correct distance for fitting the panel at the bottom, but because the post was leaning, the panel didn’t fit at the top.
It would be very disheartening to find that all your hard work had to be redone – and indeed removed before it could be redone!
If you dig each hole and put in each fence post as you go, following your string line, then you shouldn’t have any difficulty with mis-measured posts, and if you use Postcrete (or a similar product) to fix your posts then it only takes about 15 minutes to go off. Much quicker than digging out a badly spaced post!
As mentioned, our prefered method is to work one at a time and we would always recommend this approach, but if you did want to set out all your posts out in one go, just make sure you check, double check and tripple check your measurements and placements!
Step-by-Step Guide to Fitting a Panel Fence
Follow this simple step-by-step guide with pictures, for a trouble free professional-looking DIY fencing job.
The series of images can be viewed from top to bottom and will explain how to erect a panelled fence. For different types of fencing the process will be slightly different – see the list of fencing projects at the bottom of this page.
1. Dig Your Post Holes
If your first panel butts up to a wall of the house or outbuilding then you can fix the post to that wall, as you are unlikely to be able to dig a hole for a fence post so close to the foundations. See our fixing to masonry project for more information on getting a secure fixing.
Having set your line up, measure out from your starting point the length of a panel. Normally this will be 6 feet. Make sure your hole lines up with your string line, and don’t overstep your boundary line – or you could be stiring up trouble with your neighbours.
Dig your fence post hole. If you are unsure of how wide and deep to make it, see our digging fence post holes project here for more information.
Add a layer of aggregate to the bottom of the hole to help with drainage and to make it easier to level the posts.
Digging out holes for fence posts
2. Coat Ends of Fence Posts
Regardless of whether you use treated timber for your fence posts, in time they will rot if they are sitting in the ground.
One way to prolong their life a little more is to treat the ends of each of the posts where it will sit in the ground. For this you can use a standard brush or spray on shed and fence treatment or as we have here, use bitumen paint as it’s a little more substantial.

Treating the ends of fence posts using bitumen paint
3. Fix Your First Fence Panel
Drop the post in the hole and fix the panel to it by screwing them to the post using rust proof screws such as 55mm decking screws using special angle brackets you can buy for fixing fence panels to posts or simply screwing through the side of the fence panel into the post.
Alternatively you can do the job by side nailing (for speed you can use a nail gun, or by hand using a hammer) your panel to your post using galvanised nails. Make sure they are galvanised to prevent them rusting.
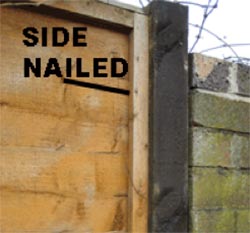
Side nailing fence panel to fence post
4. Level Your Posts
Level up the post both ways and make sure the top of the fence panel is level.
To do this use a spirit level to check both the side and front of the post to make sure it is not leaning in either direction. i.e. not leaning back, or towards you; not leaning left or right. Put the level on top of the fence panel to check it is level, then on the front to check it is not leaning.
Tip: Get yourself a post level. These are much easire to use for checking how level a fence post is that a spirit level as it will tell you the level on two faces of your post at the same time.
You may need to put some bits of brick or stone under the post to get the panel level.
Use the string line for guidance to make sure you are keeping each post and panel to the line.
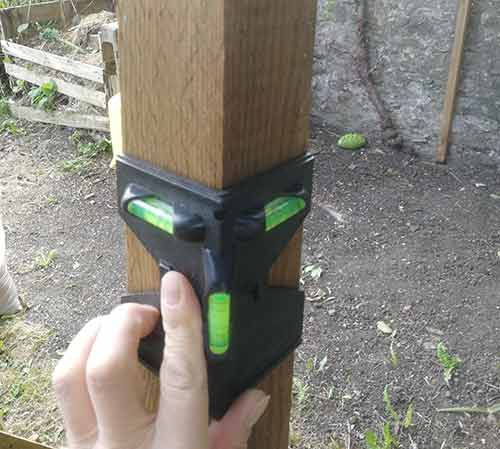
Levelling fence post
5. Concrete in Your Fence Post
When the panel and post are in position support the post either side with some timbers. Concrete the post hole by pouring in mixed concrete or adding water and then the Postcrete (or similar product) according to the manufacturer’s instructions. Find out more about how to use Postcrete for fencing in this project.
Check that the post and panel are still level and adjust if necessary.
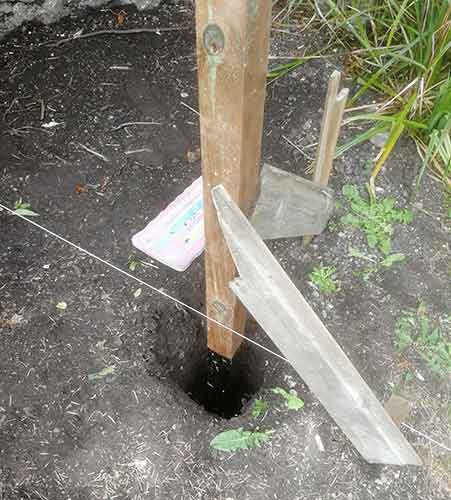
Supporting fence post in upright position using scrap timber
6. Dig the Next Hole
While the concrete in the first hole goes off, you can dig your next fence post hole. Measure for the next hole, six feet away from your first post and ensure it’s following your line.
When you have done that the concrete in the first hole should have set. Fix a panel to the last post you put in, drop the next post in the new hole and fix it using the same procedure as above. Again, check everything is straight and level.
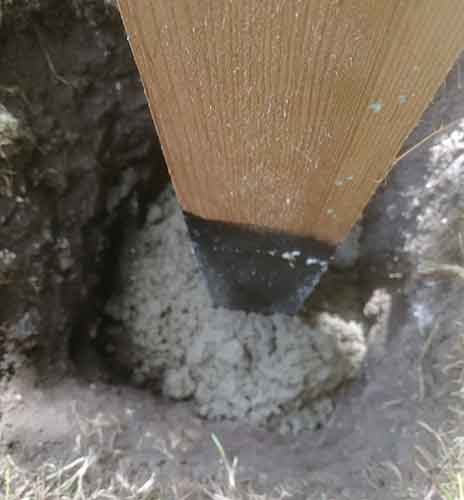
Concreting in fence post
7. Repeat Until the End
Simply carry on digging holes and adding fence posts and panels until you are at the end of the run.
Ensure that the concrete has set enough so that the posts don’t move out of level when you are fitting the panels. Ultimately it’s best to use Postcrete or a similar product when working like this as it will set much quicker and allow you work faster and moer efficiently.
If you need to cut down a fence panel to fit at the end (you are very likely to have to do this) then we have a project on how to cut down a fence panel here, which will help you do this properly.
This method allows you to move down the fence run quickly without any mistakes. Keep to your line all the time and when you have gone as far as you want to go in one day, re-check every post for plumb as each one will move a little as you add each new one.