Corner beads or angle beads are a staple item to use when skim plastering or base coat plastering. Once fixed in place they produce a nice crisp, solid and neat corner or edge.
In this guide you will learn all about corner beads and how to use them when plastering.
What is a Plastering Corner Bead?
A corner bead or angle bead as they are also known is a metal strip set at 90° with a rigid spine that sits over the apex of a corner, window reveal or similar and provides a crisp solid edge to plaster up to.
As the spine of the angle bead is made of metal it also protects the corner from any knocks and impact damage. If a corner is simply formed using plaster, which in deed it can be, if it is knocked then it will easily chip and damage. With a metal angle bead present, this will take the full impact in place of the plaster.
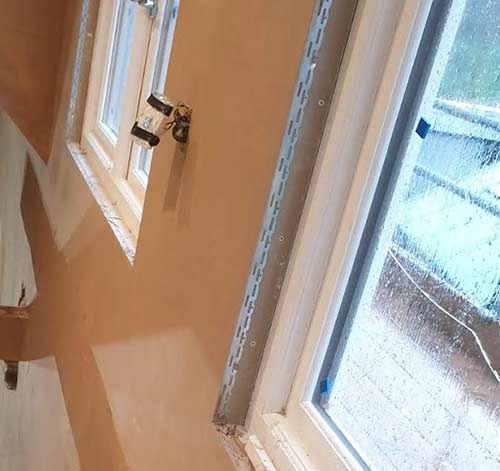
Plastering angle bead fixed in place over corner of window reveal
Even if you are a seasoned plasterer with many years of practice and experience, it’s quite hard work getting a completely square and level corner all the way down a length or wall.
In this case, by using a corner or angle bead and leveling it, you are sure to get a nice neat, crisp and professional corner that’s uniform all the way along its length.
Despite the obvious cost of purchasing all the required corner beads for a job, many professional plasterers choose to use them simply due to the huge amounts of time they save over trying to form a corner free hand.
As with plastering stop beads (see in our project here), pretty much all internal angle beads are made from galvanised steel (zinc coated) to prevent them rusting once plastered over.
However if they are to be used externally, e.g. for rendering then stainless steel corner beads should be used. This is simply due to the volumes of water and moisture they will be exposed to outside and even galvanised would corrode over time.
Types of Plastering Corner Beads
There are essentially 3 different types of angle bead available today, the standard galvanised plasterers corner bead, the rendering corner bead and the newer hook-on corner bead.
Standard Plasterers Corner Bead
As we have mentioned above, the standard internal plastering angle or corner bead is made of steel and coated with a zinc galvanised coating to prevent it rusting the wall.
Plaster corner bead or thin coat corner bead as it’s also known is generally available in 2 different types, the first has perforated wings on either of the 90° sides and the other has mesh wings.
Generally the version with mesh wings is used when sticking the corner bead on using a skim plaster mix and the version with perforated edges is preferred when the bead is being nailed in place.
In terms of dimensions plastering angle beads come in 2.4m lengths with a total bead depth of no more than 3mm, which is generally the depth of a finished skim coat of plaster.
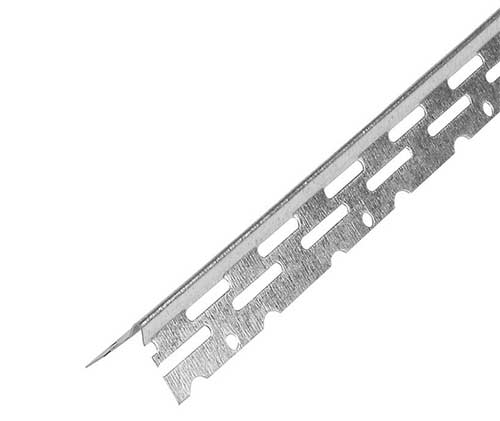
Standard galvanised angle bead
Rendering Corner Beads
Plastering and rendering have always been paired together mainly as the process of laying each on is the same and although rendering stop beads are not really anything to do with plastering it’s important that we mention them to establish the difference.
Render is a coating applied externally to brick and block walls and the similar. It provides a weatherproof coating to such surfaces and helps to prevent water and moisture ingress. On the flip side to this, plaster is applied internally.
As render has to deal with much more severe conditions is it always applied much thicker than top coat plaster, in most cases up to 15mm in depth so to reflect this render angle beads are much thicker as range from generally 10-15mm in depth.
As we have mentioned above as rendering beads are used externally they have to be extremely resistant to the elements so they are available in either stainless steel or plastic form.
When it comes to fixing, angle beads for rendering are normally nailed in place using stainless steel nails but some professionals stick them on with a render mix. However this method isn’t that common due to the time that it takes for the render to cure.
In terms of available lengths, rendering corner or angle beads are available in 2.4 or 3m lengths.
Unlike plastering angle beads that are available in 2 types, rendering angle beads generally only come with mesh wings when made of stainless steel as the mesh adheres to the render mix much better when stuck in place rather than being nailed.
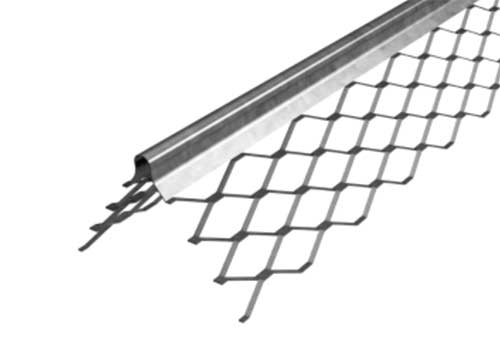
Stainless steel rendering angle bead
Hook-on Corner Beads
The hook-on plaster bead is a relatively new invention that has come on the scene in the last few years.
As you may imagine from the name, hook-on angle beads are hooked onto the wall rather than nailed or stuck in place. The idea behind this is mainly speed and ease of use.
As opposed to spending time leveling up an angle bead, holding it in place without moving it, getting a nail positioned and then hitting it with a hammer. The hook-on plaster bead is simply positioned in place and a few gentle taps engage the hooks and burying them into the surface holding the bead firmly in place.
The hook system is quite effective and ensures that the bead itself doesn’t move while it’s being plastered in and also when it’s embedded in fully cured plaster.
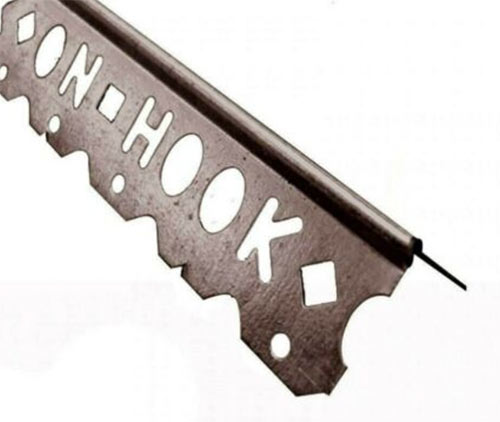
Hook-on angle bead used for plastering
How to Cut Corner Beads to the Correct Size
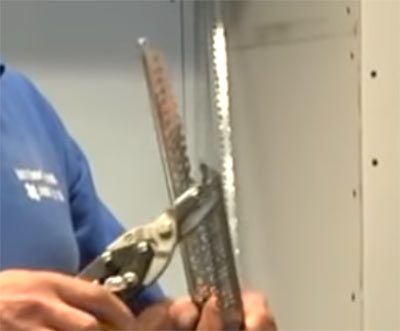
There are 2 different ways that you can cut a piece of angle bead, the first is to use a hacksaw the other is to use a pair of tin snips or metal shears.
To cut an angle bead using a hacksaw, simply measure and mark the cutting point, turn the bead over so the spine is facing upwards and then cut down through the spine and each of the wings.
To cut an angle bead using a pair of tin snips, again measure and mark your cutting point and then snip through each of the wings up to the centre and then simply twist the waste section away.
When cutting angle or corner beads using either of these methods you should always wear a pair of gloves. The cut edges of angle beads are very sharp and can easily cause injury so be aware!

Cutting an angle bead using tin snips
How do You Install a Corner Bead?
Using angle beads or top coat beads to get a neat sharp corner when skimming is not difficult with a little practice regardless of whether you are putting the beads onto dry wall plasterboard or onto a base coat you have already plastered.
The important thing is to get them on the wall so they give a uniform thickness to the plaster you will lay on against them.
It’s no good having the worlds most upright corner if you can feel the angle bead through it as it will soon show up through the paint or wall paper if there’s not enough plaster covering it.
Fixing Angle Beads to Plasterboard
If working with plasterboard (or drywall as it’s known), the best method of fixing angle beads in place is to nail them on using galvanised nail.
This is mainly because in almost all cases there will be a timber batten underneath the area that you are fixing to as a corner nearly always requires a timber to form it.
To fix the bead in place, push it on to the corner you are fixing to and run the heel of your hand up and down it to gently push it in place and ensure it’s flat against the corner.
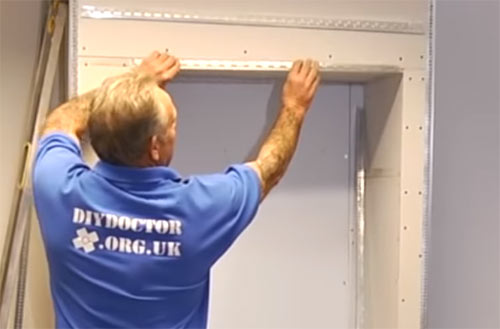
Position the corner bead in place on the corner
Take a spirit level and hold it on the top edge of the spine and check the level. If dead level that’s great,, if not, adjust the bead until it is.
Once level, take a nail and knock it in somewhere around the middle area, check the level again and adjust if needed and then knock a nail in around the top. As it’s now firmly held in place and cannot move knock a nail in the base and then 2 or 3 more along the length on both sides of the 90° corner.
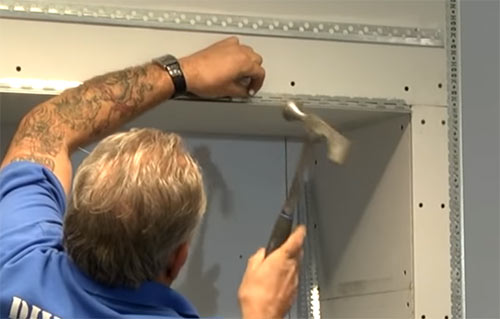
Nailing corner bead on to corner
Tack the nails well in as nail heads only have to stick out slightly to cause the most irritating of problems. Once a bead is properly in position it makes the application of the skim to the corner so easy.
When you have (as you will with window reveals where they meet the window head) two beads meeting each other. Try and mitre them together so the actual ridge of the bead sits nicely with its partner.
Plastering corner beads mitre cut to meet neatly in a corner
It’s worth noting that this is generally the preferred method for fixing angle beads when rendering due to the time it takes for render to cure compared to skim plaster. The nails that are used are generally stainless steel masonry nails or any similar nails can be used as long as they are stainless steel.
Fixing Angle Beads to Bricks, Blocks and Base Coat Plaster
When fixing angle beads to bricks, blocks and base coat plaster the best method is to glue them in place using a skim plaster mix.
To fix your bead to the wall using this method simply mix up a skim mix and use a trowel to apply a dollop of the mix down the corner you are fixing to, on either side of the corner, every 800 or 900mm or so.
Once applied take your bead and position over the corner and push it into place into the dollops of skim plaster mix. Check the level using a spirit level and adjust if needed and then hold it in place for 4 minutes or so and allow the plaster to cure.
Once it’s starting to set use a trowel to gently cut off any plaster that’s sits over the depth of the angle bead ensuring you don’t nudge it and knock it out of level.
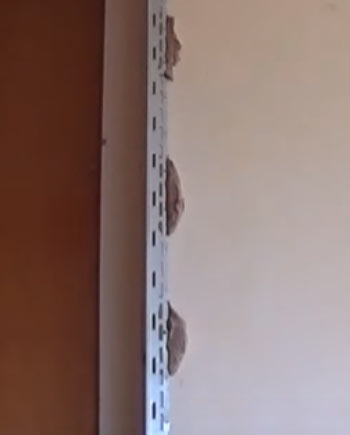
Angle bead stuck in place using skim plaster mix
Using an angle bead when plastering or rendering is in pretty much all cases a must to ensure that you get a clean and crisp professional looking corner that can also resist knocks and other impact damage.