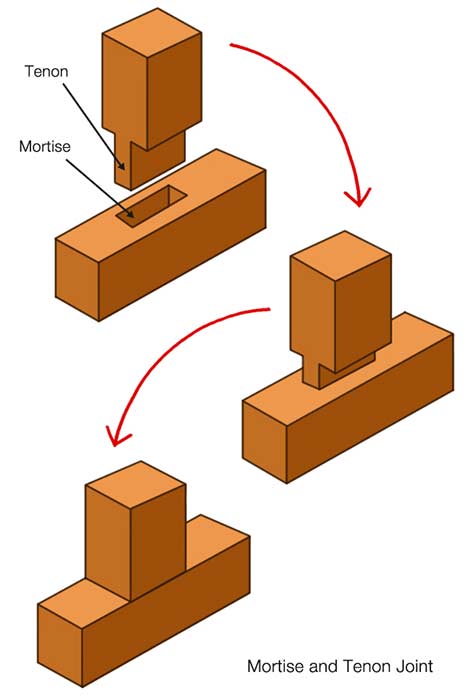
Arguably one of the most popular types of joinery and woodworking joint, the mortise and tenon joint can be used in a huge variety of woodworking projects including tables, chairs and other furniture, windows and doors and even timber framed buildings.
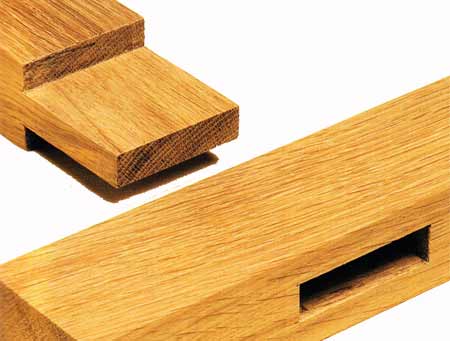
Standard through mortise and tenon joint
Due to the way in which the joint is formed, with its interlocking sections, this makes it very strong and able to cope with various types of forces such as horizontal, vertical, lateral and twisting, all the different stresses experienced in the above mentioned items.
However, it’s not really suitable for the construction of drawers and other similar objects that are moved a lot as, regardless of how well the joint has been made and how strong it is, it will loosen over time simply due to the movement.
Different Types of Mortise and Tenon Joint
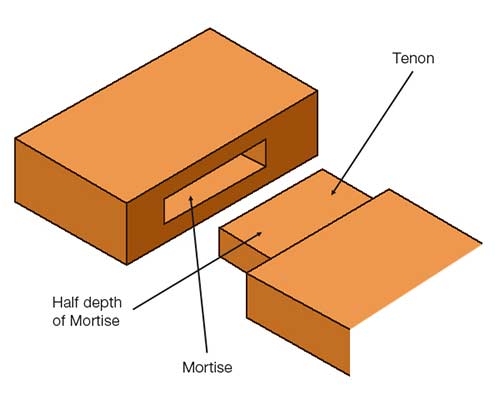
The joint itself is pretty self explanatory in that you have a tenon section that slots into the mortise section and this is then fixed in place using the method of your choice.
The main differences with this joint come in the form of depth e.g. whether is runs the full width of the mortise or stops half way through and also the shape of the both of the joints and how they are joined together.
Stopped or Blind Mortise and Tenon Joint
With this joint, instead of the tenon running the full width of the mortise so that the joint can be seen, it stops half way, essentially disguising it so that it looks neater and more visually appealing.
With this in mind, this makes it ideal for use in furniture making (tables, chairs, dressers etc….) as the overall look of the joint is much better so you get the best of both worlds – a very strong joint that in also neat and tidy.
Stopped mortise and tenon joint
Through Mortise and Tenon Joint
If you have read the details of the stopped joint above then you may be able to guess this one, that’s right, with this joint, the tenon runs the full width so that it is visible.
The choice to use either a stopped or through joint is really down to the individual making the joint as if formed correctly and accurately, it can in fact look as visually appealing as a stopped joint, making it an actual feature rather than trying to hide it away, especially if you are using timber with strong visible grains.
Additionally, the fact that it runs the full width of the mortise and provides more fixing area can make it slightly stronger, especially when you are fixing using glue.
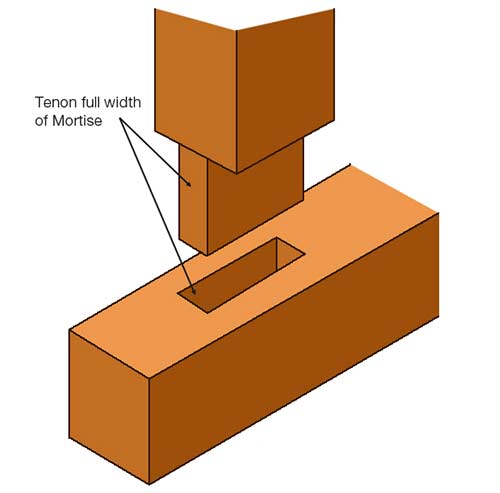
Through mortise and tenon joint
Dowelled Mortise and Tenon Joint
This is a slight variation on the traditional. Instead of cutting a mortise and tenon out of two sections of timber, this is substituted for a dowel.
Essentially, holes are drilled in your two timber pieces at set depths (can be either stopped or through) and a dowel is then glued or fixed into one section to form the tenon. These are then inserted and fixed into the other timber (the mortise) to make up your joint.
This form of fixing is quite commonly used in furniture today, mainly due to time and cost. Even using machinery it can take a while to set the machine up, position the timbers, make the cuts, but by using dowels, all you really need to do is drill four holes at the required depths.
Some regard this as a bit “cheap and naff” but if formed and fixed correctly and the dowels you use are strong (made from a hardwood such as oak, not a softwood such as pine) then it can create a very strong and lasting joint.
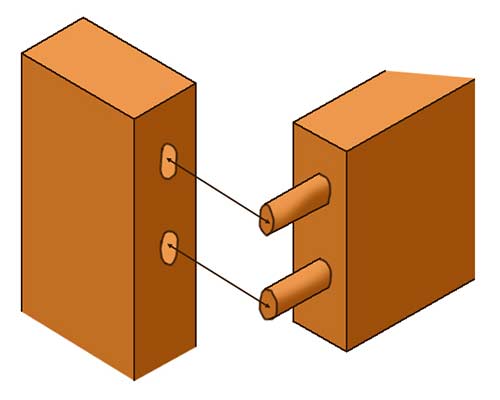
Dowelled mortise and tenon joint
Haunch or Secret Haunch Mortise and Tenon Joint
This particular take on the traditional mortise and tenon is geared towards adding some additional strength. The haunched or sloping section has several advantages including an increased surface area for gluing and also prevents any twisting of the joining timber.
The haunched joint is ideal for use when making frames such as doors, door frames and windows where dowels, wedges or screws would not create the desired visual or long lasting effect.
As this is quite a tricky joint to cut, tis is best left until you have practiced perfecting cutting traditional joints but if you would like to know how this is done a great guide can be found here on Popular Woodworking.
Ultimately, the success of your joint will really depend on how well it’s made. If all of your cuts are accurate and the two sections fit together nice and snug and are not too tight or loose then you have the makings of a strong, stable and long lasting joint.
At this point, the only thing that could let it down is how you fix it together and more importantly, what you use for the type of joint it is. For example, if you are making a table and you glue your mortise and tenon leg, over time the glue will degrade naturally and, through the general movement of the table, the joint will become loose and the two halves would separate.
In this situation, you would use glue and also something else to prevent the joint separating.
Types of Mortise and Tenon Joint Fixings
Once you have created your joint and all fits nicely you will have to settle on a permanent fixing method. There are several different ways this can be achieved but what the joint is being used for will really decide this for you.
The final fix will essentially decide how successful and long it will last without loosening. In the case that you are making a chair, the last thing you want is for your joints to move as this could potentially cause it to collapse and send the unfortunate person sitting on it tumbling to the ground.
Using Just Glue
Regardless of any additional fixings (dowel, edges and the such as listed below) all faces, or cheeks of the tenon joint should be coated in glue, including the shoulder area.
The amount of glue you apply should also be considered. As you joint should be a nice tight fit, excess glue will be forced away and pushed out of the joint all over your nice finished faces, this excess should be removed as soon as possible to prevent it ruining the actual finish.
For through joints, apply the glue, using a small brush and brush it very lightly over all faces of the tenon and also a little more liberally onto the faces of the mortise.
One thing to be aware of here is the “hydraulic action” of pushing the joints together. If there is no where for the glue to go it will simply be forced back up and out of the joint. With this in mind you should cut your mortise slightly deeper that the length of the tenon to allow for this and prevent squeeze-out!
When gluing through joints, the majority of the glue should be applied to the tenon itself, but avoid applying any to the end as this will be visible and any excess glue here could spoil the final finish.
This also goes for dowels – glue should be applied to the outside of the dowel and not to either of the ends as they will be visible.
Any glued joint should also be clamped firmly while the glue dries. Use a suitable clamp (such as a frame clamp) to firmly force the joints together and prevent any movement. Always check that the joint is square before you leave it as once the glue is dry, that’s pretty much it!
When it comes to the glue, you should use a decent quality, strong wood glue.
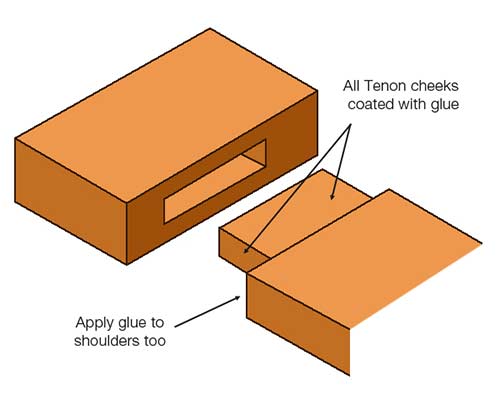
Apply glue to all faces of tenon joint, including lightly on the shoulders
Using a Dowel Rod
As well as gluing, a small section of dowel rod is inserted through both the mortise and tenon, effectively holding the joint together and preventing it separating and loosening over time when stress and forces are applied e.g. those commonly experienced by tables and especially chairs.
When it comes to the size of holes you should drill, you will need to make sure that your dowel(s) will fit. Ideally, any dowels should be slightly larger than each hole to ensure a nice tight fit. To make the holes there are several methods:
- Clamp and Drill: Put your joint together and clamp it up with some suitable clamps e.g. frame clamps. Ideally, to drill the holes you should use a pillar drill as this will ensure that they are perfectly straight and true, but if you don’t have access to one, a hand drill will suffice, just make sure that you drill down dead straight!
- Drill Joints Separately: Again, preferably using a pillar drill, firstly measure and mark your drill holes accurately and then drill through your mortise. Assemble you joint and clamp it up tightly and then, using a pencil, mark the drill points inside on the tenon inside the mortise. Un-clamp the joint and take it apart and then drill out the holes. This is a slightly riskier approach in terms of making sure everything lines up
With your holes drilled, dry assemble the joint and check the alignment and that all is square and true. Now, apply some glue to cheeks and then fit together and clamp it up.
Position the joint on a nice solid surface and insert a dowel. Using a hammer, very gently knock the dowel down through the hole until it is all the way through. If there are any slightly proud sections, these can be sanded down to match.
One other method that is well worth mentioning is “Drawboring”. The process of creating a drawbored mortise and tenon joint involves drilling the hole in your tenon slightly off centre towards the shoulder end so that the holes essentially do not line up.
The idea of this is that when you insert the dowel, it then pulls the tenon into the mortise, making it much tighter and producing much more mechanical strength in the joint itself. If done properly you don’t even need to use any glue! For more information on drawboring checkout this guide here.
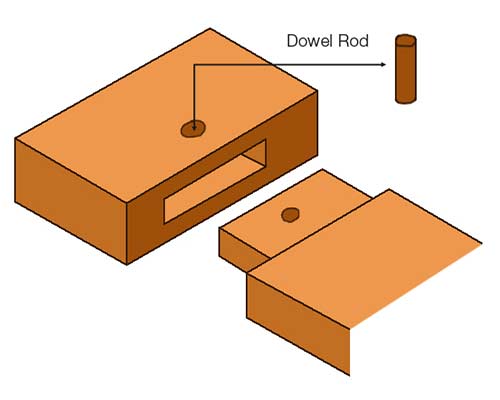
Using a dowel to joint a mortise and tenon joint so that it does not seperate
Using Wedges, Keys and Tusks
Which ever of the below methods are used, this type of joint normally is a through joint as, without a great deal of skill and experience, it is almost impossible to insert any wedges correctly.
There are two different types of wedged mortise and tenon joint. The first type is where the wedges are inserted in to the tenon within the mortise (can be outer wedged where wedges are on the outer edge of the joint or inner wedged, where wedges are inserted into the tenon to force it apart).
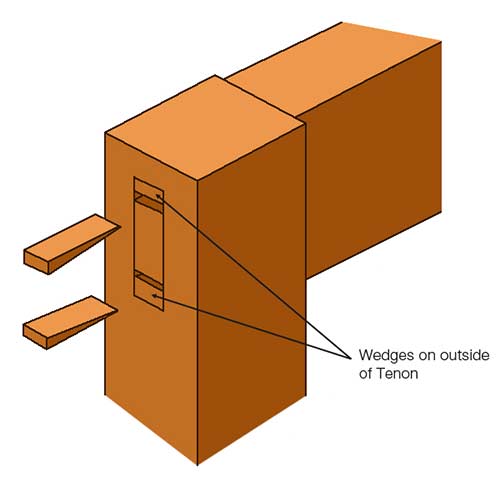
Outer wedged mortise and tenon joint within mortise
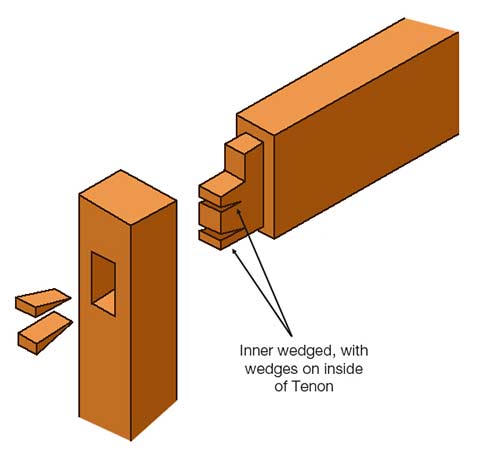
Inner wedged mortise and tenon joint within mortise
The other type is where a single large wedge is knocked through the section of the tenon that protrudes from the mortise, that essentially pulls the joint together. This type is commonly referred to as a “Tusk or Keyed Mortise and Tenon Joint”.
Tusk or keyed Mortise and Tenon joint – Image courtesy of lumberjocks.com
If constructed correctly, these are extremely strong and long lasting joints, sometimes lasting hundreds of years. If you have ever been in a church and looked down at the side of a pew you may have noticed that these are constructed using keyed or tusk joints.
In any of the above situations you will also want to use glue as well as your chosen additional fixing. The glue is essential in that it will bond all the cheeks and faces together. The main purpose of the additional fixings is to prevent the joint from separating through the different forces that could be applied to it.
That said (going back quite a few years), glue was not commonly available so traditionally, joints were fixed using objects that would cause “expansion” or “locking” and prevent them coming apart such as the dowel and wedge.
As you may have noticed, we have neglected to mention one other fixing type – screwing. Instead of using dowels, keys, wedges etc…. You can simply screw down through both sections of your joint for added strength and stability.
If the joint itself is purely functional i.e. you just want to joint two timbers and ensure it’s a strong join and don’t really care what it looks like then this is totally fine, but in most cases (especially with furniture), the joint itself is a feature of the item and really needs to look as good as possible. In this situation, screws would simply ruin this.
Tools and Timber – Some Quick Notes
If you have read any of our other timber joints projects you should now be aware of the fact that you should always select suitable timber for the job you are doing e.g. nice planed timber for a chair or table or rough-cut for a workbench. This choice is really down to you
Regardless of the type of timber there are two things it needs to be; straight with no bows, kinks or warps and as free from knots as possible as trying to cut an accurate joint in a knot is just not going to happen!
When it comes to tools, always go for the best tools you can afford or source. Budget and cheap tools are fine, just make sure they are sharp, straight and level, but if you can stretch to something of a higher quality, then do so.
As with pretty much all DIY and construction jobs, there is a tool for every job and carpentry is no exception. There are some very handy items that will help you get your joints and cuts as spot on as possible. With this in mind, you should familiarize yourself with the mortise gauge. If you have never heard of this type of tool before, there is a handy video on using a mortise gauge here.
If you are looking at buying one, then the best type to go for is one with two marking pins (or spurs as they are known), one fixed and one moveable as well as a moveable stock
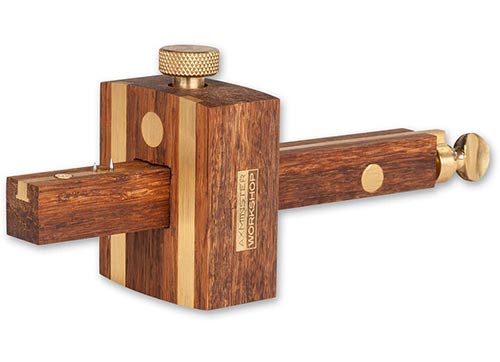
The mortise gauge is used to mark accurate mortise and tenon joints
How to Make a Mortise and Tenon Joint
As we have discussed above, there are several different variations of this joint but for the purposes of this demonstration we are going to make a straightforward through mortise and tenon joint.
Step 1 – Marking out the Mortise
The first step is to mark out the mortise section of your joint, this is best done with a mortise gauge, but if you don’t have one, a pencil and ruler will be fine.
When it comes to size, there are several ways to go:
- Large Timbers – if you are using large timbers e.g. 3″x3″ then a good rule of thumb is split the timber into thirds, so the mortise will be 1 inch wide and the same for the tenon
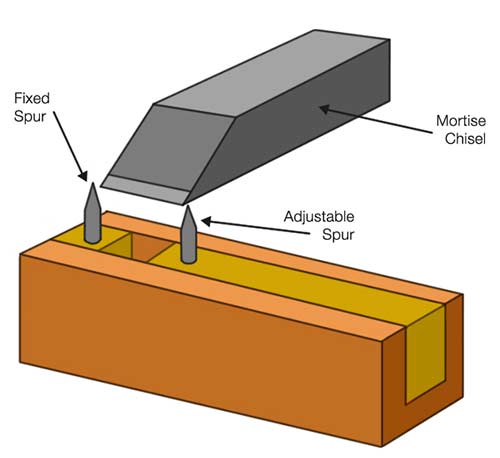
- Smaller Timbers – With smaller timbers (1″x1″), you can work with the thirds principle or you can simply go with the width of your mortise chisel, as long as it is roughly a third the width of the timber you are working with
For the purposes of this we are going to go with the width of our chisel. Using a ruler, measure the width at the tip of the chisel and make a note of this. Then measure the width of your timber, subtract the width of the chisel from this and then divide this by two.
If using a gauge, loosen the locking screw of the adjustable spur and position the spurs at the exact width of the tip of the chisel and tighten up the locking screw to hold in place.
This will give you the exact position to measure in from either edge so that your mortise is dead centre to the timber.
Marking width of mortise chisel on gauge
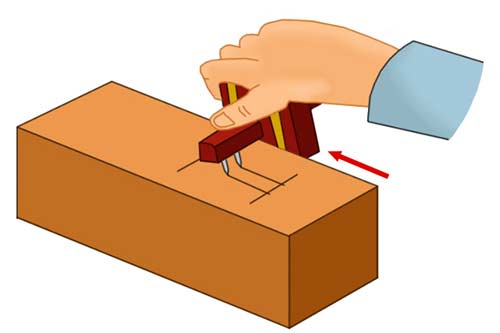
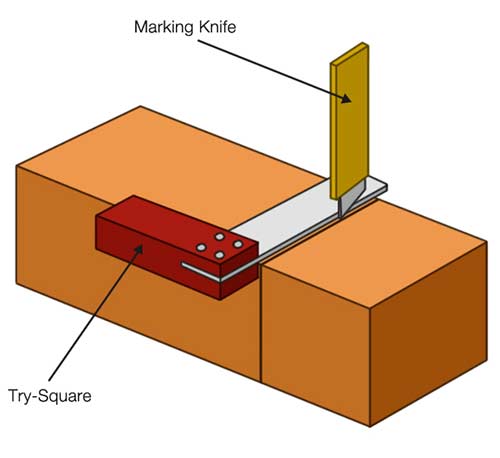
Draw a straight line using a pencil or marking knife across the width of your timber at the point that you want to start using a carpenters square and then measure down the length of your mortise and make another mark across the width. Measure in either side of the lines you have just created using the measurement from the above step, make your marks and then join them up.
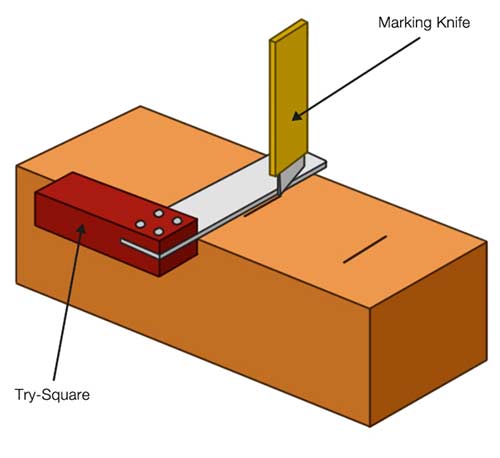
Marking mortise on timber using a marking knife
Do this for both lines and you will now have the markings for your mortise.
If you are using a gauge, position the stock away from the adjustable pin the exact measurement from above used to position the mortise in the centre of the timber.
Marking timber using a mortise gauge
Step 2 – Cutting the Mortise Joint
At this stage we can start getting down with some tools. Pick up the mortise chisel and, before we start, we are going to sharpen it as this will allow our cuts to be as accurate as possible. This can be done using a standard mid-grade hand file, a grinder or bench grinder or a purpose made chisel sharpener.
Position your chisel with the tip on one of your end lines and using a hammer or carpenters mallet, gently tap the chisel and start removing the waste wood material.
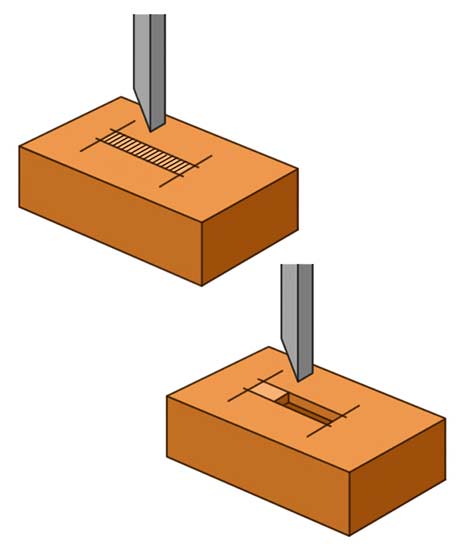
Using a chisel, remove the waste timber from your mortise joint
You should always take your time and also great care while doing this, it is a bit of a time consuming job but if you do it properly using a sharp chisel then you can be reasonably sure your joint is going to be as accurate as it can be.

Using a carpenters mallet, tap the chisel to remove waste timber material from the joint
Continue with your cutting until all waste material has been removed and you have a nice clean hole. If you have some untidy areas don’t be tempted to clean them up yet until your tenon is cut as you will want to do a test fit first to make sure you’re not removing material that may affect the fit.
Step 3 – Marking out the Tenon
For the sake of this guide we are going to be using timbers the exact same size. Essentially, timbers can be any size with the exception that the mortise needs to be larger than the tenon for the joint to work.
To start, we are going to mark the depth of our mortise all the way around our piece of timber. Use a ruler to mark this point and then a carpenters square to draw a line all the way around. Alternatively, you can use a marking knife and then go over it with a pencil.
Mark depth of tenon on timber
Next we are going to mark out the tenon. The best way to do this is use a mortise gauge. As you did above, set the adjustable spur to the width of your chisel and then set the stock of the gauge so that the tenon is positioned in the centre of the timber, the same as your mortise.
If you are working with timbers of a different size you will need to make the required adjustments for your measurements so that both parts of the joint fit where you need them to.
Clamp your timber in a vice or Workmate so that it is at an angle and then hold your gauge with the stock butted up tightly to the timber and with the spurs sitting on the line around the timber.
Pull the gauge along the surface of the timber to create the marks for your joint along all three surfaces. Re-position the timber if needed to mark the downward face. If need to make your marks more obvious you can go over them with a pencil.

Using a mortise gauge to mark out a tenon joint
Step 4 – Cutting the Tenon Joint
We can now move on to the final piece of our puzzle. Clamp your timber firmly in a vice or Workmate so that it is standing upright.
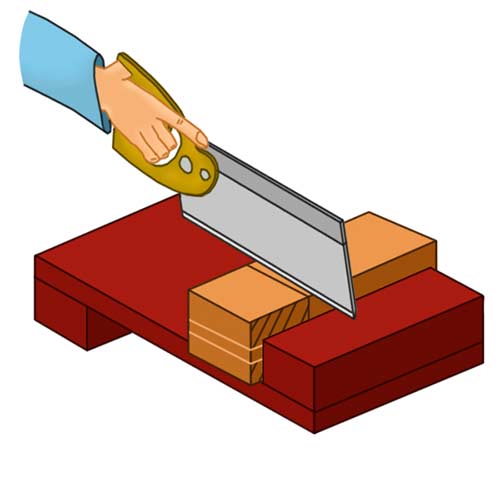
The best saw to use to make any cuts is a tenon saw. This saw features a ridged spine running the length of the blade and this prevents it from flexing and keeps the cut straight and true. You can use a standard Jacksaw but as this flexes, it is likely that your cut will not be straight.
Start the cut gently by pulling the saw back along your line. Make sure you are cutting in the correct place e.g. if your line marks the start of the cut, cut past it on the waste timber side, but if your line marks the end, cut before it and if it’s on it, cut down.
Gently saw away down through the line, stopping regularly to check that you are still straight. Cut down until you meet the shoulder and stop. Flip the timber over and repeat for the other side.
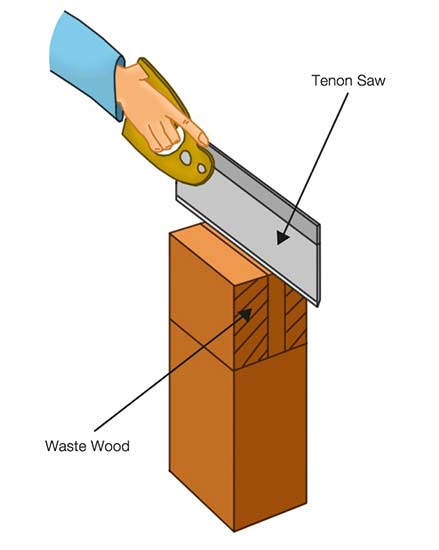
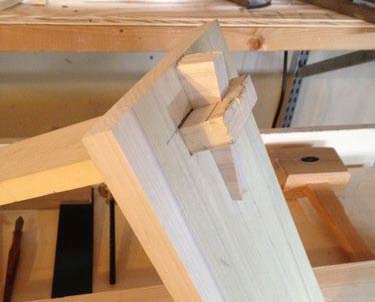
Cutting timber to form shoulder and joint
The final cuts are made to remove both waste sections and form the shoulder. If you have a bench hook you can use this while cutting, but if not clamp it up in a vice.
Use your saw to cut down each of the shoulders, again checking to make sure all is straight as you go and once done, the waste sections should then drop off.
Cutting away waste sections to form shoulder and tenon joint
Fitting the Mortise and Tenon Joint Together
With both sections of your joint ready to go, start with a trail fit to check for binding, tightness and even looseness.
Start by pushing the tenon into the mortise. Ideally it should be tight but with a little wiggling, it should slot together nicely.
If you find that this is not the case, a few minor adjustments will be needed. Push the sections together and as you do, study it closely to look for any proud areas that may be causing binding.
To solve minor issues such as this, a piece of sandpaper and your sharp bevel edge chisel are the tools of choice.
Grip the timber upright in a vice and position the chisel flat on the proud area. Gently shave (also know as pairing) a small amount of material off and then re-check the fit. Continue this for any problem areas, regularly checking the fitment as you go until you have the perfect fit.
For any rough edges, run over these with the sandpaper, again checking the fit as you don’t want to take too much off.
As you have now mastered making your own mortise and tenon joint, feel free to experiment a little with different sizes, shapes and even mitres.
Completed mortise and tenon joint
Need More Information About Timber Joints? Then visit our other four timber joint projects:
- Timber Joints – The Bridle Joint
- Timber Joints – Halved Joints
- Timber Joints – Mortise and Tenon Joints
- Timber Joints – Dovetail Joints
- Timber Joints – Finger Or Comb Joint
- Timber Joints – Shoulder / Rebate / Lapped Joint
Alternatives to Timber Joints
Successfully creating the joints detailed above can take a certain level of practice and skill which sometimes is just not practical. In these situations there are products available today that take care of this for you. These product enable you to simply cut your timber to length and slot it into a "ready-made joint".
If you would like to find out a little more about these types of joint, we recently used one particular product to make a work bench – see how we did it in our work bench project.