There are many types of timber joints and woodworking joints and the choice of the type you use is really determined by the item you are making. For example, if you are joining a leg in the middle of a workbench then a halving joint would probably be the way to go, but if you are fixing a leg to a chair then a mortise and tenon may be more suitable
Which ever timber joint you use, you have to ensure it is the correct one and up to the job. Some joints are strong while others are more aesthetically pleasing, but there are some that combine both of these features.
What is a Dovetail Joint?
The Dovetail joint is one of these joints. When cut correctly and accurately, the “tails” and “pins” interlock with each other making it virtually impossible to pull the joint apart.
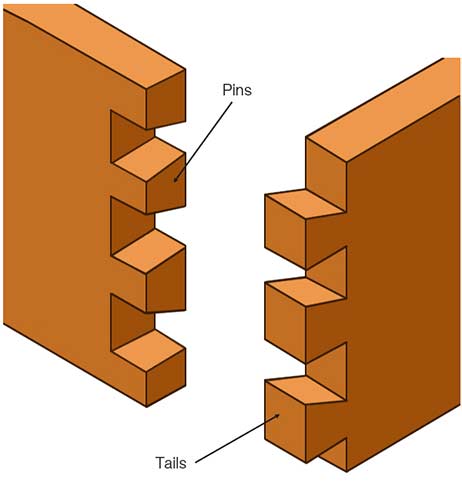
Parts of a dovetail timber joint
This makes them perfect for use is the construction of boxes, drawers, cabinets and other items of furniture that are subjected to stresses and strains such as pulling, pushing, twisting and also downward forces.
What makes them so good when it comes to the construction of items such as boxes and drawers is their resistance to pulling and pushing. A drawer is opened and closed many times during its life and each time it is opened, the pulling forces that are applied to any joints, try to pull the drawer apart.
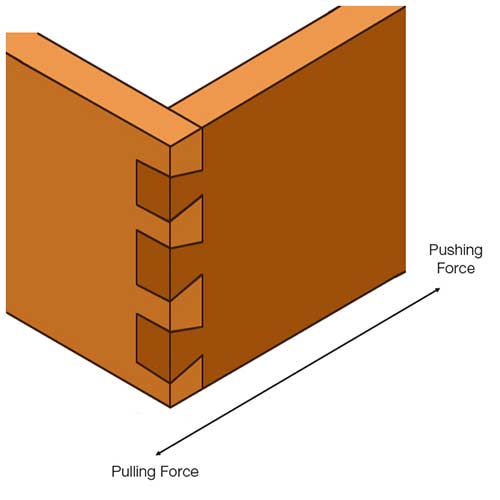
The tails and pins of the dovetail bite into each other when forces are applied, preventing the joint from coming apart
If a joint such as a mortise and tenon or halving joint were used, in time (probably quite a long time), the joint would separate as the pulling and pushing forces would get the better of it. This is not the case with the dovetail as the sharp of the tails and pins prevent this form happening.
As well as being very strong and robust, the dovetail joint is also a very attractive and visually appealing timber joint, proving again that it’s ideal for furniture making, as in these situations the visual finish and appearance is almost as important as the strength of the joint.
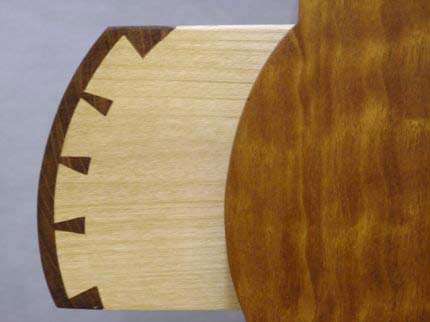
Once mastered, you can get really creative with dovetail timber joints and make something truly unique – Image courtesy of finewoodworking.com
Despite its strength and attractive nature, this is a very hard joint to make and one that requires quite a bit of practice to get right, but once you have mastered it you can really get creative and make some wonderful and unique woodworking joints.
Types of Dovetail Joint
On a basic level, every dovetail joint will feature at least one pin and tail (or mortise and tenon as they can also be called), but the number, size, angle of the cuts and whether they are visible will depend on the type of dovetail joint. Here follows some of the most common types:
Full Dovetail Joint
This is probably the most common type of dovetail joint and one that you will probably have seen on various items of furniture such as drawers, boxes and other items.
This type of joint is commonly used for wider panels and features tails and pins that run the full width of the timber section so that the entire corner they form is supported to form a full and solid joint, making the full joint visible from both the front and side.
The success of the joint as a whole really depends on the slope of the tails or tenons. The slope that is cut depends on whether you are using a hardwood or softwood:
- Hardwoods: Angle of slope will be less than that used for softwood and should be cut using the “rise over the run” method, in this case, 1-in-8 for hardwoods
- Softwoods: The angle of sloping for softwoods is greater than those used for hardwood and again uses the “rise over the run” method, but this time it should be 1-in-6
The cutting of the slope angle is critical – if cut too steep there is the chance the joint will eventually split due to stress but if cut too acute the joint may open
To get the most accurate cuts you need to plan everything before you start cutting. This includes calculating the number of pins and tails, their size and how they are spaced. Some good rules of thumb are:
- The widest area of the pin (or mortise) should be around half the thickness of your timber
- Your angles should generally be somewhere between 15° and 20°
For spacing your pins, generally you should be aiming to ensure this is around twice the actual width of each pin, but this will really depend on what you’re making. For finer detailed work this may be the case but if you are making drawers for a workbench that is probably going to get a bit of abuse then it’s probably not worth the time and effort as they are going to be more functional.
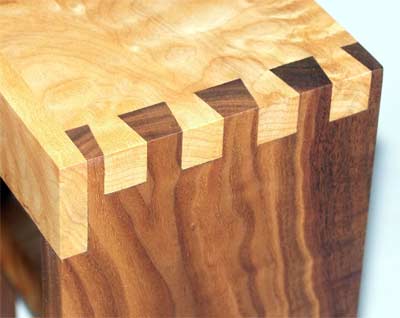
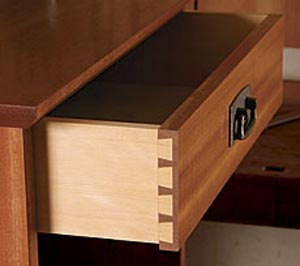
Full dovetail joint used to form the corner of a drawer – Image courtesy of pinterest.com
Half Blind Dovetail Joint
In many ways this joint is pretty much the same as the above type with one subtle difference in that the actual joint is only visible from the side, hiding the joint from the front.
In the case of a set of drawers, this joint would be preferable as in most cases you would just want the facing timber of the front of the drawer visible and not the joint itself.
Blind dovetail joint only visible form the side
Sliding Dovetail Joint
The sliding dovetail is slightly different from the above examples in that as opposed to joining two pieces of timber at a corner, this joins two edges. An example of this would be joining a shelf to the back-panel of a shelving unit at 90°. This type of joint shares quite a few similarities with the tongue-and-groove joint.
To form this joint you would cut a pin or mortise the full length of back of the shelving unit and then cut the tail into the rear of the shelf, again, over the full length.
Once you have completed both the joints you can then simply slide the shelf on to the back section. This is obviously just for a shelf but as you can see, the sliding dovetail can be used in a great variety of ways to create a firm and strong joint between two timber sections.
Additionally, this does not have to be at 90°, you can cut joints at pretty much any angle you want to suit the job you are doing.
There are a couple of things to be aware of though; in the case of the shelving, you would also want to support these at their front corners as if left floating and too much weight is applied, there is a good chance that the tail would break off.
Also, when creating both parts of the joint, leave a little “wiggle” movement in the two joints as this will help to counteract the friction that you will encounter when trying to fit the joints together. In this instance, if you make your joints too perfect you will have a huge job fitting them together.
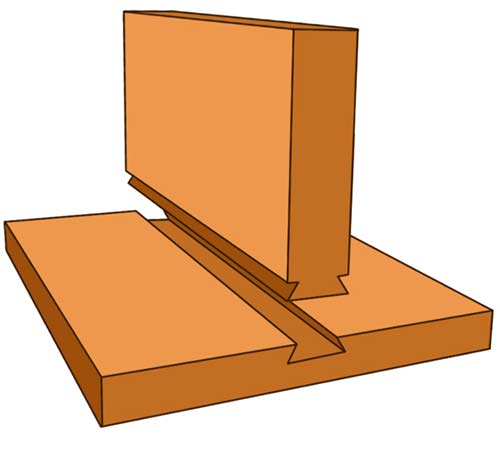
Sliding dovetail joint
Mitered Dovetail Joint
The mitred dovetail (also known as French dovetail joint, full blind dovetail joint or secret dovetail joint) takes the idea of hiding your joint even further. Unlike the half-blind dovetail joint where the joint is only visible from the side, this joint is completely invisible from any angle.
With this joint you combine the dovetail with a mitre so that when the two sections are joined together the actual dovetail joint is hidden within the mitre.
The standard dovetail is quite a challenge to make at the best of times but this takes the standard joint to a whole new level.
To start you will need to cut a rabbet along each end of the timber you are using, where the faces of the timber meet to form your joint. A rabbet is essentially a groove or recess cut along the length of your timber similar to the image below. Once done, face-off the top to a 45° angle.
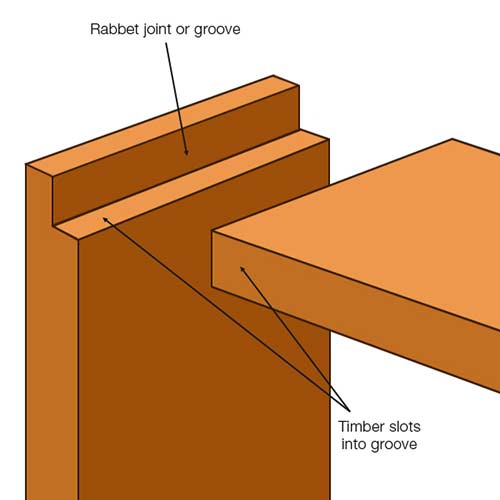
Rabbet groove or recess cut along length of timber face
With the remaining section of the timber you can now cut your pins and tails in each section of timber to form your dovetail. As this is not a “through” joint e.g. pins and tails running right through the width of the timber it can be quite a tricky job to cut all the waste out to correctly form them.
To help you with this you will need to use a very sharp chisel as this will ensure your cuts are as accurate as possible.
Once done, you should end up with something that resembles the below. Once assembled the mitres will join perfectly at the inside and outside corners, hiding any evidence of your joint.
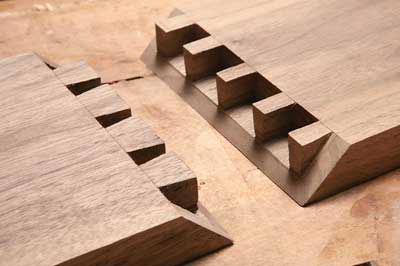
Mitred dovetail joint hides dovetail pins and tails when assembled – Image courtesy of woodworkesinstitute.com
As mentioned, once you have practiced and mastered the art of making dovetail joints you can experiment in many different ways, combining different types together to create beautiful but very strong joints. One such example is combining both a dovetail and halving joint to make a halved dovetail joint.
Quick Note on Timber and Tools
As with any woodworking project, it is a good idea to select timber that is as straight and square as possible. Also avoid any timber that has too many imperfections, knots or is bowed or warped.
Using wood that is not quite as good as it could be will introduce many issues such as measuring from ends that are not square that will lead to your cuts not being square, warped timber will mean that when joining sections of timber together, the resulting structure will probably not be square and many other unnecessary headaches.
The same can also be said for tools. Budget tools are find but always buy, borrow or hire the best tools that you can afford. Lines will be straighter, cuts more accurate and angles much cleaner. Cutting costs is fine but using poor quality or half blunt tools will show through in the end result.
There are various different methods for cutting your joints including using certain power tools such as routers, bandsaw’s and tablesaw’s. Using any of these with a little practice will give you a super-accurate joint. Using machines is really a time saving exercise in the trade as it allows anyone with the correct knowledge to produce joints on mass in a short space of time
Despite the above, the real test that both hobby-woodworkers and tradesmen aspire to is to cut their joints by hand. This takes a great deal of knowledge and experience but due to the fact that each and every cut will be slightly different, it gives a great deal of character to the end result.
How to Mark the Cuts for Dovetail Joints Tails
Marking out Your Cuts
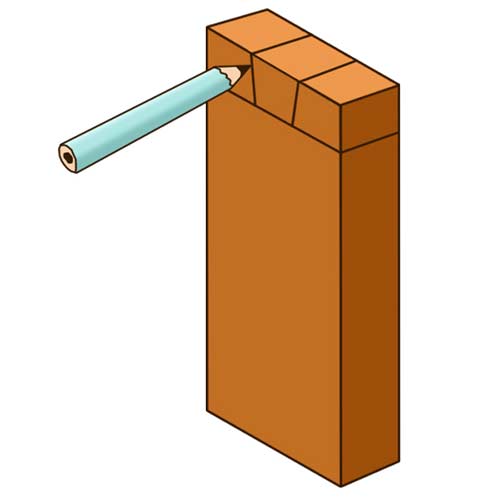
Before we can cut anything we have to mark it all out. Start by taking your two timber sections and placing them end-on at a 90° angle and then mark the thickness of the upright on the flat piece using a pencil.
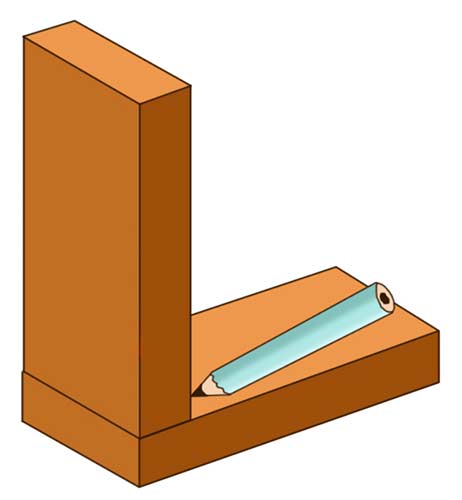
Mark the thickness of your joint using a pencil
With your pencil line marked, remove the upright timber (the one we are using for cutting the pin) and place it to one side. Next we are going to transfer this line all the way around your timber.
Using a marking knife if you have one or a pencil if not, place a carpenters tri-square precisely on your line and go over it with the knife of pencil a few times so that it really stands out. It is best to use a marking knife if you can as this will have the added bonus of scoring the timber fibres that will also help positioning your saw to start cutting.
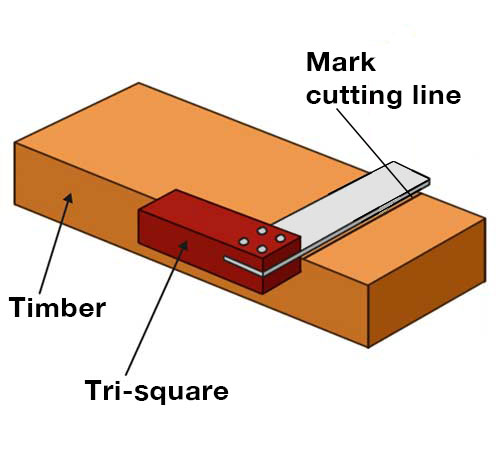
Go over your lines with a marking knife if you have one
Make your way around the timber, transferring your cut line on to all faces. Make sure that the line is clearly defined and easily visible.
This next part is the tricky part – marking the tails. The best way to do this is to cut yourself a dovetail template. This template will be the exact size and width of each of your tails so that you can easily transfer their correct size across both the tail and pin timbers.
The best material to make this from is a piece of 1-2mm sheet metal but if you don’t have any lying around, use some sturdy plastic or card.
In this example we are making a single tail and pin as this is the best way to practice, lets not run before we can walk! Once your confidence and skill levels increase you will certainly want to add more so use the principles we outlined here to correctly mark cuts on your timbers.
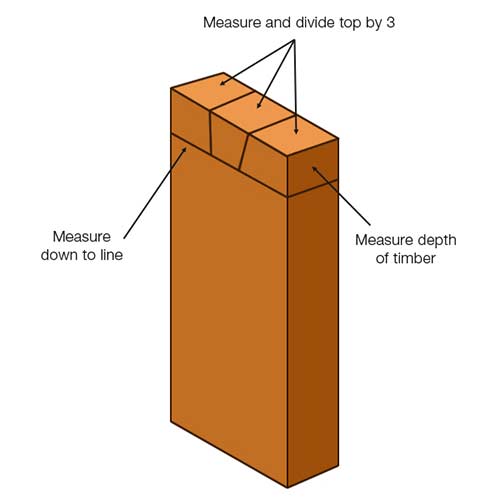
Start this step by firstly measuring the width of the timber and divide this number by three and this will give you the width of tail, mark this on the top.
Using the tail width, mark this as well as the depth on your chosen material for your template, making sure your lines are dead straight. Measure from the top of the timber down to your line and this will tell you how deep your tail will be.
Marks a square below the one you have just drawn on your template material below it using the depth of your line to stop. On the inside of this new sharp you will now calculate and mark a 20° inward-sweeping line either side to form the cheeks of your tail and then cut out your template and bend it to 90° on the line between both shapes.
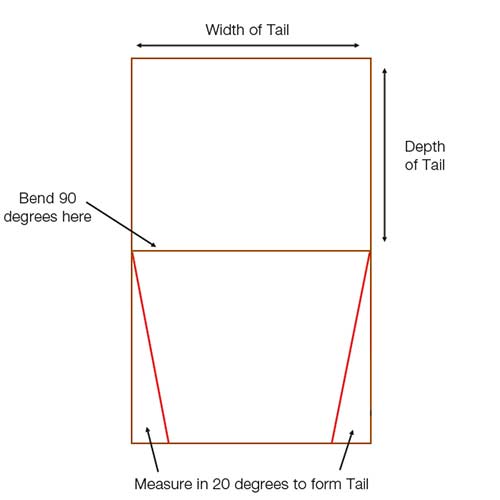
Template example that can be used to mark tails for a dovetail joint
Note: The 20° referred to above is a rough guide, it’s best to work with the principles stated above for sloping – 1 in 8 for hardwoods and 1 in 6 for softwoods.
Place the template on the centre marks on your timber and mark out your tail.
Marking out your tail on your timber using a dovetail template
If you are cutting several tails into your timber, remember to leave space a pin at either end as this will help to strengthen the joint as typically these can be weak points.
Cutting out Dovetail Joint Tails
With all your cuts marked, now is the time to start cutting. Grip your timber tightly in a vice or Workmate in an upright position. If you are relatively new to carpentry you may find it easier to angle the timber slightly so that your sloped tail is straight, allowing you to better keep track of how straight your cut line is.

Cutting away waste timber to form your tail
When it comes to cutting tools you have several choices. It’s probably best to use a tenon saw but you can use a coping saw or even a bandsaw or table saw if you have one.
Take your time cutting and check your progress regularly to make sure you are going in a straight line and also not cutting down too far. Also, make sure you cut the correct side of your line e.g. the tail side or waste side.
Once you have cut your first line move on to the second line so that your tail is now visible.
The final job is to flip the timber over 90° (both sides) and cut down the shoulders. Once this is done you should then be able to remove the waste timber and you will have a nicely formed tail.
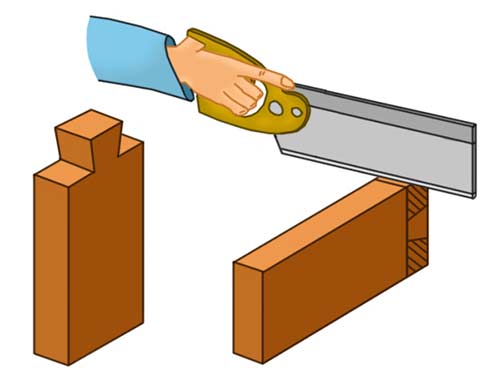
Cutting away waste timber either side of tail
How to Mark and Cut the Pin for a Dovetail Joints
If you have worked through the steps above to create your tail then marking out and cutting your pin should be a fairly simple process as you will have most of the measurements etc…. ready to go.
Start by holding the tail flat on the top of your pin timber and then use a pencil or marking knife to mark out the shape of the tail that you can then use to form your pin. Once marked go over your marks again using a tri-square to ensure that all lines are straight.
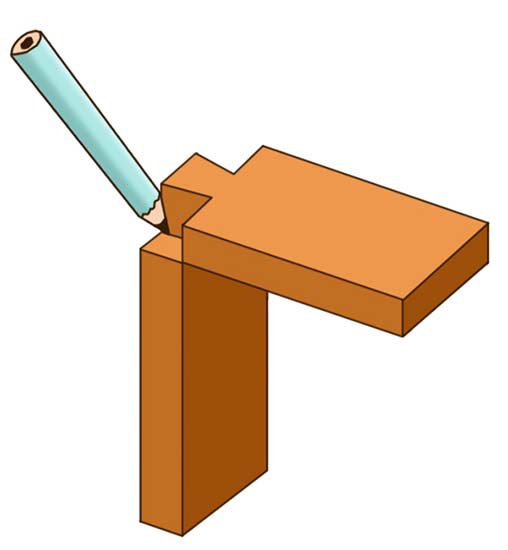
Marking out the cutting lines for your pin
Measure the depth of the tail and transfer this measurement to the pin timber. Measure down from the top this exact measurement on the pin timber and mark either side. Join the marks using a pencil and tri-square so that you then have a straight line marking the depth of the pin. Transfer this line all the way around.
Mark a straight line down from your pin marks to the depth line on both sides and you will now have the cutting lines for your pin.
Marking from the pin lines down to depth line
Now your lines are marked out you can start your cuts. Grip your timber upright in a Workmate or vice and cut down each pin line using a tenon saw. Again, make sure that you cut on the correct side of your line, either the pin side or waste side.
The tricky part with this stage is cutting along the base of the waste section so that it can be removed. The best tool to use for this is a coping saw as the blade is so thin, you can turn it as you cut, allowing you to cut along the base.
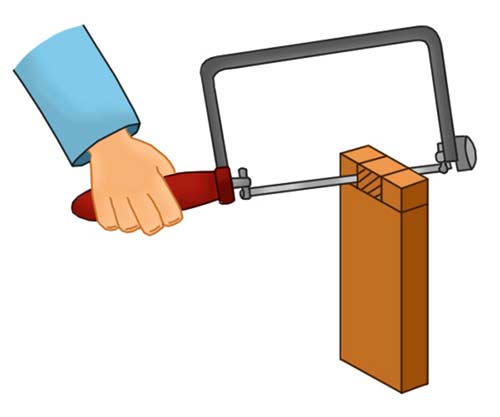
Cutting along base of waste section using a coping saw
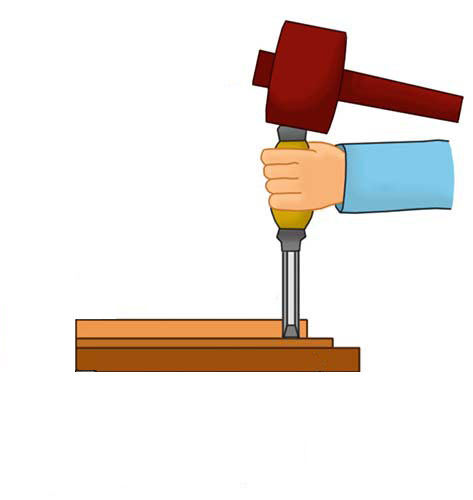
Due to the tricky cut, it is inevitable that you will have a few areas that will need tidying up. Grip your timber upright in a vice and using a sharp chisel, tidy up any edges that need it.
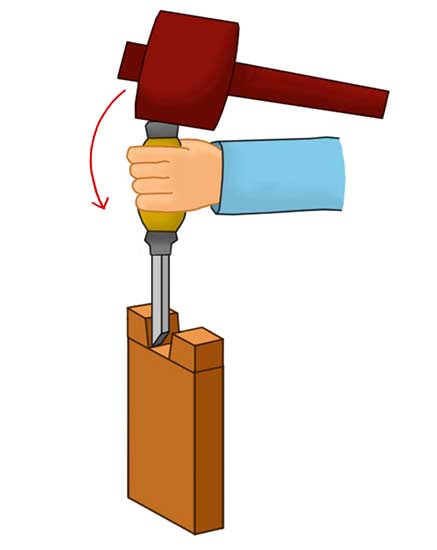
Tidy up any edges using a sharp chisel
One thing you have to do during your tidying up is to do regular test fits to ensure that you are not removing more than you need to.
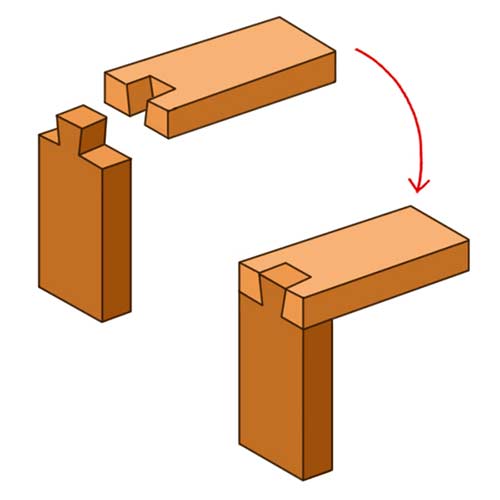
Fitting Your Dovetail Joint Together
With all cuts made you should now have both your tail and pin ready for fitting. When slotting the two pieces together you might find that they are pretty tight and if you have made your cuts accurately this will certainly be the case, but if they are so tight that the joint won’t go together then you will need to make a few adjustments.
While pushing the joint together, make a mental note of the points that go tight. If you can visually see raised areas or humps then this is a good indicator also.
To remove any proud areas causing the sticking, lay your piece of timber on a flat surface with the offending area easily accessible. Using a sharp bevel edge chisel, hold the tip flat against the surface you are working on and gentle push down. If your chisel is as sharp as possible, you should be able to remove very thin slivers of timber.
Use a very sharp bevel edge chisel of a suitable size to fine tune and remove any unwanted material
As we have stated above, only remove a very small amount of material at a time and once you have done so, refit the joints together to check the fit as once you have taken off too much material, that’s it, you can’t put it back on again!
If you have any rough edges or surfaces, use some very fine sandpaper to tidy them up, 320 – 400 grit should be suitable.
With all your adjustments made you should now have a nice fitting joint, not too tight but not too slack either. Apply some suitable wood glue to the internal faces and push the joint together and clamp it up tight using suitable clamps until the glue has dried.
Making the final fit of your joint once all adjustments have been made
Want to know About Other Timber Joints?
If so then visit our other timber joint projects listed below:
- Timber Joints – The Bridle Joint
- Timber Joints – Halved Joints
- Timber Joints – Mortise and Tenon Joints
- Timber Joints – Dovetail Joints
- Timber Joints – Finger Or Comb Joint
- Timber Joints – Shoulder / Rebate / Lapped Joint