Parts of a Table Saw
Below you will find a labeled image that shows all of the common parts and features that make up a table saw. These may vary slightly between model and manufacturer but in most cases, most saws will feature the majority of these.
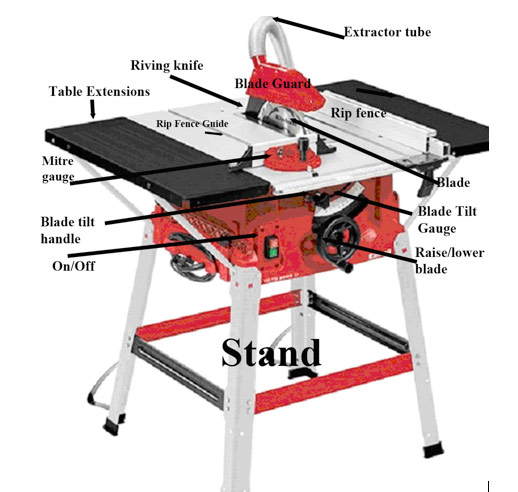
How the parts of a table saw work together
Why Buy a Table Saw?
There follows a few simple reasons why, when working on a large project, buying a table saw makes great economic sense as well as adding to accuracy and safety for your woodworking projects.
- A length of 6 inch (150mm) x 1 inch (25mm) timber costs less that 2 lengths of 3inch x 1inch timber
- An 8ft x 4ft sheet of plywood costs much less than buying smaller sections pre-cut by the timber merchants or DIY Store
- Making many cuts the same length is tedious and, when done by hand, can lead to discrepancies in lengths
- Ripping down the grain of a length of timber is extremely hard work and very difficult to keep a hand saw on line
- Table saws give you much greater stability when cutting larger pieces of timber
- Table saw blades remain stationary while the timber does the work. This leads to more accurate cuts
- Table saw blades can be adjusted easily to cut different depths and different angles or bevels. This means that with careful cutting the saw can be used to notch out timbers creating rebates and chamfers
- Dust extractors, even a simple vacuum hose, keep the workshop or garage relatively sawdust free
What to Look for When Buying a Table Saw
The Cabinet Saw
Table saws come in 3 flavours! The cabinet saw is a giant, heavy table saw which sits in the workshop and goes nowhere. It is simply too heavy to move! This is the type of table saw serious woodworkers have in their workshops and one which offers the best and most accurate work if set up properly.
The table is large allowing large work pieces to stay in position properly. As the cabinet saw is a permanent fixture in a workshop it is usually accompanied by all of the safety features sometimes missing on more portable saws.
The blade guard for example, may be much wider to accommodate a larger extraction system for the sawdust. The stop and power buttons will be larger so they can be operated by a knee when necessary. A blade brake system may be incorporated to cut wetter timbers and so on.
In short, with (usually) a cast iron table, a cabinet saw is a fixture for the serious woodworker with space to store it permanently.
Cabinet table saw with cast iron table
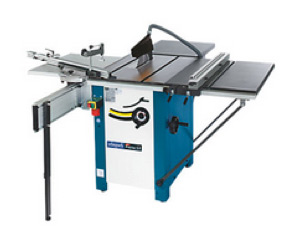
The Contractors Saw
The Contractors saw replaces the cabinet around a cabinet saw, with fully adjustable legs which can be levelled on site to give a solid, safe working platform.
Contractors table saws are designed to be fully portable and used in the open but still have all the safety features, such as the extraction tube etc…. to allow full safety both indoors and out.
The stand, or legs, can usally be removed to turn the contractors table saw into a bench-top table saw.

Contractors table saws are portable with stands or legs
The Benchtop Saw
The smallest (but not necessarily the cheapest) of all 3 options. The benchtop saw these days is doubled up with and can be used as a site saw also.
They can offer large outputs as far as wattage is concerned and need to be handles with a lot if care. While a bench table saw is the usual choice of the occasional woodworker they can certainly be just as dangerous as the others.
Make sure your saw is sited properly and fixed in position before you start work.
One other thing we should mention at this point is the power of the saw and what you should be looking for.
Typically, saws will range from 600W to 2000W and in general, the more power available the quicker and deeper the cut will and also the more expensive the saw will be (but not always). Also, teh more power there is the greater the chance of kick-back (more about this below).
When it comes to what you should buy, as will all tools, you should buy the best that you can afford whilst also bearing in mind how often it will be used.
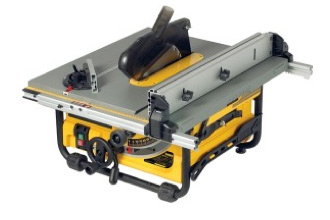
Using a bench top table saw
What to Check Before Using a Table Saw
Sideways Movement in Table Saw Blades
Check the blade has no sideways movement. Make sure all power is off and hold the blade at the top and then move it from side to side. Apart from any natural flex in the blade itself, there should be no sideways movement. If there is, check the retaining nut or clamp that fixes the blade to the motor and tighten it.
Table Saw Rip Fence
The same thing applies with the rip fence and the mitre guide (see image) all should be locked in position and immovable. This ensures the timber is cut in a perfectly straight line.
The rip fence needs to remain absolutely parallel with the blade at all times. When the rip fence or mitre block need to be moved for a different cut they should slide easily in their guide slots and lock easily and firmly into position.
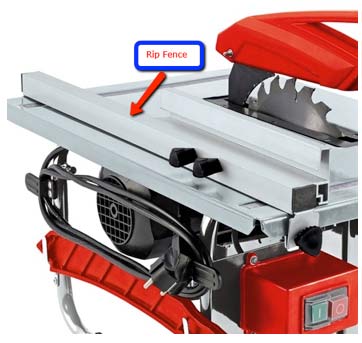
Rip fences on tables saws should remain parallel to the blade
Table Saw Mitre Gauge
The angles on the mitre gauge should be easily adjusted with no sticking and a solid lock once the correct angle is found.
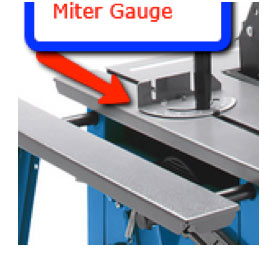
Table saw mitre gauge should lock easily into position
Table Saw Dust Extractor Pipes
The extractor pipe should be situated as close to the blade as possible and centred into the blade guard. Ideally the extractor pipe would be fitted to an extractor fan which would take the sawdust either outside the workshop or in to a large bag where it can be stored safely.
In most cases however, it will simply be attached to a vacuum or have a rubble bag tied to the end of the extractor pipe!
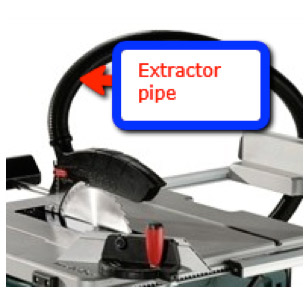
Keep extractor pipe connected to dispose of sawdust
Choosing the Right Blade for Your Table Saw
The blades used by your saw need to be chosen with care. The wrong blade can lead to spending many hours tidying up joints and sanding down rough edges.
Essentially, the more teeth a blade has the smoother the cut will be. If there are fewer teeth on the blade “ tear out” can occur where the timber is not so much cut as literally torn out, especially on cross cut cuts.
The most useful blade for an amateur using a table saw is the combination blade which uses (normally) 40 to 50 teeth and has an alternative top bevel to the teeth.
This type of blade will give you good cuts when both ripping and cross cutting the timber. It will not give you what woodworkers like to call “finished” cuts and some sanding may be needed after the cut. The alternative however is to change blades regularly between an 80 tooth cross cut blade and a 30 tooth ripping blade.

For an all round blade use a 40 – 50 tooth combination blade with alternate bevels to the teeth
Types of Teeth for a Table Saw or Power Saw Blade
Blades come in different types with different teeth that all give a slightly different type of cut. You can learn much more about power saw blades by checking out our webinar on power saws found here.
The image below depicts the most common types of power saw blade teeth and their abbreviations. The blade you use must be 100% flat otherwise kick-back can occur, more on this below.
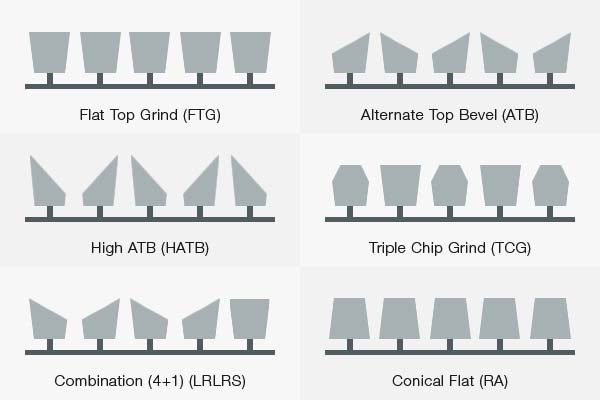
The various teeth used on circular saw and table saw blades
What is Kickback in a Power Saw or Table Saw
When talking about kick-back, this is the process whereby the material your cutting binds to or on the cutting blade and as the blade is traveling at speed, normally in excess of 140mph, it then essentially becomes a catapult as the material is gripped by the blade and flung across the workshop, or in most cases, right at you!
As you can imagine, a fairly solid piece of timber traveling through the air at speed is hugely dangerous to you and any surrounding objects.
Pretty much all saw blades are manufactured to avoid kick-back in that the teeth of the actual blade are wider than the blade plate. This ensures that as you cut down through your chosen material, the width of the actual cut (or kerf as it is also known) is such that it does not touch or bind on the material you’re cutting and prevents.
If the teeth were the same width as the blade plate then it would inevitably stick the deeper you cut into your chosen material.
Other reasons for the blade binding when cutting timber can be that it may be wet and want to “close” round the bade as it cuts through, the timber may be full of sap which can bind on the side of the blade, the edge of the timber may not be tight up against the rip fence, the timber may be warped or have a particularly tight grain which can cause binding or the Riving Knife (see below) may not be aligned properly and is causing the timber to close up on the blade.
Other forms of kick-back are caused when the cutting guide or fence is not absolutely parallel with the cutting blade and is skewed at angle towards the blade itself. In this case the material you are pushing through to cut would be forced into the side of the blade by the fence causing not only binding but friction that could also damage the material itself.
Most saws and attachments (blade etc….) come out of the box claiming that they are setup correctly to avoid kick-back, but in most cases they aren’t so you should always setup your saw correctly each and every time you use it. If all is setup as it should be then the chances of this happening should be at a minimum.
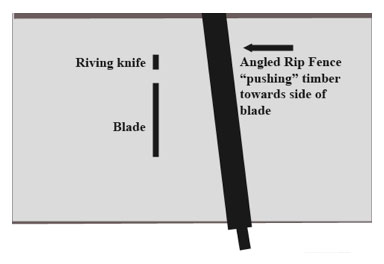
Table saw kick back caused by angled rip fence
The Riving Knife
A riving knife is a safety device on your table saw. It sits close behind the blade and should also rise and fall with the blade as the cut depth is changed.
Its purpose is to keep the two halves of the timber, as it is cut, from springing back together and binding on the blade, helping to avoid the possibility of kick-back and also allowing the saw to cut much easier due to the lack of resistance which should also help to give you a cleaner cut.
Most decent saws and manufacturers will provide one with your chosen saw but some of the cheaper, lesser known brands may not. for some saws it is possible to buy a universal riving knife that can be attached but make sure it fits correctly and does not hinder the saw at all.
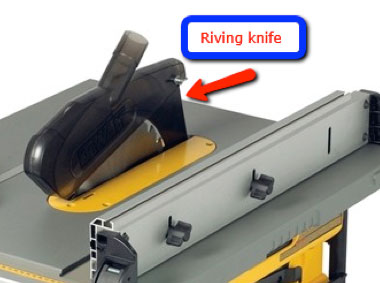
Riving knife situated behind blade of table saw
Extensions to Table Saw Platform or Work Table
Extension tables for your table saw make life much easier. You are able to cut much larger pieces more easily with them.
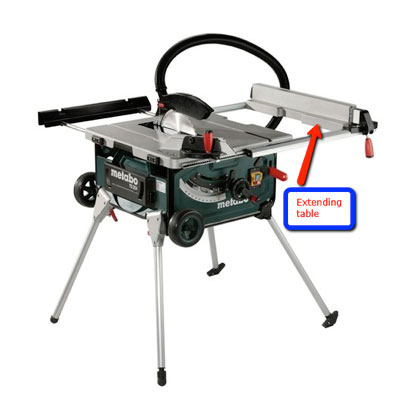
Cutting larger timbers with table saw extension tables
If you try to cut a large piece of ply for example, and it is not fully supported underneath, it may twist or bow. This causes the timber to twist against the blade and may result in kickback and also cause the timber to split or break if working with thinner items such as sheet timber.
If you do not have a big enough table for the piece of timber you would like to cut it is really advisable to build a platform of some kind next to your saw to help support it.
There are special rollers (roller support stands) which can be aligned with a table saw to steady work pieces as they pass through the saw. These have the advantage of being portable so they can be moved around in to any position.
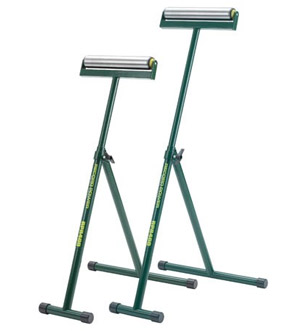
Support work pieces on a table saw with roller support stands
Using a Table Saw
As useful as they are, table saws are also very dangerous and should always be treated with the respect that they deserve.
Before starting it is always a good idea to have a practice run of your cut and make sure that any supports are in the correct place and that the edge you are working from e.g. the edge that will be running against the face of the fence guide is square, if not then you may be opening yourself up to kickback or the cut you are actually making may not end up square.
Additionally, don’t be fooled in to thinking that any factory cut edges are square, in most cases, they probably won’t be so don’t use them as the basis for making your final cuts.
Once you have practiced, ensure that the saw is set up and that your fence guide is set to the correct position for the size of cut you are making and that also it is totally parallel with the blade.
Check that the safety cover for the blade is firmly fixed and positioned over the top of the blade.
When all is ready to go, start the saw up and gently push your item through the blade making sure you take your time. Do not force it through as you may damage the material and also put unnecessary strain on the saws motor. Keep an eye on your cut line and that you arefollowing true to it and also that your timber if flush with the fence guide.
It goes without saying – do not put your fingers anywhere near the blade! If you are cutting small objects or making cuts that will end up close to the blade then you can either use a “push shoe or push stick” to guide the timber through the final stage. This will prevent your fingers from going anywhere near the actual blade.
A table saw push stick or push shoe used to guide the cutting material through the final stages of the cut – Image courtesy of familyhandyman.com
Once you’re finished, turn the saw of straight away and wait for it to stop before you attampt to remove any cut pieces of timber or other materials, nudging a small piece of timber against the blade can cause the teeth to catch it and send it flying through the air! If all is well and good, you should now be all done!