Condensation in the home is an absolute nightmare. Not only does it make everything damp but it can also cause black mould growth which can be extremely dangerous to your health.
In this project guide we run through all the steps involved in identifying the cause of condensation and then how to cure it. Read on to find out more.
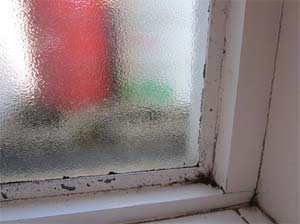
Condensation problems on windows and recesses create damp conditions causing flaking paint and black mould on window frames and walls
What is Condensation and How Does it Form?
On a basic level, condensation is water which is already present in the air, that, when it hits a cold surface then settles on it and makes it damp or wet. Over time this moisture can lead to damage by peeling paint off windows, and walls and causing black mould growth.
This window in Bath, Somerset in the image below was in a house we were called to a few years ago, it was fitted with metal windows which are notorious for condensation, and you can see what happened to the paintwork!
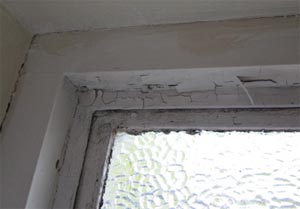
Condensation on windows causes flaking paint around window frames and windowsills. Flaking paint is a common symptom of condensation
The damp conditions also encourage the growth of mould spores which thrive in these damp and moist places. This then leads to black mould growth on windows, walls and even on curtains, where condensation has been allowed to build up over time.
All air contains water vapour, but the amount of water air can hold is determined by the temperature of that air. This ratio is called the ‘relative humidity’.
Hot air is able to carry much more moisture than cold air, so as the temperature of air rises it is able to hold a greater volume of water.
The water comes from everyday activities including, bathing, cooking and washing. Even our breathing causes condensation, and this is why car windows steam up when you sit with the windows closed and the fan off.
Once the air is saturated with water vapour (at any given temperature) it will deposit beads of water (condensation) onto any surface that is cold enough for it to condense. The temperature of the surface at which this moisture will form is called the ‘dew point’.
As an example, take a cold glass bottle out of the fridge, and it will soon be covered in condensation. When the surrounding air is warm, condensation will literally run off the bottle.
Another area that you often see this happening is on bathroom pipes and toilet cisterns – we look at how to avoid this in more detail further on in this project under ‘Best advice for Fixing Condensation problems’.
This pipe (pictured below) is typical of many bathrooms in the UK. The cold mains-water comes into a warm bathroom where the water vapour in the steamy room condenses on the pipe, often leaving a puddle of water below it.
In some instances this can be so bad that you might think you actually have a water leak from the pipe.
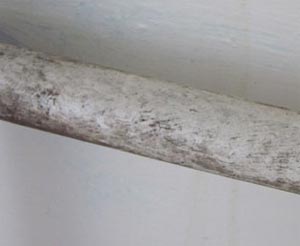
Condensation forms on cold pipe work in kitchens and bathrooms leading to flaking and discoloured paint
You can see this effect outside too. Where the dew point is close to the ground, to a small layer of damp air, dew, or frost will be formed.
Where a larger amount of air is involved, mist or fog will arise. If this happens to air that is rising in the atmosphere, and therefore expanding, then clouds will form.
If this happens in the home…. It’s called condensation.
Condensation Symptoms
The main symptoms of condensation below are listed in the order they are most likely to occur. In other words, in the places most at risk of condensation forming and the way the condensation affects that area.
- Window condensation – Beads of water on windows
- Pools of Water on the windowsill
- Beads of water on external walls
- Damp patches on external walls
- Damp patches on ceilings
- Damp patches in the corners of rooms
- Damp internal walls
- Black mould on window frames, window recesses and windowsills
- Black mould on walls – particularly corners and recesses with little air flow
- Black mould in cupboards
- Black mould on curtains and clothes
- Wet internal walls
- Black mould on carpets – can be a symptom of condensation but is more often a sign of penetrating damp especially if you don’t have any of the symptoms above
If you are experiencing any of these issues then you have a condensation problem and you will need to get started on resolving this as soon as possible before it starts to cause further issues.
Diagnosing Condensation
One question that we hear a lot here at DIY Doctor is: Is it rising damp or condensation?
Many believe that all damp at low level must be rising damp, but this is often a myth not true at all. In fact rising damp is actually extremely rare and in most cases it’s either penetrating damp or indeed condensation.
Penetrating damp is where water is getting in through damaged or shoddily built areas such as a roof leak, cracked render, failed wall ties, damaged brickwork or badly fitted window frames.
Rising damp may occur in certain circumstances but as said, it is very rare in modern housing.
Rising Damp or Condensation – Busting the Rising Damp Myth
Question – "I have wet walls at low level and dry walls above three foot, so it must be rising damp"
Answer – Heat rises so the lower part of the wall is where the surface is cooler and more likely to suffer from condensation; also water always tries to travel down to the lowest point, so if the condensation is running off the walls it stands to reason the lower part of the wall is most affected
Question – "I have black mould on my external walls and not on the internal walls in the same room, so it must becoming in from outside"
Answer – The interior surface of external walls tends to be the coolest surface in the room, so they naturally attract condensation.
Question – "I have black mould growing at the bottom of my walls it must be rising damp coming in from underneath the floor"
Answer – See the answers above. If you live in a house without a damp proof course, or if you think your damp proof cause is damaged or compromised, then it could be rising damp and you can find out more in our project on rising damp. If you live in a modern house or a flat above the ground floor it is most unlikely to be rising damp and you should keep reading to find out how to be sure you have condensation not rising damp or a leak.
Question – "My walls are wet, not damp or mouldy, so it can’t possibly be just condensation"
Answer – Yes it can! There is no such thing as ‘just condensation’. Condensation can be a cause of major structural damage as well as damaging paintwork, soft furnishings and clothes, if allowed to carry on unchecked. We give you some photographic evidence of this structural damage in our air brick Project.
These are just some of the most common remarks we get, but if you have a particular question you want answered then visit the damp and damp proofing DIY Forum and post your query there.
Most damp walls in modern housing are caused by condensation. You can usually tell by the pattern of the damp and damage.
Also do not be fooled by the amount of water involved, in some cases it can be huge. As stated above, due to the volumes involved, some people believe there must be a leak because the walls are so wet.
As we have also stated, black mould growth is the most common effect of condensation, but mould can appear in many other colours on carpets, clothing and wood.
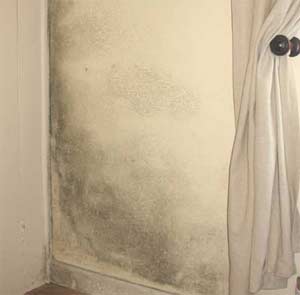
This picture (below) shows the effects of condensation in the corner of a room in a property in Hampshire. Note the way that the black mould climbs and concentrates on the coldest part of the wall – an outside corner.
If this was rising damp it would most likely form at the same level on the whole external wall.
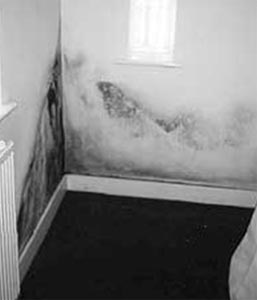
Condensation will often settle on external walls causing mould on walls in this classic pattern, which shows where the walls are coldest
Failed Wall Ties
One other cause of damp walls you could consider is where a wall tie in a cavity wall has become compromised and is allowing water to travel along the tie from the external wall and on to the internal wall.
We explain damp being caused by wall ties more thoroughly in our Damp in Cavity Walls DIY and information project.
If you are in any doubt how your walls are getting wet then you could perform a simple test.
Clean and dry the area and then tape a square of aluminium foil over a test patch, about 30cm (1 foot) square should do it, and use Gaffer tape not Sellotape.
Leave in place for a day or two. When you remove the foil if it is wet on the inside you may have a leak, if it is wet on the external surface then it is likely to be condensation.
If you want something a bit more scientific then you can buy Damp Protect indicators or Condensation Indicator Cards which can help to tell you whether you have a damp or a condensation problem.
With these tests, the chemical strips turn blue where condensation is present and they also show how long a high humidity reading has been present.
The reading is what is called ‘non-reversible’ which means that it always shows the highest recording even if the humidity levels then fall again, so you can always see what the maximum reading was.
Preventing Condensation
Now we have defined condensation, you know what the problem is, and what the symptoms are, the next thing you want to know is how to prevent condensation. Put simply ventilation is pretty much always the cure for condensation.
How do I Stop Condensation?
As soon as warm air, containing vapour, hits a cooler surface, it will condense. This is most obvious on windows, mirrors and wall tiles, but condensation on walls and ceilings is also happening a lot of the time, quite unnoticed.
If we insulate our homes and warm the house thoroughly, then this should not happen I hear you cry….. But unfortunately it will!
As most modern homes are so well insulated these days there is very little natural ventilation so all of the moist air that is produced by bathing, cooking, breathing etc. never escapes and simply becomes condensation.
The only way of preventing this is to provide ventilation. The warm air, containing the water vapour, will rise and circulate around the room until it finds a cooler surface, unless we let that air out and some cooler air in.
In order to ensure that there is good ventilation in your home, a change of air is recommended in all rooms of the house once a day, at the very least, preferably every few hours.
Improved ventilation can help prevent condensation forming and aid in resolving problems like wet internal walls and black mould issues. However, for a total solution there are some products and equipment that you can use to solve the problem.
In these simple steps below we tell you all you need to know about preventing and treating condensation.
Condensation Problems and Solutions
There are plenty of DIY condensation solutions that you can use in your home. They do not need to be expensive, and treatment will depend on the problems you are experiencing.
Preventing condensation forming in the first place is the easiest solution, but in this section we run through other treatments if damage has already occurred.
As previously mentioned condensation in our homes is most obvious on mirrors, single glazed windows and wall tiles, but it may also happen on walls and ceilings, particularly in areas of high humidity such as kitchens, utility rooms and bathrooms.
Measure Relative Humidity – Find the Cause of Your Condensation
The amount of water vapour in the area is the key to condensation forming. The moisture content of the air is known as Relative Humidity or RH.
In order to avoid condensation we need to keep the moisture content of the air between around 55-65% Relative Humidity.
If we insulate and warm our house thoroughly, you might think that condensation will be avoided, but unless we keep the moisture content of the air below this level then condensation will still form on the coldest surface.
You can measure the moisture in the air using a Hygrometer, otherwise known as a Home Humidity Monitor pictured below. These are available online or from your local DIY store.

Hygrometer or Home Humidity Monitor
These Home Humidity monitor models have a memory feature, so you can keep a record of damp levels and whether your relative humidity level is going up or down. This will also help you gauge which household activities are causing the most condensation, if you take measurements before and after common condensation causing tasks.
Use a Dehumidifier to Remove Moisture from the Air
To control the Relative Humidity we need to balance heating with ventilation, or use a dehumidifier to extract moisture from the air.
Use a Hygrometer to show you the actual Relative Humidity level in the room. If you are not able to measure the RH it makes getting the right balance between heating and ventilation difficult to achieve.
A dehumidifier is an electrical mechanical device which removes moisture from the air using the same system of condensation that causes all those problems!
A fan sucks air into the machine and passes the moist warmed air from the room over a cooled plate, the moisture in the air then condenses on the plate and runs into a tank within the machine.
The tank in the dehumidifier will need to be emptied periodically (depending on the amount of moisture in the room) but it will cut off when the tank is full so it can be safely left to run if you cannot be in while it dries the area.
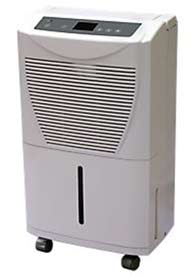
A dehumidifier will quickly dry out a damp room and can be wheeled into each area of the house (although care should be taken using electrical equipment in kitchens and bathrooms)
You need to close windows and vents when you are running your dehumidifier, otherwise you will be trying to dehumidify the world.
Using a dehumidifier is an efficient way of removing moisture from the room if you are suffering severe condensation problems.
Most Dehumidifiers give off some heat (like a fridge) however we have known them to lower the room temperature, so it is not necessarily any better than opening vents and windows to ventilate the room in terms of keeping warm in your home.
Dehumidifiers can also be quite expensive to run, so they are really only a temporary measure. You don’t have to buy one as they can easily be hired from your local hire centre, and are useful to employ when a room has become very wet due to condensation build-up over time.
Once the room is thoroughly dried out you can then just use ventilation to keep condensation at bay.
I have Condensation but I don’t want to leave my Window open
If you don’t want to open a window (because you are a chilly mortal), or you don’t feel safe leaving a window open while you are out at work, then you can fit trickle vents to your windows.
This DIY job is not difficult and we explain how you can do it yourself in our Fitting Trickle Vents Project.
The vents come in two halves, one for the inside and one for the outside of the window. Several holes are drilled through the top of the widow head to allow air passage into and out of the room.
There are integral flaps fitted so the vents can be closed in really cold weather, and insect grills keep all the creepy crawlies on the outside! We fitted them to our old house in Frome, Somerset, which had timber single-glazed windows which were prone to condensation (see below).
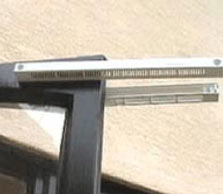
Trickle vents come in two halves and fit either side of the window allowing ventilation without opening a window to solve window condensation
Tips To Stop Condensation
Effective condensation control is all about lifestyle, once you get the situation under control you will start to automatically put into place the measures that will stop condensation forming.
Here is our quick guide to condensation prevention:
- Do not push furniture right up against the walls, especially external walls which are often the coldest in a room. Keeping furniture a little further away from the walls means the air has a free flow around the room
- Do not fill cupboards to bursting point, again, allow the air to flow
- Make sure that your loft insulation is not blocking the ventilation provided by the gap between the facia boards and the house wall. In modern houses there are often purpose-made ventilation grilles and vents in the loft, and you should keep these clear of blockages
- Install cavity wall insulation to help eliminate cold spots on the internal walls. You must first ensure this complies with building regulations for your home.
- Have central heating or underfloor heating fitted if possible
- Have heating thermostatically controlled wherever possible
- Ventilate tumble driers externally, or have a self-condensing model
- Install extractor fans in the kitchen and bathroom. The best models are available with a humidistat control, which means they are automatically triggered to operate when the humidity in the room rises
- Install trickle vents in your windows
- If you already have trickle vents make sure you open them for the majority of the day to allow a change of air and improve ventilation in the home
Fixing the Causes of Condensation Problems
As we have now covered, condensation is an underestimated cause of damage to our homes. When people find they have a damp room with black mould, they usually assume it is a leak or rising damp that is causing the problem, but this is rarely the case.
Condensation can cause significant damage to paintwork, wallpaper and especially plasterwork and plaster board.
So once you have the relative humidity under control you will need to repair the damage once you have sorted out your underlying condensation problems.
Treating Black Mould
The main symptom of condensation is black mould on walls and ceilings. This can show up as small black spots or in bad cases can make the whole area black and ‘sooty’ or you could get mould which is white and fluffy which looks a bit like the walls have tonsillitis!
This is unsightly and damaging to your interior decoration, but it can be extremely harmful to your health too. People who are sensitive to irritation, such as asthmatics, can be adversely affected by the airborne spores, so removing the mould is a must!
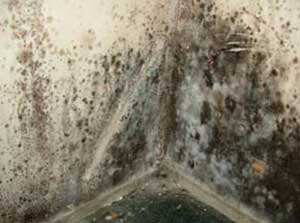
Black mould or mildew will thrive in the moist conditions created by condensation and as well as damaging your paint and wallpaper it can be harmful to your health (pictures courtesy of Property Repair systems)
If your walls and paintwork have been damaged by black mould you should first thoroughly clean and treat the area, and then redecorate with anti-condensation paint.
We look into how to do this in more detail in our guide ‘How to Treat Black Mould’ below.
You need to use a solution of anti mould cleaner to wash the affected area to kill the spores and help to prevent the mould regrowing.
This should be done before you attempt to redecorate, as simply washing off the mould with detergent and then redecorating will not kill the spores and the mould is likely to regrow, even through anti-condensation paint.
This will be most effective where you have dealt with the underlying problem of condensation.
How to Clean and Treat Black Mould
- Firstly, spray the effected area with an Anti-mould killer spray cleaner and leave for the manufacturers recommended time so that the solution kills the mould and any remaining spores
- Thoroughly clean the area, preferably with sugar soap (mixed with water to the manufacturer’s specifications) or detergent with water to remove any grease. Wear Rubber gloves and a breathing mask.
- Rinse to ensure that the area is grease-free.
- If this hasn’t removed all the flaking material then rub the area down with fine sandpaper so that you have a smooth sound surface.
- If you have sanded the area, rub down with a dampened lint-free cloth to remove all the dust.
- Using the anti-mould killer or treatment, treat the area fully making sure that you work the solution into any nooks and crannies with a brush. Allow it to dry without washing off
- Next, prepare your topcoat paint. Add any paint treatment (if using this) to your paint at the manufacturers recommended rate and then mix it in thoroughly to ensure that you get an even coverage across your surface
- If the area is stained, treat next with a stain and damp seal paint which is also available from most DIY stores
- Once that dries you are ready to paint on your topcoat. To help avoid black mould reforming on your newly redecorated walls and woodwork, use anti-condensation paint. This is special paint which is hygroscopic, allowing the paint to ‘breathe’ and makes it ideal for kitchens, bathrooms and shower rooms. Alternatively, you can incorporate anti-mould additive to your choice of regular paint for a similar effect
- If you are replacing damaged wallpaper, it is best to strip off the old wallpaper and treat the walls as above, and then to simply repaint the walls rather than replacing with wallpaper, because mould loves to grow on damp wallpaper lining. If you feel you must hang wallpaper again then use an anti-condensation wallpaper and anti-fungal (anti-mould) wallpaper paste.
Treating Efflorescence
Condensed moisture can also react with the salts in skim plaster, masonry and stone in your walls. This can cause efflorescence or ‘salting’, which shows up as a fluffy or crystalline coating on the surface of the wall.
If this has happened to your walls you should sand off the salts and then paint on salt neutraliser to neutralise the salts before redecoration, so that they do not simply reoccur and damage all your hard work.
There are many types of salt neutraliser available and for a selection, visit your local DIY store.
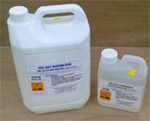
Salt neutraliser to treat efflorescence on internal walls
If you think the salting might be caused by penetrating damp then you need to find out for sure what is causing the damp. You can visit our Diagnosing Damp Project or you can consult a structural engineer.
If the problem is diagnosed as penetrating damp then you will need to look at damp proofing before you try to treat symptoms such as efflorescence and mould.
DIY Doctor has a number of Projects about damp and damp-proofing including one about DIY Damp proofing by injecting your walls and how to fit and repair damaged damp proof course, as well as our project about Dealing with Rising Damp.
Decorating after Condensation Treatment
Once you have got rid of your condensation problem, the walls are no longer running with water, and you have dealt with all that horrible black mould then you are ready to pick out paint colours and start redecorating.
Anti-Mould Emulsion
You can purchase low odour anti-mould coating, again, from pretty much all DIY stores. This paint combines modern paint technology to make it breathable, plus highly advanced and proven biocides.
The paint is guaranteed to protect the surface against unsightly and unhygienic black mould even when there is persistent condensation.
The anti-mould biocide is combined throughout the paint film and it is formulated for toughness, elasticity, water resistance and durability.
Anti-Condensation Coating
For areas which are not subject to abrasion and washing such as ceilings, the underside of roofing sheets, steel building frames, pipework and ducting, and the inside of cupboards, you can use an anti-condensation paint.
Anti-condensation paints inhibit condensation by absorbing moisture and improving insulation. Most of the time they also contain a biocide to protect the paint in the can against mould growth.
Anti-Condensation Wallpaper
These are specially formulated wallpapers that inhibit mould growth and allow walls to breathe. They can be used on walls and ceilings and they are usually tough and hardwearing.
They are as easy to hang as normal wallpaper so they are a DIY solution to condensation.
There are also foil wallpapers which can be hung on the wall first before papering over with normal paper, but these are not really a condensation solution.
They are more suited to areas with no damp proofing or penetrating low level damp such as basements.
Condensation has caused the wallpaper to peel off this wall, and mildew is growing on the paper causing discolouration
Practical Tips to Stop Condensation
Hopefully in this project we have provided you with a load of DIY condensation solutions which will help you deal with condensation, but because it is so long we thought we would give you a quick round-up.
How to Stop Condensation in 10 Easy Steps
- Ventilate your house – change the air once a day. Open a window, or fit trickle vents. Where you have trickle vents fitted make sure you leave them open.
- Fit a fan and use it – make sure your bathroom fan is working while you are bathing and showering, use your kitchen extractor fan when you are cooking.
- Don’t dry washing indoors – if you have a tumble dryer make sure it is properly vented or buy a self-condensing model.
- Use a Dehumidifier to quickly dry out an area that is very wet.
- Use a low-cost digital Hygrometer to help you keep your humidity between 55-65% this is the best environment for comfortable living. Don’t forget you can use memory setting to monitor levels of relative humidity in your building throughout the day.
- Cold spots are building defects and may indicate failing wall ties, so use an infra-red Thermometer to find any cold spots, as well as badly insulated and damp areas.
- Test walls and floors with a Damp Meter to make sure that you don’t have water ingress or leaks.
- If you have wet walls and want to be sure you have condensation use Condensation Test Strips in affected areas. They will change colour if condensation occurs, ruling out some other types of defect.
- Wash down all surfaces, which have been subject to mould growth, with Anti-Mould Cleaner prior to redecoration.
- Incorporate Anti Mould Concentrated Additive to all paints that you use (unless you are using Anti-Mould Paints).
Condensation in the home can be a total nightmare and apart from damaging wallpaper, paint and plaster it can have a very damaging effect on your health, but as long as you carefully manage your heating and ventilation, it’s certainly something that can be controlled fairly easily.

