Scribing timber and indeed scribing many other materials such as tiles, carpet, laminate flooring etc is a job that you are most likely going to run into if you are actively involved in DIY or construction.
Scribing a piece of timber so that it can be shaped to fit is in most cases required where an object such as pipework boxing, skirting board, a shelf, kitchen unit or other needs to be fitted against an uneven surface such as a stone wall or a similar shaped surface.
Obviously, you could just place your shelf what ever item you’re dealing with up to the surface and leave it at that, but for that polished and professional finish, it’s always going to look better if it’s shaped to fit naturally.
Scribing or marking out an odd shaped cut to fit a uneven or random surface is relatively easy if you know how, but if you’re not well practiced in this technique, it can be easily messed up and the final job will most probably not be a satisfactory one.
With this in mind, the key really is to take your time and practice, so read on below for some of the tips and tricks used by the professionals and in no time you will be scribing and cutting the most random shapes imaginable, absolutley perfectly.
What is Scribing?
Cutting timber, tiles, carpet etc around difficult shapes is a process known in the building trade as “scribing”. According to the dictionary, the act of scribing is defined as:
to mark or score (wood or the like) with a pointed instrument as a guide to cutting or assembling.
Traditionally, woodworks would have use a bradawl (as seen in the image below). This is a fairly small hand tool with a sharp pointed end.
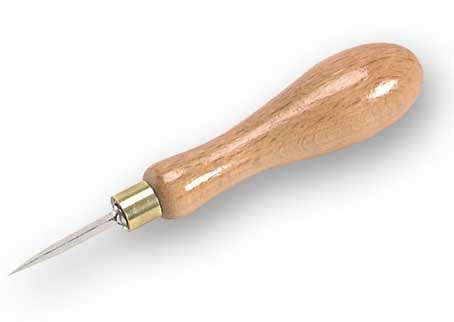
A traditional bradawl for scribing and marking timber and other objects
The pointed end is used to scribe a line on the object you are wanting to cut and once done, you then have a clear line to follow to ensure your cut is accurate.
Aside from the actual cutting, the sharp point of the bradawl also “scores” through the timber grains, providing an easy start for your saw.
Howadays, the bradawl has been mostly replaced by the pen or pencil and this the case of this project, a compass, but essentially they all do the same job, provide a clear, easy to follow cutting line.
Scribing a piece of timber using a pair of compasses
As we have mentioned above, it is one of those jobs which needs some practice to perfect, and the easiest, least expensive way of practicing is with a cardboard template or an old off-cut of timber.
Scribing is especially useful when fitting shelves to “wayward” and uneven walls and ceilings, it can give great satisfaction when buckets of filler go unopened!
What Tools do I Need for Scribing?
The main tool that we will be using for this project will be the humble compass or pair of compasses as they are also known (as seen below).
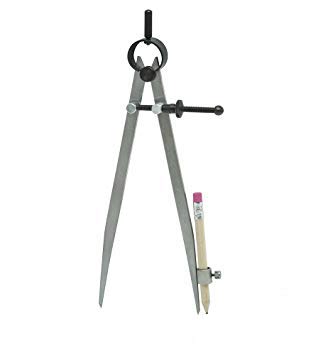
A precision or engineers compass (or pair of compasses) with adjustable legs
There are several different types of compass; ones that feature either a bradawl-style point or pencil lead in the marking arm and ones that allow a pencil to be inserted that handles the marking.
There isn’t really a right or wrong answer to which one you should use but we do tend to go for the ones that hold an entire pencil, mainly because leads can break easily and a pencil is much easier to source than just the lead!
Saying that, we would alwasy suggest that you opt for an actual precision or engineers compass that features a threaded adjuster that sets the width of the legs.
This particular setup ensures that the legs of the compass do not move while you are scribing as this could cause inaccurate marks and any subsiquent cutting to be way out.
Scribing Timber to Surfaces or Cutting Around a Difficult Shape for a Perfect Fit
Now that we have established the tool we will be using, the next step is to actually get on with some scribing.
For the purposes of this project we are going to be fitting a shelf to a rough stone wall with a very uneven face. Regardless of what surface you are fitting to and what object you are fitting, the principals outlined below should be the same.
Place the Shelf (or Other Object) Flat to the Surface
This may sound a little contradictory as the entire reason we are doing this is because we don’t have a flat surface to fix to.
What we mean here is position the shelf (or other) on the surface so that it is totally plumb level in all directions e.g. horizontally and vertically.
To ensure your shaped cut is as accurate as possible and the final fit is as good as it can be, your scribing needs to be accurate. If the shelf is dropping along it’s vertical level, then your scribed line is going to be too close to the edge touching the surface.
Likewise, if your object is not level horizontally you are going to be tracing sections of your fixing surface you’re not even going to be fixing to and again, the finished cut will be way off.
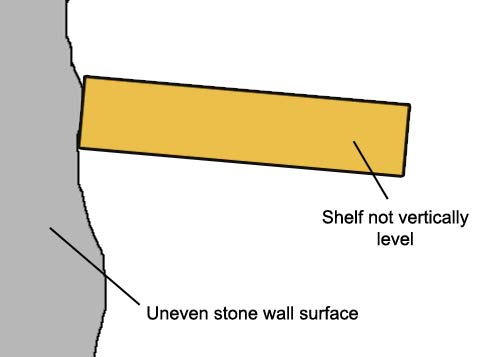
Shelf positioned against surface but not leveled vertically
At minimum, it’s best to seek some assistance for a second pair of hands to hold the item while you level it and then scribe your marks, but ideally it’s best to temporarily fix the item to the surface.
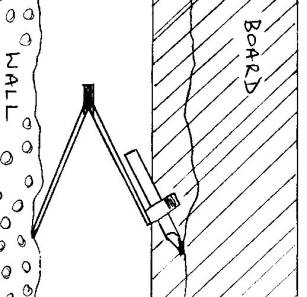
If you’re going to be scribing a floating object such as our shelf, this can easily be done using some angle brackets. Fix the brackets horizontally level (use a spirit level to check) ensuring they are positioned at the correct height and span and then sit your shelf on top and clamp it up with some clamps.
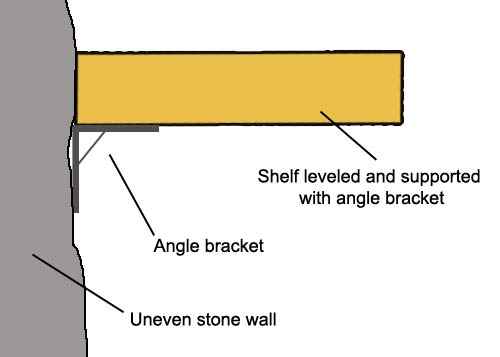
Using an angle bracket to level and support shelf for scribing
For other objects such as such as kitchen units and other items of furniture etc position them in the exact place they are going to reside in as flat to the uneven surface as possible or with worktops, position the units in place and then rest the worktop on top.
Set the Compass and Check Your Measurements
With your shelf or other object now resting in place ready for marking, before we actually start our marking or scribing we have to check our measurements.
By this we actually mean the distance that you set the legs of your compass apart as this will ultimatley dictate how much of your object you end up cutting away.
In some cases this may not matter too much but in others this may mean the difference between a job well done and one that’s sadly lacking.
For example if you are fitting a worktop against an uneven wall but the worktop also requires a uniform lip on the front edge that sit’s over the top of the unit doors or drawers, this will need taking into account.
If you take too much off the cutting edge, this is going to pull the worktop back decreasing the lip at the front.
Another factor here is how uneven the surface actually is e.g. how far does it protrude from what would be the furthest or lowest dip in the wall. If you don’t cut away enough then your object won’t sit flush.
To measure this accurately is not a simple job! The easiest way to do this is, with your object sited flat to your uneven surface, use a tape measure to measure each area where it’s not touching along it’s length and ensure that you set your compass legs to this width plus a few milimeters just to be sure.
Using this method you should ensure you remove enough material and still get a great fit.
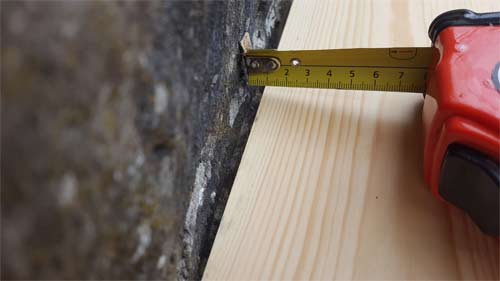
Measuring the deepest depression in your uneven surface to ensure you remove enough material
Using a Compass to Scribe a Cutting Line
With your object, in this case a shelf, in position and your compass set, you’re now ready to mark or scribe your cutting line.
Starting right at the edge of one end, hold your compass at 90° to the shelf or item you’re working with, with the marking arm over the shelf and the other touching the face of the surface you’re shaping to.
Move your compass along the length of your shelf slowly, taking your time and ensuring that your scribe line follows the undulations of the surface.
Keeping your line true is the tricky part and the one that takes the most practice. Additionally, ensure your compass stays fully upright at all times.
Once you reach the end you now have your cutting line fully marked. Remove the item to be cut from it’s current location to a stable, flat surface such as a work bench and now trace over your line to highlight it and ensure you can easily follow it when cutting.
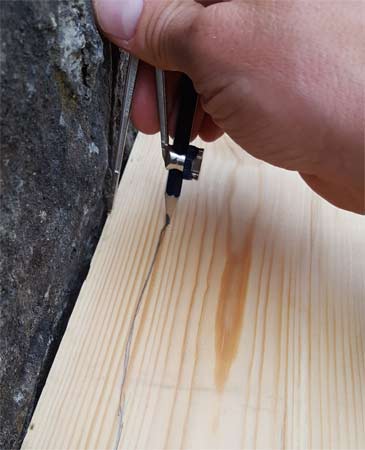
Scribing an uneven cut on a shelf using a pair of compasses
Cutting Your Scribed Line
The final job is now to make your cut. Probably teh best tool to use for this is a jigsaw, but if your shaping is only very slight, instead of cutting it may be worth using a sander, plane or file/rasp as you will have much more control over teh amount of material you remove.
Before you start cutting or shaping, make sure your item is clamped securly to a solid surface and won’t move.
As with your marking, take your time when cutting and don’t rush and becareful not to remove too much as you can’t put it back!
Once you’re done cutting, position your shelf or other item back in place for a test fit. If all is well you should have a nice snug fit and all that’s left to do is tidy up your cut with some fine grade sandpaper.
If not, you are going to need to put it back in place and see where you’re not quite as accurate as you could be and mark these areas.
As this type of fine tuning is probably only going to need small amounts of material removing, use a file and sandpaper and keep checking the fit to make sure you don’t remove too much.
Scribing timber and for that matter any other objects to shape them to fit odd and uneven surfaces is a handy skill to have and, once you’ve got the hang of the techniques involved, is probably one that you will find your self using time and time again, but it does take some practice.