When installing Venetian blinds, Roman blinds and Vertical blinds, they all follow the same routine (pretty much). It normally involves fixing a bracket or brackets (or the entire carriage) to either the internal area of the window recess (top fix or recess fix) or above the top of the window (face fix).
The blind itself or its mechanism is then housed in a box called a blind carriage. The carriage (if it hasn’t been fixed directly to the wall) is then fixed into the brackets and your blind is then already to go.
Vertical blind carriage and fixing within window recess
In most cases, the carriage will be secured within brackets and these brackets themselves will be fixed to the wall.
Depending on the type of blind you are fixing will really depend on what brackets are used. Even a single type of blind (e.g. Roman blind) could potentially have several different types of bracket, depending on who has manufactured it. To these ends we will explain below the general methods of fixing the brackets as, in pretty much all cases, this will be the same.
Different ways of Fixing Window Blinds
Blinds can be fitted in two ways, either on the face of the wall above your window opening, called "face fixing" or up onto the soffit or head of your window opening. This is called a recess or a head fitting. Before you actually fix it in place, you will need to make sure that it is indeed the correct size.
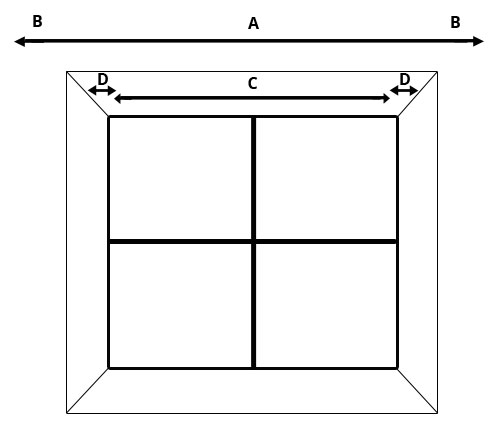
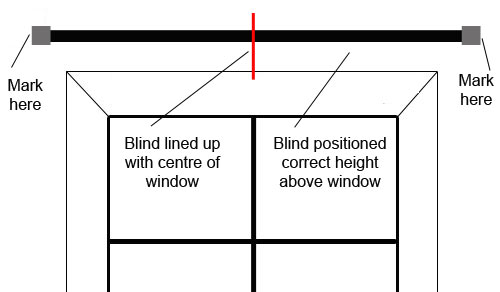
Centre the blind to the window opening
Face Fixing
For a face fitting, using the diagram above, the centre of your blind carriage should be in the centre of your window opening. This means that any overhang, demonstrated by the figures B should be the same.
One thing to be aware of is that it is a good idea to have a bit of an overlap between the blind and the wall, so that the blind runs over the wall by at least 8cm. This way, once closed, it should block a fair bit of light also, but if you are not interested in achieving this, ensure the blind is the correct width for your needs.
It is also worthy to note that once you have found the centre you will have to decide how high above the top of the window recess you fix your blind. Again, make sure it goes up at least 8-10cms if your goal is to block light.
Recess or Head Fixing
For a recess fixing, the gap either side of your blind (figures D) should be the same.
Again, depending on the type of blind you are fixing and the brackets included with it, may dictate where they are fixed. In the majority of cases, brackets will be fixed to the head of the window recess, but we have seen some that need fixing to the sides of the recess.
With these types, once fixed in position, they will provide more than enough fixing strength but the problems comes in actually fixing them in place and getting them level, not to mention, ensuring that the blind itself or carriage are the exact width required!
If you have these types of fixings, just be aware of the need for accurately measuring the width of blind you need.
As with the above, if your main aim is to block light from the window then you will need your blind to run the full width within or over the recess so that it blocks as much light as possible.
Additionally, most blinds can be universally fitted as the brackets feature fixing points for both face fix and recess fix, but some blinds are more suited to fixing in a certain way:
- Roman Blinds: Can be fitted both inside and over window recess (face and head fixed)
- Venetian Blinds: Can be fitted over and inside the window recess (face and head fixed)
- Vertical Blinds: Generally, more suited to fixing inside the window recess (head or recess fixed)
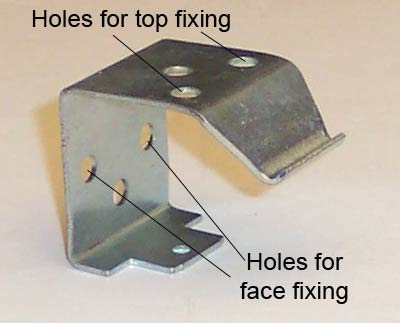
The different fixing points on a bracket for face and head fixing
Measuring the Size of Blind you Need and Getting it Central
All blinds are fairly easy to fit but require accurate measurement at the start to make sure you have the correct size of blind and it is positioned in the correct place in the window reveal or over the window itself.
Your chosen method of fixing (outlined above) will pretty much dictate how you measure your blind in terms of whether it needs to fit to the exact recess or whether you are face fixing so can be a little more flexible with your measurements.
To measure for the size of blind you need:
- Face Fix: Measure the width of the window recess and then add on 8-10cms either side, as required, if you want the blind to cover the entire window area
- Head Fix: Measure the width of the window recess and then deduct 5-10mm or so from either end to allow for a little movement if required
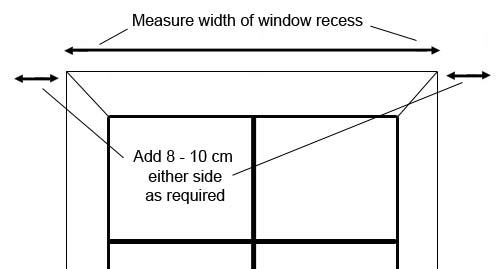
Measuring for a blind that is going to be face fixed above window recess
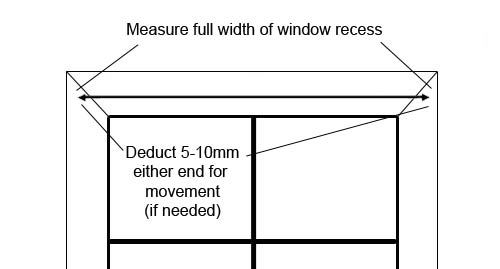
Measuring for a blind that is going to be head fixed within the window recess
One final point to be aware of when measuring is that both the carriage and the edges of the blind should be equal in width.
If the sections that actually make up the blind extend beyond the carriage you will have to take this into account when measuring, especially if you are head fixing as if they are too close to the faces of the wall they may not open or close correctly.
Additionally, always measure your window in three places – top, middle and bottom, from the top to the bottom of the recess and also in three places (left, middle and right) for the width. Although your window or even door recesses looks square it might not be so by measuring you will be able to tell this.
If it’s not and you are going to head fix, use the smallest width measurement for the width and the longest height measurement for height.
Which ever fixing path you have chosen you will need to make sure the blind is central once in place. This is really more of an aesthetic thing, although if your aim is to block visibility, if the blind is too far to the left or right then it may not end up covering parts of the window and also any moving parts may be too close to the walls surface to allow them to work properly.
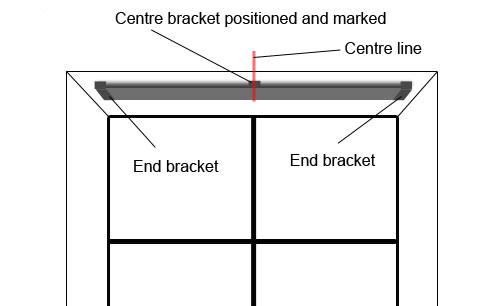
To guarantee that the blind will be central, the easiest way is to measure the size of the window opening and mark the centre with a pencil. Then measure the length of the blind carriage and place a mark on that. You can use this method for both types of fixings e.g. face fixing or recess.
When the blind is fitted the two marks should line up meaning you have the centre of the blind in the centre of the window.
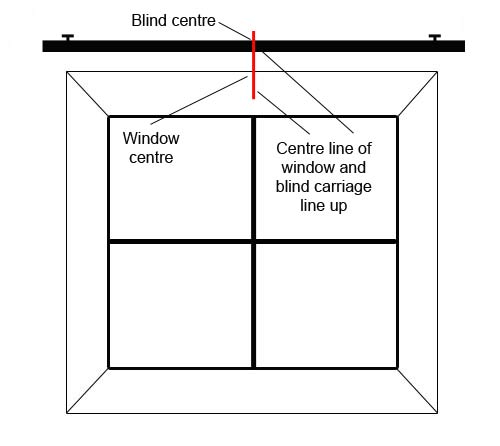
Centre line of the window and blind should both line up once fixed in place
Fixing the Blind Brackets or Carriage to the Wall
When you are 100% sure about the position of your blind carriage, the next job is to fit the brackets that hold the carriage in position, unless the blind requires the whole carriage fixing to the wall.
As we have established, there are numerous different types of bracket for different makes of blind but in most case the bracket is fixed to the surface using the normal fixing technique of drilling a hole, adding wall plugs and then screwing the bracket up. The carriage then clips in or slots into each bracket.
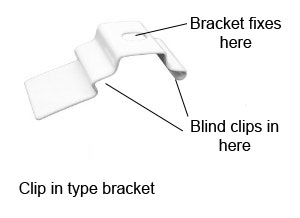
Clip-in type bracket for blind carriage
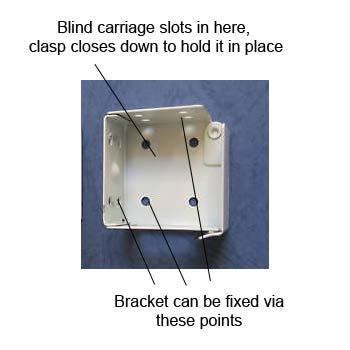
Slot-in type bracket for blind carriage, mostly Venetian blinds
There should be at least two (sometimes three) brackets with your blind. If you have two, then each should be fixed near either end and if there are three, one at each end and one in the middle to distribute the weight of the blind evenly between them.
If you are fixing the entire carriage to the wall, then in most cases there will be three fixing points inside the track of the carriage, again at opposing ends and then one in the middle.
Fixing the Brackets in Place
For face fixing your blind, follow the below steps:
- You will either be fixing brackets at either end of the carriage or above:
- Either end: Place the brackets onto the ends of the carriage and then position the whole lot above the window, lining up the marks on the centre of the carriage and centre of the window reveal that we made earlier (you may need a second pair of hands to help you with this). Move it around until it is at the desired height and then, using a pencil, mark the wall at either side of the bracket so that you know where it needs to be fixed. Remove blind and take the left hand bracket off and position on pencil mark on wall and then, using the pencil, mark all the fixing holes on the bracket, on the wall so you know where you need to drill your holes
- Above: Using the left hand edge of the window recess as a guide, measure upwards to the desired height that you want your blind to be and mark with a pencil. Next, place the bracket on the pencil mark and then mark all the fixing holes of the bracket on the wall so you know where to drill
Position blind and then mark desired location of brackets
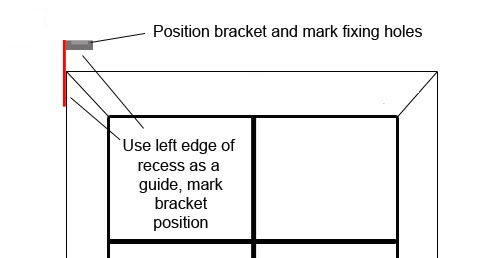
Using the left hand edge of the window recess, measure and mark bracket position
- With the fixing holes for the first bracket marked, take you drill and suitably sized drill bit (6mm should do the job) and drill out all the required holes
- Next, insert a wall plug (should be supplied with your blind kit, if not, the red wall plugs are the ones to use) into each of the holes, knocking them in with a hammer if needed
- Position the bracket in place and using a screw (these should be supplied with your blind kit, if not, screws of 6-10 size should do), screw it into the centre fixing hole and tighten until it just starts to pinch up
- Now, level the bracket using a small spirit level and then use a long spirit level (6 feet should do) lay it on top of the bracket and then move to the other side, lifting the end of the level until the bubble indicates it’s level. Again you may need some extra help with this. Once level, mark the position on the wall with a pencil
- Now, take the blind carriage and position it into the first bracket that is now fixed to the wall. Move to the opposite end and raise the blind up until it is level with the mark you have just made. If using an end bracket, fit the bracket and then mark the edges so you know where to re-position it and if using top fix, fit it to the carriage and slide it to the edge of the recess, lining it up with the level line you have just made. Again, mark the edges of the bracket
- Remove the blind and place the bracket back on the marks that you made and then mark all the fixing holes for the bracket, remove it and then drill the marked positions out, insert wall plugs and screw the bracket up in just one position (the centre if possible) until it is pinch tight
- With the brackets fixed, again, fix the carriage into them to check that it is centrally aligned with the window and level (place your spirit level on top of the carriage to check this). If you find that you are not central or level, work back through the steps above to re-position the brackets as needed or if it’s not too bad, you may decide to just live with it!
- If you have a third, middle bracket, fix this bracket onto the carriage in the centre (using your centre lines as a guide) and then pencil mark the bracket position
- If all is well, remove the carriage and then add additional screws in the other fixing points and screw all screws up tight
- For the third bracket, position it back on the wall in its correct place and mark fixing holes. Using the same steps as above, drill out centre hole and add wall plug and then screw bracket up in centre fixing hole. Place your spirit level across all brackets and they should be level. If not, reposition and fix as required. If so, screw the middle bracket up tight
- You are almost there – for one last time, fix the carriage back into the brackets and (if needed) fix the actual blind section(s) onto the carriage (following manufacturers instructions – more mentioned below) and then check it all works as it should do. If not, check back through the manufacturers instruction for the blind, but if so, stand back and admire your handy work!
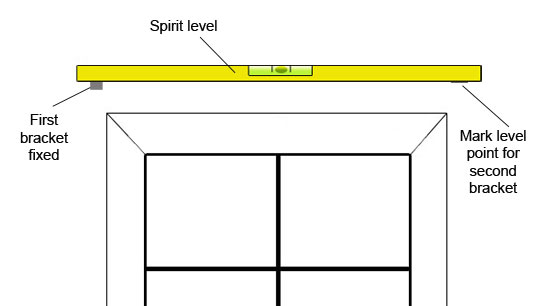
Using spirit level to level second bracket
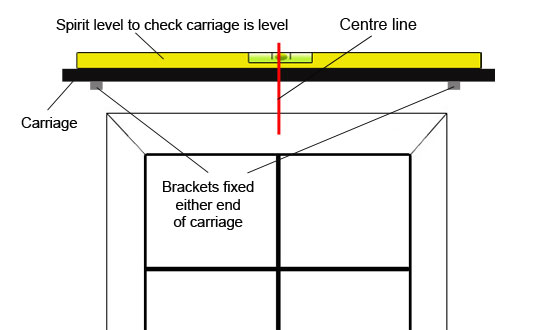
Check that the carriage is both level and central
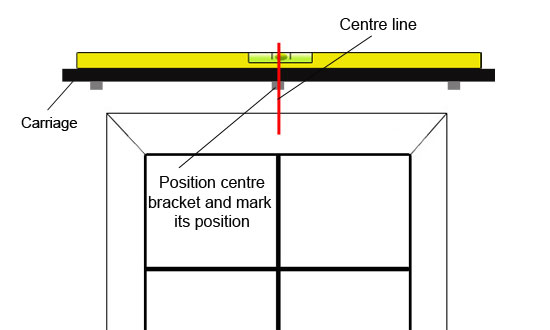
Position third bracket in centre and mark its position
For head or recess fixing your blind, follow the below steps:
- This process is very similar to the above only now you are working to a fixed width e.g. the width of the window recess. If you have measured correctly for the size of blind you need then this should fit perfectly and all you need to do it fix the brackets
- If you don’t know the exact width of your blind (including end brackets if it has them) and the full width of the recess then measure this up now. Once you know this information, deduct the width of the blind from the width of the recess and you should be left with somewhere between 1-4cms
- Next, divide this figure by two and you will have the exact measurement that you will need to leave at either end of the blind to ensure it’s central. With this in mind, measure in by this number at both ends of the head (top) of the recess and mark this point with a pencil
- Now you will need to decide how far from the front of the recess (the window) the blind will go, this is really up to you. Whatever you decide, measure in from the window this amount and mark with a pencil. When marking, line this up with the previous mark you made and this will now give you the position for your bracket. Do this for both ends
- If dealing with end brackets, the above will pretty much dictate where these are to be fixed, but if dealing with top brackets (e.g. ones that the carriage clips in to) then you will want to move these in slightly, about 8-10cms from the actual ends of the blind carriage
- Next, measure in your chosen amount from the mark you made from the end of the blind and mark with a pencil. Now, measure in your chosen amount from the window and add a pencil mark. Again, line the two marks up to set your bracket positions
- Before you start making any holes, take your blind carriage (include end brackets if they are present and also fix top brackets or what ever brackets you are using to the carriage) and position it in place, on the pencil marks just to make sure that all appears level and you are happy with the overall position. You may need an extra pair of hands to help with this
- Take one of our brackets and put it in position on the pencil marks and then mark the fixing hole so you know where to drill. Do this for both end brackets
- Using a suitable drill (mains powered with hammer action or similar) and a suitable 6mm tough masonry drill bit as if you have a lintel above the window, this will be tough to drill into, drill out the holes for your brackets
- Insert your wall plugs, either those that came with you kit or the red-type wall plugs. Knock these in with a hammer if they are a little tight
- Using the screws that came with your kit, or 6-10 size screws if using red wall plugs, screw the brackets up into place and tighten them until pinch tight
- Take your blind or carriage and position it in place, either into the end brackets if you have them or clipped into the top brackets and make sure all fits well and as it should
- If you also have a third, pop the carriage or blind down, add this bracket in place and then put it back into position in the recess. Line the third bracket up with the centre line that you made earlier and mark its position on the wall. This might be a little tricky as there won’t be much room, but you should be able to mark the front and sides if possible
- Remove the carriage and take the middle bracket off. Position it back on the wall and mark the fixing point and drill out and plug as in the steps above. Finally, screw the bracket up until it’s pinch tight
- The final job is to now put the blind or carriage up into place and check that all works. If so, well done, you’re finished! If not, check with the manufacturers instructions for more details about the blinds operation
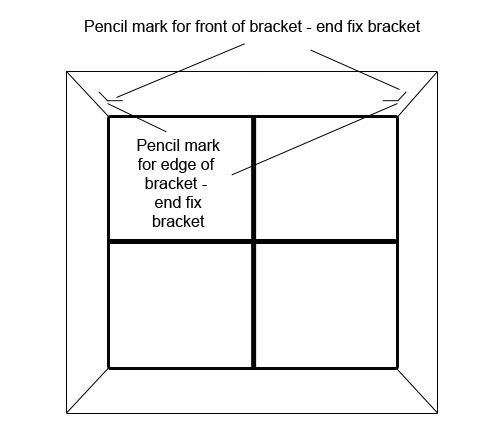
Marking for end fix brackets in recess
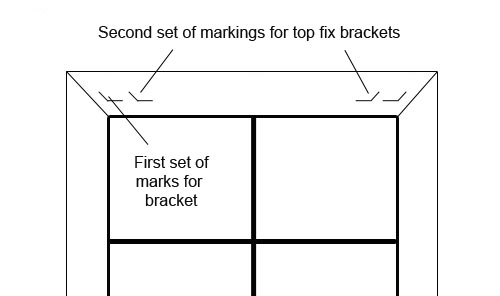
Marking for top fix brackets in recess
Carriage fixed in place to check all square and level and third bracket added and position marked
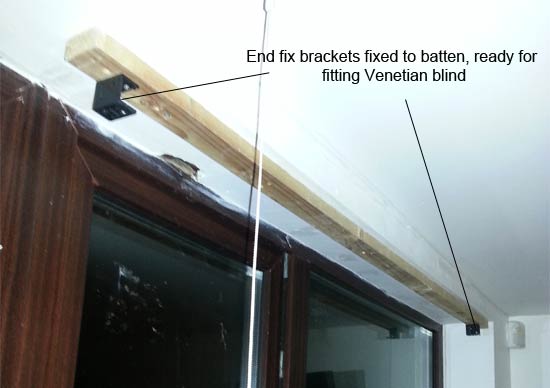
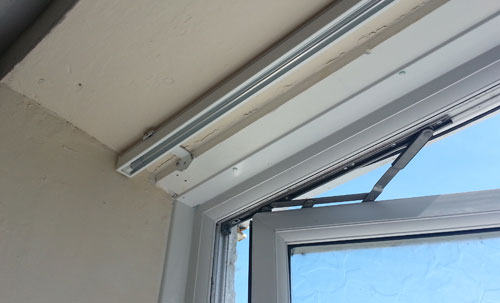
End brackets fitted to batten, fixed inside window recess, ready for installing Venetian blind
Fixing Roman, Venetian and Vertical Blind Sections to the Carriage
Once you have your brackets and carriage in place you may now need to fix up the actual blind sections (or vanes as they are also known) to complete the job.
If you have a Venetian blind then in almost 100% of cases the vanes and the carriage will come in one complete set, so once you have fixed to the brackets you are all done!
However, if you have a Roman or Vertical blind you will probably still have a bit more to do. In most case both of these blinds will come with the vanes detached so you need to fix these in place.
Due to the variety of fixing methods between manufacturers we cannot advise exactly on how to do this but in most cases it will involve clipping each vane (in the case of vertical blinds) on to each clip on the carriage or clipping up the blind material and inserting the dividers in the case of a Roman blind.
For which ever blind you have, refer to the manufacturers full instructions on how to fit the vanes and complete the job. Once all fitted, give it a test to make sure it all works correctly.