On Site Test of the Radclamp Pro Kit
We tested the Radclamp Pro kit on a refurbishing site where the situation was very real and the camera could get up nice and close to film exactly what was happening. This was the first time for many years the radiator had been removed.
This is evident in the video as all of the dust, dirt and cobwebs are exposed ! You can also see on the wall the area of unpainted surface as the brush or paint roller could not get down behind the radiator.
How the Radclamp Pro Kit Works
The Radclamp works by sealing the outlet and inlet holes to, and from the radiator by stretching a rubber seal, on an aluminium frame (called a seal-fork) over the openings. The seal is held in place by a sliding guide bar which puts pressure on the rubber and holds it in place. This allows all water to stay in the radiator while it is being removed.
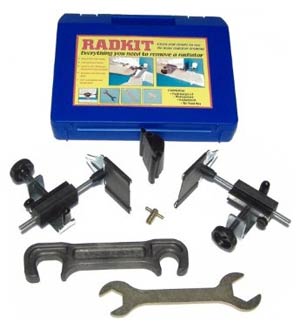
ABD Tools Radkit Pro Radiator Removal Kit
Instructions for Using the Radclamp Pro
Removing a radiator is an easy job. Doing it without making a mess is not!. The Radclamp Pro allows you to remove the radiator with the slightest of spills and no damage to your carpets or other flooring.
- Bleed the radiator of air using the Radclamp Pro bleed key
- Close the radiator valves either side of the radiator using the radiator wrench and the radiator spanner
- Place a cloth under the vales to catch the few tiny drips
- Fit the Radclamps to either side of the radiator making sure the rubber seals are in good condition with no holes or splits from previous use
- Slide the guide bars into the Radclamps and lay the seals on the floor under the valves
- Place the radiator wrench over the valve as shown in the video while you place the radiator spanner over the nut that connects the radiator to the valve. It is worth remembering that this not is connected at the radiator end and when undone, will stay on the radiator, not the valve
- Undo one of the valve nuts and as soon as the nut is free from the valve pull the valve away from the radiator a tiny amount while you slide in the rubber seal fork
- Twist the black lug on the end of the guide bar so it slips into the slot in the seal fork. Twist again so it locks into place
- Push the end of the seal fork and guide bar down the rubber of the Radclamp and tighten the thumb screw in the Radclamp to hold the guide bar in place. Do not stretch the seal rubber too much
- Repeat at the other end of the radiator
- Lift radiator off the wall and place away from the job
- To replace, lift the radiator back onto its brackets and reverse the removal process
Benefits of Using the Radclamp Pro Kit
No Draining Down Required
Being able to take off a radiator without draining down is a huge advantage. If this operation is carried out without the use of a kit there is a huge chance that the water from the radiator will spill out of the ends before you can get your thumb over the ends.
The radiator water is filthy, full of sludge many times and can easily ruin carpets in seconds. Many plumbers use a paint tray to catch the radiator water in as they slide nicely under the radiator. Even the biggest paint tray however, does not hold all of the radiator water and has to be emptied.
The Radclamp Pro kit allows you to remove a radiator with only the minimum of drips from the radiator, which are easily held by a cloth.
Radiator Bleed Key in the Kit
Every central heating system, at some time, allows air in. When air gets into a heating system it bubbles its way to the top as it is lighter than water. When air is at the top of a radiator or piece of pipework, the same space obviously cannot be occupied by water. This means (as heat rises) the top of the radiators can become cold making the whole radiator and sometimes the whole system, inefficient.
Radiators are fitted with bleed valves to allow this air out should this happen. This operation is called bleeding a radiator. Having a radiator valve bleed key handy in the home is a great idea and the Radclamp Pro kit comes with a key which fits nicely into the case maiking it easy to find for future use.
Specialist Extra-length Radiator Spanner
Quite often imported radiators are placed in a house an standard spanners do not fit. Even if the valve nut is standard, most often a wrench, or adjustable spanner is used to undo it. Often the wrench or adjustable spanner slips off the nut making this an awkward and difficult job.
With the Radclamp Pro kit, neither of these is necessary as the kit comes with a radiator spanner which fits all sizes of radiator nut making the job easy. The radiator spanner which comes with the Radclamp Pro is longer than a normal radiator spanner as (using the Radclamp Prod wrench) more leverage can be applied to the valve nut making this easier to undo.
No Loss of Rust Inhibitor or Other Central Heating Additives
By using the Radclamp Pro kit, none of the central heating water is thrown away so rust inhibitors and other additives simply stay in your system. Even the warmth of the water can stay in the system as it is not necessary to drain any of the warm water out and refill the system.
Holding the Radiator Valve in Place
One of the difficulties associated with removing a radiator is holding the radiator valve in place while the radiator nut is removed from the valve. Failure to do this operation correctly can result in the feed pipe to the valve kinking as the valve turns with the nut.
The Radclamp Pro kit contains a special hardened plastic wrench which is designed to hold all radiator valves. By placing this wrench over the valve body, the valve is prevented from moving making it much easier to undo the valve nut and remover the radiator. Furthermore, the wrench ensures that the radiator valve is not damaged as often happens from the teeth of metal wrenches when used to do this job.
Having all the Tools in one Place
There is nothing worse than, having decided to do a job such as removing a radiator, you have to spend two hours looking for the tools to do it! The Radclamp Pro kit comes with a great plastic case which keeps everything in it’s own compartment so it is all there every time you need to use it.
Change or Refix Radiator Brackets
From time to time, especially on plasterboard walls and more especially when there are young children in the house, a radiator bracket will become loose. Refixing this bracket is now an easy job when the radiator can be removed easily by using Radkit Pro.
Painting or Wallpapering Behind a Radiator
Even when using a radiator roller, any decorator will tell you that it is not possible to cover every inch of wall behind a radiator. Now it is! With the Radclamp Pro all walls can be fully painted or papered and left neat and tidy. It is great to know that spiders and other ″creepy-crawlies″ are not hiding behind your radiators.
Laying Ceramic Tiles to Bathroom or Kitchen Walls
Before the Radclamp Pro, laying tiles behind a radiator was a huge job. Now the radiator can be removed in moments making tiling behind it a simple operation.
Fitting Reflective Foil Behind Radiators
So much heat is lost from a radiator when 5% of the heat it gives off soaks straight into the wall behind it. By removing the radiator, reflective foil can be placed behind the radiator which, sooner rather than later, will save you the cost of the Radkit Pro you need to do this job easily.
DIY Doctor Opinion of the Radclamp Pro from ABD Tools
Brilliant! Even our time-served plumbers who take off radiators daily were impressed by this kit. Apart from the kit itself, only a cloth is required to make the most compact toolkit every for this job. Radiators are removed with ease, even if the valve nuts are very tight and no mess is made along the way. If our system allowed for 6 stars, that’s what we would give it! As it is, 5 will have to do.
The Doctor’s Rating
Reviewed by: Mike Edwards

(5 out of 5 stars)
Get This Product Now