
There are a number of options that are open to DIY enthusiasts when it comes to finishing walls with a professional look. Even if you are just looking for information about repairing or maintaining them this section will provide all the information that you need.
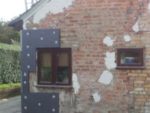
The first distinction to make is between internal and exterior walls, as the finish on an external wall will have to withstand the elements. This means that it will be much more durable and they tend to be rougher in finish.
Things to Consider When Choosing the Exterior Finish to Your Walls
For more information about exterior wall finishes and rendering please see the section which includes projects all about creating, repairing and maintaining render and other exterior wall finishes. There are a number of important considerations that you will need to take into account when selecting the finish to your exterior walls, some of which are not relevant to interior walls too:
- What is the Finish for? This might seem obvious, but there are two main reasons; firstly it might be to protect the walls and house from the elements. Secondly, you might want to alter the appearance of the walls. In most cases it will be a mix of both these, but it is as well to understand the potential limitations you may have and why you are doing the work
- Do you have permission? As the finish will alter the appearance of your home, the local council may have to approve your choice of finish. It is important that you have all the correct permission in place prior to starting work. If in doubt find more information on the Planning Portal
- What’s your Budget? Knowing what you can afford or are prepared to spend on your wall finish will have a big influence on your choice. The cost of simply painting can be as low as £1 per sq m but for a top of the range composite cladding could be hundreds of pounds per sq m
- Who’s doing the work? This is a big consideration as even the most experienced DIY enthusiasts will not be able to achieve some of the more complex finish installations. If you are planning to do the work yourself this might limit your choice (and you should consider the risk of working at height)
- Some other important things to consider It is well worth checking the warranties that come with your choice of finish (if any at all). It is a good idea to check with your buildings insurer to see if there are any implications on your insurance premiums. Also consider if you need to apply the finish to the whole house; sometimes it is sufficient to treat just the lower (or upper) half of the property
Research is very important when making a choice of this kind as your exterior wall finish will probably be with you for a couple of decades or more!
Considerations for Choosing Interior Wall Finishes
The pressure for making the right decision for and interior wall finishes is not quite so great as the costs are typically less and decisions can generally be changed more easily, without costly scaffolding etc. However, it pays to get the decision right first time, so we do recommend doing your research in advance.
The options can be pretty bewildering and, unless you are being seriously radical and innovative, there is a logical way to help make the decision. The primary reason for a wall finish internally is to create a flat surface to apply whichever form of decoration you choose, such as wallpaper or paint for example.
Your main interior wall finish options are:
No Finish
If you are not going finish your walls then there is no any need to apply some form of finishing technique. This will leave the structural elements of the wall visible. Exposed brick or stone work is commonly used to create a dramatic interior design effect, but whilst they are exposed them probably need to be treated to reduce excess dust.
Wet Plaster (on Masonry)
Traditionally this was the way that all plastering was done, be it on plaster laths or directly onto the masonry. Now it is very rare to see this approach done on laths, except in the case of repairs, however it has certain advantages for applying to masonry directly.
Firstly a scratch coat of plaster, known and the “key coat”, is applied. This is scratched, or keyed, before is it dries so that it will provide a sound key for the next layer which is the skim coat. Typically a cement or gypsum based plaster is used, but often lime or clay plasters are used particularly in traditional, older homes. It takes considerably more skill and practice to work with these more traditional materials so make sure that your plaster of choice is experienced. (You can find a skilled plaster here).
This is often the best solution for traditional properties, leaving an even and durable surface. It is relatively sound proof and air tight, however it does require a much higher level of skill to apply, which will inevitably cost you more. You cannot add any form of insulation (internally) to the wall and it does take longer to apply and dry out ready for decorating.
Skim Plaster on Board
This is where plasterboard is fixed to the wall and then a layer of plaster is skimmed over the top of it. The plaster board can either be screwed to battens (which is the technique used for when adding internal wall insulation), or the boards are stuck to the masonry or battens with adhesive, often plaster itself. This technique is known as “Dot and Dab”.
This is one of the quickest ways to finish a wall, and the chances of the plaster showing cracks are much reduced, which makes it a great DIY project. Also, it is possible to add insulation. The issues associated with this technique include the extra space that it can take up, particularly if a cavity with insulation is added. It can also be hard to attached fixtures (such as radiators, shelves and pictures) to the wall and it is not very airtight.
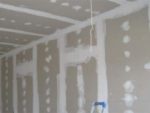
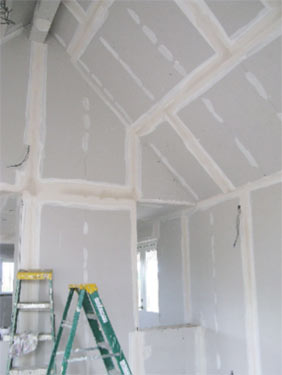
Drylining
This is a North American technique which is sometimes used here. The plaster board is screwed to the battens and the joints between boards, and are filled and taped. Any screw holes or other holes are filled before the wall is then sanded to leave the final finish.
Obviously this is a very quick technique and there is no need for any messy plastering which reduces the cost. This makes it a relatively easy DIY project. There are a number of significant downsides; the finish is always slightly duller even after painting and the wall feels hollower lacking the solidity that you get from a plastered wall. Plasterboard in easy to damage and offer virtually no soundproofing at all.
Drylining before decorating starts
Textured Coating
Textured coating such as Artex and woodchip wall papers can be used to cover uneven walls and ceilings. They are not as popular as they have been, so the interest is typically more about how to remove them nowadays!
The do have a place where it is not possible to get a smooth finish to the wall as a textured coating or finish will mask this very easily. A textured finish is also much easier to apply so this often favoured by DIY enthusiasts. There are issues, other than the fashions of the time, which have lead to it’s unpopularity; It is hard to repair as matching the pattern of the texture is impossible and most significantly Artex which was applied before in the 1970’s and 80’s will have asbestos in it (which was finally banned in 1999). Therefore exercise caution when removing asbestos – for more information see our asbestos project
Interior Wall Finish Innovations
There are a number of recent innovations that we have come across which we believe will come more and more common. Here are some of the best, which you might consider for your home:
- Soundproofed Plasterboards: There are a number of boards that offer improved soundproofing although you do have to pay a fair amount more for them. We have a great deal more information about the options in our project specifically about soundproofing
- Insulated Plasterboards: Most of the leading insulation manufacturers now manufacture insulated plasterboard. Again this is more expensive than normal plasterboard, and will come with a range of insulation values depending on your needs and budget. Find out more in our internal wall insulation project
- Strengthened Plasterboard: There are a range of products from manufacturers such as Xella or British Gypsum which are strengthened so that they can support fixtures such as radiators. They are also more expensive, but do help to overcome an age old problem. There are also boards that have been specifically designed for use in wet areas and so that they can carry the weight of very heavy stone tiles
- Insulated Plaster: Where it is impossible to add insulation to the wall there are plasters, such as Thermalime, which have fibres in the mixture and are said to provide a level of insulation. Clearly they are not as good as a proper insulation solution, but where you have not option every little helps!
- Magnetic Plaster: This will not be for everyone – or for everywhere! British Gypsum have a metallic plaster; it look and works just like a normal plaster but contains enough ferrous material for you to be able to stick fridge magnets etc to the finished article. It is quite expensive, but can be great fun to have more “fridge” space to stick up your “little treasures” art work