Pop riveting is a technique use to join thin pieces of sheet material such as metal, plastic and in some cases timber together where a strong joint is not required. Pop rivets are ideal for joining aluminium or even thin sheet plastic such as Perspex.
Using a rivet gun involves drilling a hole through the two materials to be joined at the point you want to join them and inserting a rivet that has two parts; the pin and the rivet. The rivet gun pin die then slots over the pin or mandrel and when the handles are squeezed, pulls the pin through the rivet which then deforms forming a dome on the underside, joining the two surfaces together.
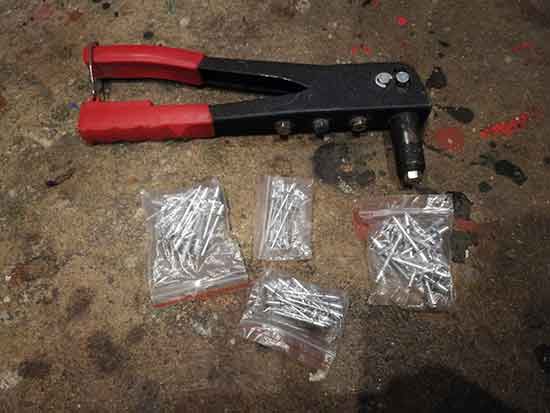
Rivet gun and selection of different size rivets
Once the two surfaces are joined, the rivet pin or mandrel then breaks off leaving the rivet in place and fixing the two surfaces together.
To find out exactly how to use a rivet gun to join two items together, read on below.
Parts of a rivet and a rivet gun
To understand fully how to use your rivet gun and rivets correctly it’s important that you first understand the different parts that make up each item.
Parts of a rivet
The main parts that make up a rivet are as follows:
- Mandrel head
- Mandrel
- Rivet pin
- Rivet head

Different parts of a rivet
Parts of a rivet gun
The different parts that make up a rivet gun are as follows:
- Head
- Handle
- Spare dies
- Pin die
- cavity
- Handle lock
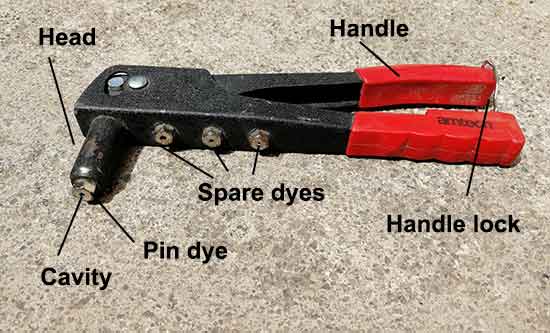
Parts of a rivet gun
Depending on the make and model of rivet gun you have it may come with a selection of additional pin dies screwed in to one of the handles. The spare pin dies are used for different size rivets.
If you look at the cavity opening in the different dies you will notice that they are all slightly different sizes which allow for different thicknesses of mandrel.
Ensure that you are using the correct sized die for particular the rivet you are using. The mandrel should fit fairly snugly inside.
How to use a rivet gun to joint to objects together
For the purposes of this project we are going to be using two scrap pieces of 2mm Perspex, but what ever items you need to fix together, the principles are exactly the same.
Step 1 – Position items to be joined
The first job is to align the objects you are joining together at the point you want to join them and then drill what will be the rivet hole through both objects.
Perspex sheets aligned together ready for drilling
If you are joining two items together using a rivet but the holes already exist e.g. you have drilled out an old rivet and need to replace it with a new one, line up the existing holes and move on to step 3 below.
Step 2 – Drill out rivet hole
Once lined up in the correct place, select the correct sized drill bit for the rivet you are using.
In this case we are using a 4mm rivet we need to drill a 4mm hole.
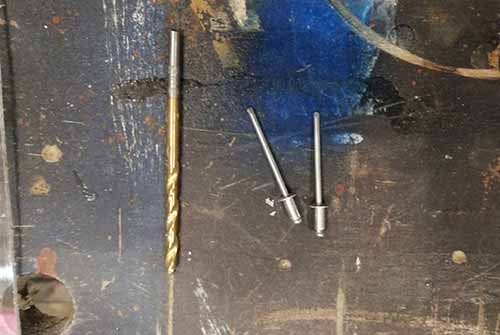
4mm rivets and 4mm drill bit
Pop the 4mm drill bit in the chuck of your drill and position it in the exact spot you want to add the rivet.
If you are drilling brittle materials such as the thin Perspex sheet we are using in this example, be very careful as you drill. Apply too much pressure or move the bit as you are drilling can easily crack materials such as these.
Additionally, drill materials such as these at a slow spped and do not apply too much pressure. You should also use a sharp drill bit and keep it well lubricated.
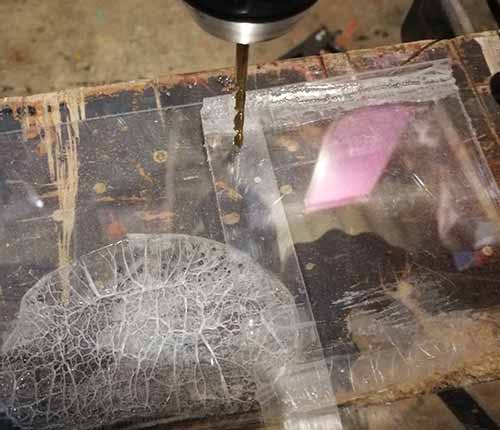
Drilling hole for rivet through Perspex sheets
With the drill bit positioned, drill down through both objects, taking your time. Once through, remove the drill bit and clean around the hole.
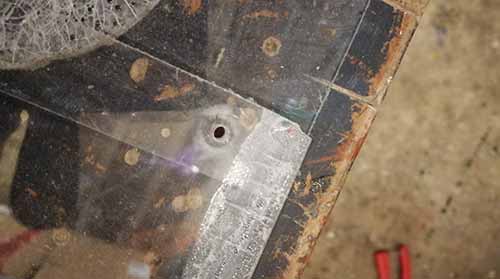
Hole drilled through Perspex sheets
Step 3 – Insert rivet in hole
With the hole now ready, select your rivet and insert the rivet pin in to the hole so that the mandrel is facing upwards as it’s the mandrel that slots up into the rivet gun die cavity allowing you to pull the rivet up tight.
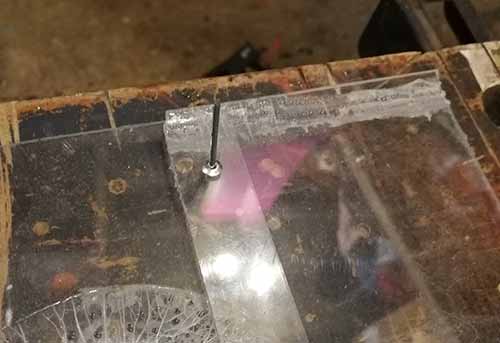
Rivet pin inserted into hole in Perspex sheets
If the rivet pin is tight to fit in the hole you may need to enlarge it slightly using a bigger drill bit.
This is especially the case when dealing with thin fragile materials such as the Perspex we are using here. In some cases if the hole is too tight, as the gun pulls the mandrel up it can cause the rivet pin to expand in the hole slightly and if there is no where for it to go, it exerts pressure on the hole itself and the material it’s wedged against simply splits.
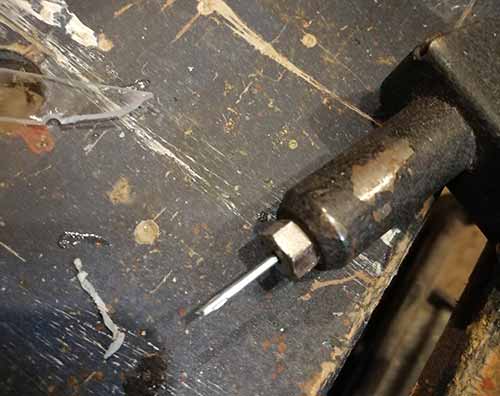
Step 4 – Slide rivet gun die over mandrel
With the rivet in place, slide the die cavity over the madrel until it hits the rivet head.
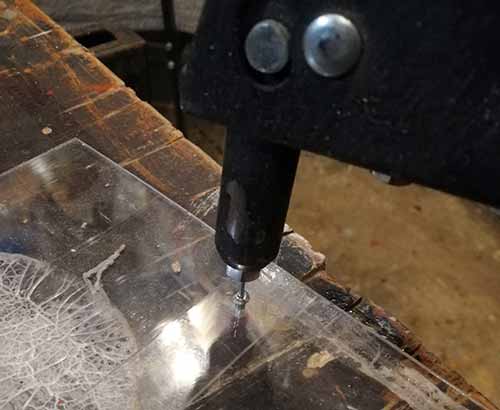
Sliding rivet mandrel up in to rivet gun die cavity
Once the die is in contact with the rivet head, squeeze the rivet gun handles together. To pull the mandrel head of the rivet up fully you will need to pump the handles a few times. They are spring loaded so will open back up again fairly easily.
As you pump the handles you will feel them get tighter and tighter as the mandrel pulls the rivet pin up and crushing it against the object you are joining.
Once it goes fully tight and wont tighten any further the rivet mandrel will snap off signaling that all is now fully secured.
Rivet mandrel snapped off after fixing rivet
With the madrel snapped off your two materials should now successfully be joined.
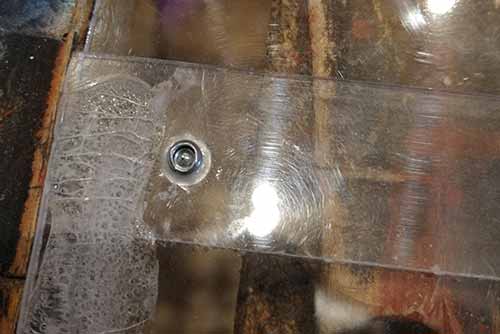
Rivet fully crushed up and fixed joining two objects together
As we are in this example, you have to be very careful when crushing up the rivet if you are joining brittle materials. Too much pressure and it will simply split!
The rivet gun is a very versatile tool and allows you to quickly and easily join two materials or objects together when a fixing doesn’t need to be too strong.