Water Butts: The Basics
More and more homes are now fitted with a water meter, which means that they are now charged by the amount of water that is used rather than a flat rate. Although we think that we have plenty of water, with the dense concentration of population in the U.K., particularly in the South East, we have less water per person than most Mediterranean countries!
The results in the all too common hosepipe ban restricting water usage in your garden. Installing one or more water butts to save rainwater is the best way to create a ready supply of free water for your plants, protecting you from having to go without when there is a ban in place.
Your plants will certainly thank you for installing a butt, as rainwater is much better for plants than tap water. A water butt can be fitted to any downpipe where there is space to sit a container either directly underneath or nearby. They are easy and cheap to fit and can be an attractive feature in the garden.
Choosing a Water Butt
A wide range of sizes and styles are available, allowing you to choose a suitable water butt for every location. If you don’t have much space, slimline models are available. If it’s price you’re concerned with, standard green plastic barrel type water butts are very reasonable and often come with a matching stand and tap, or you can even recycle second hand barrels that you can buy on eBay.
If you have a traditional cottage garden and don’t want a big plastic barrel to spoil the look, then you can buy genuine oak whiskey barrels. Plastic butts in the style of terracotta pots, stone containers and wooden barrels are also available. If you have a large roof and need to store a lot of water, you can connect two or more butts up together or invest in a really large storage tank.
Make sure you purchase or make a stand for your chosen butt so that you can fit a watering can under the tap. A large barrel full of water is very heavy so make sure your stand is either purpose-made or very sturdy. Bricks or concrete blocks can be used to good effect. Not all water butts are sold with taps, so make sure you purchase a suitable one if needed.
All water butts should be sold with a lid, both for safety and to keep the water fresh by stopping leaves and other debris from falling in. If you have young children, look out for water butts that feature a child-safe lid.
Fitting the Water Butt
You can either cut off the downpipe and place the water butt directly below it, with the cut-off pipe going through a hole in the lid, or you can install a rainwater diverter. This is often a better option as it means that an overflow pipe is not required, and it gives more flexibility for sitting the butt.
Whether you have round or square downpipes, you should be able to find a diverter to fit. Place your butt on its stand next to the downpipe, and mark the height of the butt on the pipe. Use a hacksaw to cut the downpipe 3cm down from your mark.
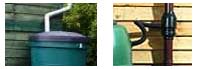
Water butts connected to guttering system
Attach the rainwater diverter to the downpipe where you have cut it off. Attach the piece of pipe you cut off to the bottom of the diverter.
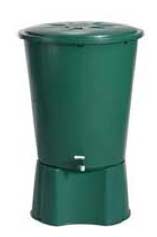
Green plastic water butt
Drill a hole in the side of the water butt, 8cm down from the top. The hole needs to be just the right size to fit the connector fitting of the diverter through. Fit the connector piece in place by pushing it through the hole you just drilled and screwing the supplied washer and nut on.
Attach the diverter to the water butt with the piece of pipe supplied. Fit the lid onto the water butt and wait for it to rain!
The level of the diverter should be such that when the water butt is full, it won’t overflow – instead the rainwater will just go down the drainpipe. If you find your water butt is overflowing, firstly check that the diverter pipe is not blocked with leaves or moss. If it is not blocked, it could be that the diverter level is too high on the downpipe. Try wedging something underneath the water butt (empty it before you attempt to move it) to raise the height.
Water butt connecting kits are available if you want to install more than one water butt to a downpipe.
Some Water Saving Tips
There are some things that you can do to help to make the water you collect in your water butt go that little bit further:
- Use a watering can rather than a hose pipe as this will significantly reduce the amount of water you use
- If you must use a hose use a trigger on it as this will limit the flow to only what you need
- The morning and evening are the best times to water your plants as the water doesn’t evaporate in the heat of the day before it can reach the roots
- The design of a watering can can mean that much of the water doesn’t reach the roots where it is most needed, so be careful with this
- Watering too often can keep roots shallow and weaken plants; wait for signs that the plant is suffering before watering
- Weed away unwanted weeds that might take the water from your plants
- Don’t worry if your lawn looks brown and parched. Going brown is its natural survival mechanism and most lawns will recover completely when the rain finally arrives