Over time double glazed units or sealed units as they are also know can fail. In terms of failure, this normally comes in the form of a blown unit and by this we mean that the air tight seal has failed and the inert Argon gas that fills the void between the two panes leaks out.
The Argon gas helps to provide an additional layer of thermal insulation and once gone the sealed unit will then allow cold air from the outside to pass much more easily through it and into the inside of your property, making a considerable difference to your comfort levels and also your heating bills.
To remedy the issue a double glazing specialist or company will probably advise to replace the entire window (frame and glass) but in most cases the frame will still be fine and if there is no evidence that any other sealed units have blown then these will be fine to, so replacing the entire window is essentially just a waste of time and money.
A better, cheaper and less wasteful solution is just to get a new sealed unit made up to replace the old one so in this project you will learn how to remove and replace a sealed unit.
How to Measure a Sealed Double Glazing Unit
Before you can get a new sealed double gazed unit made up it is hugely important that you know what size sealed unit you need. The UPVC frame the sealed unit sits in has little tolerance for movement so even if your new unit is a few millimeters too big it simply won’t fit and as its glass you can’t get away with “making it fit”!
When measuring a sealed glazed unit you have to measure not only the width and height but also the thickness!
To measure the width, height and thickness the best method is to prise out the “beads” to expose the existing sealed unit and measure this. Measuring the existing sealed glazed unit will ensure your new unit is constructed to the correct size.
Measure Existing Double Glazed Unit
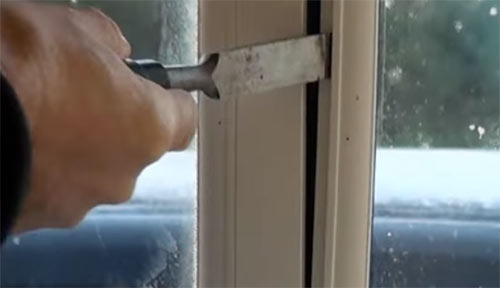
To prise out the beads you will need a sharp chisel or similar sharp wide-bladed flat edge screwdriver. Position the blade against the very edge of the bead where it meets the window frame and use the heel of your hand to hit the chisel or screwdriver in, prising the bead away from the frame.
Take your time when doing this to avoid causing any damage to the frame.
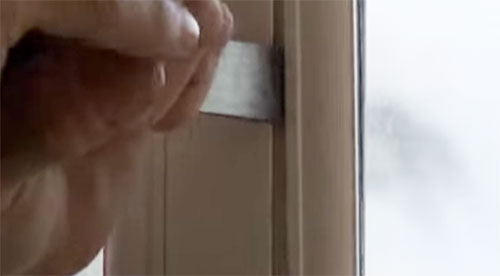
Prising bead away from UPVC frame using a sharp chisel
It is a very good idea to seek a second pair of hands at this point as once all the beads are removed the sealed unit can easily fall out and smash so it’s a good idea to have someone hold the unit while you measure it.
With your helper holding the sealed glazing unit remove the remaining beads, leaving the top bead to last and then allow the sealed unit to fall back slightly out of the frame.
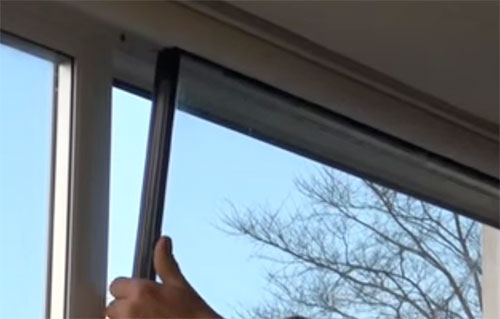
Removing sealed double glazed unit to measure dimensions
Allow the sealed unit to fall back to about 45° from the frame and while your helper holds it firmly, accurately measure the width, height and also the thickness and record the measurements.
Once fully measured, pop the sealed unit back in the frame and then fix the beads back in place in the order that you removed them, taking care not to damage anything while you do it.
Measure UPVC Frame
If removing the beads and measuring the sealed unit isn’t possible you do have another option. For the width and height dimensions, measure from the edge of each bead to the one on the opposing side (horizontally and vertically) to get the width and height dimensions and the deduct 10mm from each side.
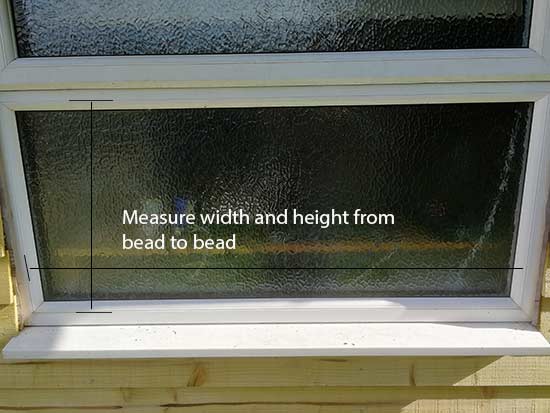
Measure from the edge of the bead to the edge of the bead on the opposing side
Subtracting 10mm off of each side will give you 5mm of wiggle room each side of the frame as you are effectively guessing what’s behind the beads. UPVC frames differ in design between manufacturers. With most designs the double glazed unit fills the gap from the edge of the bead to the same on the opposing side, but some frames allow the glass to sit deeper in the frame, past the edges.
In terms of measuring the thickness of the double glazed unit the best way to do this is by using a set of large calipers. Open any casement of vent light windows in the frame to allow you access to the side of the unit you wish to measure or the edge of the casement or vent if the unit is part of these.
Now you have access, clip your calipers around the frame so that each measuring tip on each of the legs is touching the double glazed unit on opposing sides. If your calipers have an integrated analogue or digital dial this should now tell you the exact thickness of the unit.
If your calipers don’t then you will need to mark each leg at the point they overlap near the friction joint, remove the calipers and the reset them on the mark that you just made and then you can measure the gap between each measuring tip and tis will tell you the thickness of the unit.
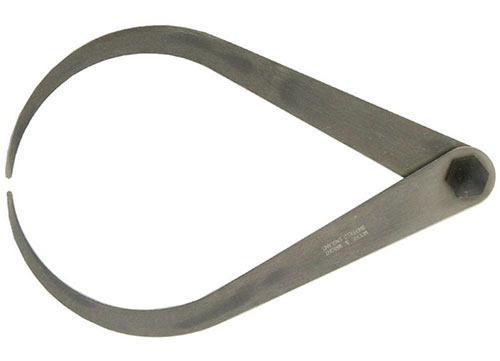
External calipers used to measure thickness of double glazed unit
Who can Make a new Sealed Double Glazed Unit?
Once you have your measurements the next task is to get your new sealed unit made up, but if you’ve never done tis before then where do you get a new sealed double glazed unit from? This is a very good question and in answer to this, most double glazing companies will also make sealed glazing units to order.
If you simply give your local glazing supplier a call they will in pretty much all cases be glad to produce a sealed unit to your measurement specifications.
Today there are even suppliers online that will produce a sealed glazed unit for you and mail it to you once completed. A simple search engine search for “new sealed double glazed unit” should reveal several such companies.
How to Remove and Replace a Sealed Double Glazing Unit
Now that we have looked at how to measure up the double glazed unit you wish to replace and where to get a new one made we can now look at exactly how to replace your old sealed unit with a new one.
Remove Beads and Existing Sealed Unit
The first job is to remove the beads. As we described above, this should be done using a sharp chisel or a sharp, wide bladed flat edge screwdriver.
Position the blade over the joint between the bead and the frame and gently tap it in using the heel of your hand. Once the bead has started to break away from the frame, use your chisel or screwdriver to prise it out and the bead will unclip itself from the frame.
Prise bead away from frame
Work your way around each bead leaving the top bead to last so that it holds the sealed glazed unit in the frame so that it doesn’t fall out unexpectedly and smash or injure you
As you prise each bead out ensure that the rubber within each bead doen not stick to the glass as this can pull it out of the bead and damage it. The rubber forms a seal around the glass and the frame and if damaged can cause air leaks.
As you prise out the top bead use your body weight to rest against it gently to hold it in the frame. Once the top bead has been removed gently support the glazed unit with both hands and the steadily move backwards and the sealed unit should then start to fall away from the frame. Remove the old sealed unit from the frame and put it somewhere safe for now

Removing sealed double glazing unit from frame
Clean the UPVC Frame
Once the existing sealed glazed unit has been removed from the UPVC frame it’s now a good time to give the inside of the frame a good clean.
For this use an old paint brush (4 inch is ideal) to sweep the frame out, removing and dust, debris and cobwebs that have accumulated in the frame over time. Although technically the frame should be sealed, objects such as these find their way in over time.
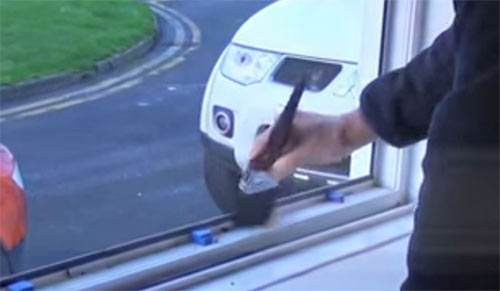
Clean out the UPVC frame using an old paint brush
Insert the new Sealed Glazed Unit and Clip in Beads
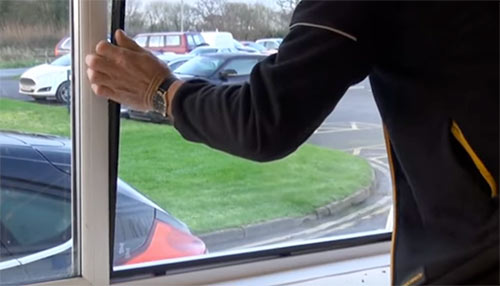
Once the frame has been cleaned the next job is to insert the new sealed double glazed unit back into the frame.
As your new unit should be the exact same size as the old one this should be a like-for-like swap and the new unit should just slip into the frame. However if you have measured the external of the frame using the edges of the beads it may be a few millimeters off.
If this is the case then you may have to adjust the existing “packers” that may be present in the frame (normally red or blue slips of plastic). to ensure the glazed pane sits comfortably in the frame, add or remove packers as required. If you need to obtain some packers, a simple online search for “glazing packers”, “frame packers” or “window packers” will reveal many sources to purchase them.
Place the packers underneath the sealed unit in the frame and position so that it is absolutely square in the frame, this is very important.
Replacing new sealed glazed unit back into UPVC frame
With the sealed unit in the frame it’s now time to get the beads back in place. For this it’s a good idea to enlist some assistance from a helper so that they can hold the glazed unit in the frame while you fit the beads back in.
When refitting the beads a tip is to add a thin bead of washing up liquid to rubber seal on the bead all the way along. This will allow the rubber to easily slide along the glass as you slide the bead in.
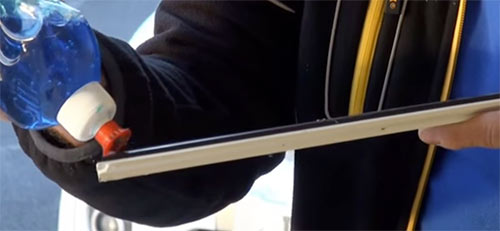
Add washing up liquid to bead to allow it to slip into the window frame easily
Pop the top bead back into position by sliding it along the glass until it falls into place. There are many different types of bead, each with their own method of clipping back into the frame. In the majority of cases most should be a simple “push to clip” system where you push on the top edge of the bead and it clips back into the frame.
Although they clip in, physically getting them to clip in can be a little tough and to save your fingers use a small piece of timber to push against the bead. With a little pressure across the bead and also using the heel of your hand to knock the base of the piece of wood, it should eventually snap into place in the frame.
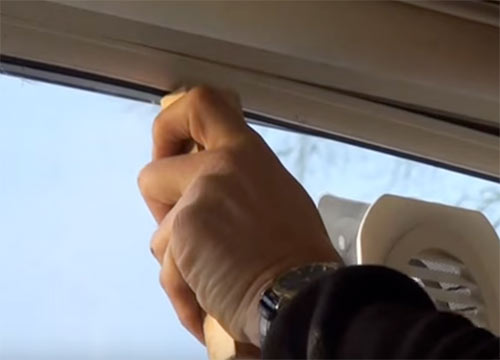
Block of wood used to push bead back into window frame
When inserting each bead start at the corner by pushing the corner into the frame first and then using your block of wood to knock it down until it clips in. With the corner clipped in proceed along the length of the bead until it’s all clipped in.
Once the top bead is in place work your way around the remaining 3 beads.
With all the beads now back in their rightful place you have now completed the installation of your brand new sealed double glazing unit.
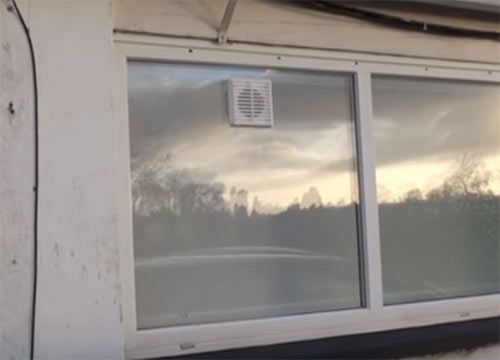
Newly installed sealed double glazed unit
Removing and replacing an old glazing unit with a brand new double glazed sealed unit is a fairly straight forward job. The key to a successful outcome is to ensure that you measure the size of glazed sealed unit you need accurately and also that you take your time when removing and installing the UPVC frame beads.