Being more eco-friendly and environmentally aware is a hot topic today and one that we should all be looking towards a little more. One thing that can be done that is of great benefit to all is to reduce the amount of waste that each of us produce and also our reliance on chemical fertilisers and the likes.
If you’re feeling brave and willing make the jump, one solution to this is to make your own fertiliser from your own waste, by building your own composting toilet. In this guide we run through the process.
What is a Compost Toilet?
A compost toilet is an eco-friendly, waterless toilet that uses the natural process of decomposition to turn human waste into compost.
Unlike traditional flushing toilets, composting toilets don’t require plumbing or a mains sewage connection, making them ideal for off-grid living, eco-homes, allotments, and rural locations.
The solid waste is collected below, what’s normally a traditional looking toilet seat in a chamber below where it breaks down naturally with the help of microorganisms, sawdust, wood shavings, or peat moss.
By using this process, it eliminates pathogens, which leaves behind a safe, nutrient-rich compost that can be used to fertilise non-edible plants.
Composting toilets, if you have the nerve to use one, come with quite a few benefits, some of the most common being:
- Eco-Friendly: Saves thousands of litres of water per year and reduces pollution from sewage systems.
- Low Maintenance: No need for plumbing, making it hassle-free and easy to install.
- Cost-Effective: Reduces water bills and eliminates the need for costly sewage connections.
- Ideal for Off-Grid Living: Perfect for campsites, tiny homes, nature reserves, and remote areas.
Do You Have to Empty a Compost Toilet?
Yes, compost toilets do need to be emptied, but far less often than traditional systems. Unlike flushing toilets that send waste to a sewer, compost toilets naturally breaks down human waste into compost, significantly reducing its volume over time. When managed correctly, the emptying process is simple, odour-free, and environmentally friendly.
Most compost toilets separate liquid and solid waste to speed up decomposition and prevent odours. Liquid waste is usually diverted into a soakaway or collected separately for safe disposal. Solid waste, combined with organic materials like sawdust or coconut coir, slowly composts inside the unit.
Depending on the size of the system and usage levels, the solid waste container typically needs emptying every few weeks to a few months.
Once the composting process is complete, the remaining material resembles soil and is safe to handle. In the UK, regulations advise using composted human waste only on non-edible plants, such as trees, shrubs, and flower beds.
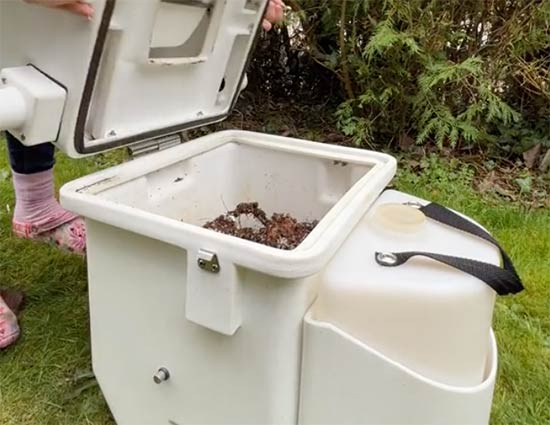
Emptying a commercially available composting toilet
How Do Composting Toilets Work?
Composting toilets use the natural process of composition to break down human waste into compost, that can then be used to grow and fertilise non-edible plants and flowers. This solution offers an eco-friendly alternative to traditional flush toilets.
While widely used in the Far East for many centuries, they are now gaining popularity in the UK for sustainability reasons, especially for those looking to live a more off-grid lifestyle.
Unlike standard toilets that flush waste away to treatment plants, composting toilets process waste on-site. They typically have two separate chambers:
- Active chamber: Where waste is initially collected and begins breaking down with the help of organic materials like sawdust or coir.
- Composting chamber: Waste continues decomposing in a controlled environment until it turns into safe, nutrient-rich compost.
By eliminating water usage and turning waste into usable compost, these toilets provide a practical, sustainable solution for off-grid living, eco-conscious homes, and remote locations and for those looking to be a little more environmentally friendly.
Types of Compost Toilets
Compost toilets come in various designs, each suited to a different scenario, from off-grid living to eco-conscious homes.
Unlike traditional flush toilets, they require little to no water, making them a great solution to those looking to fulfil one of the above lifestyles . Below are the most common types:
Self-Contained Compost Toilets
Ideal for small spaces like garden offices, boats, and caravans, self-contained compost toilets have a single unit where waste is collected and processed.
They often use a mix of sawdust or coir to aid decomposition and control odours. These models are easy to instal, however do require periodic emptying.
Split-System (Central) Compost Toilets
Designed for homes and larger buildings, split-system compost toilets separate the toilet fixture from the composting chamber, which is usually located outside or beneath the property.
This system allows for higher capacity and less frequent emptying, making it a low-maintenance option for long-term use.
Urine-Diverting Compost Toilets
These toilets separate liquid and solid waste to speed up decomposition and reduce odours.
Urine is often diverted to a soakaway or collected for fertiliser, while solid waste breaks down in a separate chamber.
This system is highly efficient and ideal for those wanting a low-odour composting solution.
Electric-Assisted Compost Toilets
Electric models use fans and heating elements to accelerate the composting process, reducing moisture and odours.
These are particularly useful in colder climates where natural decomposition may be slower.
However, they require a power source, making them less suitable for remote off-grid locations.
Can you Build Your own Compost Toilet?
Yes, you can build your own compost toilet, from simple timber and a few other materials and it’s a cost-effective, eco-friendly alternative to traditional plumbing.
Whether you need an off-grid solution, an outdoor toilet for an allotment, or a backup system for emergencies, a DIY compost toilet is a great solution to any waste problems you are looking to solves.
With a few basic materials and some careful planning, you can create a functional, low-maintenance toilet that turns waste into valuable compost.
When Is Compost Toilet Waste Safe to Use?
For safe use in the garden, compost toilet waste should be left to mature for at least one year.
This ensures that any harmful bacteria and pathogens that may be present are broken down.
Many people allow waste to sit for two years before using it as fertiliser for non-edible plants, trees, or landscaping.
How Long Does it Take for a Compost Toilet to Decompose?
The decomposition time for waste in a compost toilet depends on several factors, including temperature, moisture levels, aeration, and the balance of carbon (e.g. sawdust) and nitrogen (e.g. human waste).
On average, waste takes around 12 months to fully break down into safe, usable compost. However, with optimal conditions, the process can be quicker.
Factors That Affect Composting Time
- Temperature: Warmer conditions speed up decomposition, while cold weather slows it down. A compost pile should ideally stay above 10°C for efficient breakdown.
- Moisture Levels: Composting works best when materials are damp but not too wet. Too much liquid can cause anaerobic conditions, slowing the process and creating odours.
- Aeration: Oxygen is essential for decomposition. Stirring or turning the compost regularly improves airflow and speeds up breakdown.
- Carbon-to-Nitrogen Ratio: A good mix of carbon-rich (sawdust, wood shavings) and nitrogen-rich (human waste, food scraps) materials ensures efficient composting.
How to Speed Up Decomposition
To accelerate the composting process, maintain a well-balanced compost pile, add aeration pipes or stir regularly, and ensure the temperature stays warm.
Using a two-chamber system—one for fresh waste and one for maturing compost—also helps keep the process efficient and safe.
Do Composting Toilets Smell?
Contrary to common belief, a well-maintained composting toilet is odour-free and hygienic.
Proper care and ventilation prevent unpleasant smells, making them a practical and eco-friendly alternative to traditional toilets.
How to Prevent Odours
After each use, adding a handful of sawdust, peat moss, or straw helps balance moisture, absorb odours, and fuel the natural composting process.
This is essential because human waste contains high nitrogen levels, which can create ammonia-like smells if not properly managed. Toilet paper is also safe to use, as its carbon content aids decomposition.
Eco-Friendly Benefits
Composting toilets save water, requiring no flushing, which reduces household consumption of clean drinking water.
They also eliminate the need for electricity and chemical cleaners, lowering environmental impact.
Unlike septic tanks, which can leak and contaminate groundwater, compost toilets process waste on-site, creating a safe and sustainable alternative.
Tools Needed to Build a Compost Toilet
To build your very own composting toilet you will need the following tools and products.
- Sheet timber – ply-board (preferred), OSB or similar, at least 10mm x 2.4m x 1.2m
- Tape measure
- Pen/pencil
- Hand Saw or Circular Saw
- 2m length of 2 x 1 inch timber
- Drill/driver
- Countersink drill bit
- Selection of drill bits
- Pair of hinges
- Correct sized screws (normally around 8x 40mm)
- Jigsaw – Ideal for cutting a precise hole for the toilet seat.
- Sandpaper – Smooths rough edges, you don’t want any splinters
- Paintbrush (Optional) – For applying protective sealants or eco-friendly paint.
- Varnish, wood preserver or similar to treat timber
- Bucket or container for waste collection
- Toilet seat
- Sawdust or peat moss for odour control
How to Build a Composting Toilet
As we have now looked at all the different aspects of composting toilets, the final part of this guide is to now look at how to build your very own.
Step 1: Choose a Location
Select a well-ventilated, dry spot for your compost toilet.
In most cases, your build will be an outdoor one, so if it is it’s going to need some shelter. For this you can site it in a shed or similar or construct a simply structure around it.
Four walls (one being a door) and a sloping roof are what’s required.
If however you are going for an indoor build If it’s an outdoor build then you have to ensure the space you are putting your toilet in has plenty of ventilation as odours can accumulate if not.
For the purposes of this guide we will concentrate on the construction of the actual compost toilet as opposed to any surrounding shelters, but there are plenty of guides online where you can learn how to construct one.
Step 2: Build the Frame
When it comes down to it, a composting toilet is just a simple box shape with a hole cut in the top of it, so the first step is to measure out and mark on your sheet timber, four equal pieces for the sides.
Make sure that when in position, the sides will make the toilet high enough for you to sit comfortably on.
Once you have cut out the sides, next, cut a further 2 pieces of timber for the top and the bottom. Ensure they are the right sizes to fully cover their respective openings.
Remember, once you screw the sides together, it won’t form a perfect cube as as two of the sides will be screwed along their edges.
Once all the sections have been cut out, use a pilot drill and countersink drill bit to drill out five screw holes down the edge of each piece of sheet timber you cut out and then screw the four sides together and then screw on the bottom section.
As we will need to access the interior of the toilet to empty it, the top section needs to be hinged, so screw two or three hinges on the top section and then screw the lid on the top of the cube.
Just before the lid is screwed into place, use a jigsaw to cut an 8 inch hole in the centre of the lid and then screw your toilet seat in place over the hole.
To ensure it remains stable once sat on, screw three lengths of 1 x 2 inch timber around the top of the cube shape to support the lid.
Step 3: Install the Bucket
The next task is to install your bucket or internal container inside the compost toilet to catch the waste when in use.
Lift the lid up and position your container in the centre of the cube area. Ensure that it’s big enough to catch all the likely waste it’s going to encounter.
Step 4: Add Ventilation
One f the most important aspects of a compost toilet is the ability to control any odours that may emanate from the toilet itself. For this there needs to be plenty of fresh air flowing around, to channel any odours outside.
The most simple solution for this is to cut or drill out some ventilation holes in the walls of your shelter/toilet housing and cover them with vents. This may not be that practical as this will obviously lead to a great deal of heat loss.
A better solution to this is to utilise any windows that may be present or even to install and wall-mounted electrical extractor fan.
Step 5: Use and Maintain
It is absolutely essential that after each and every use, any waste is covered with a scoop of sawdust or peat moss to help absorb moisture and control smells. This is the main function of a compost toilet so has to be done!
To control any potential issues and and smells, again, it is essential that the bucket is regularly emptied.
In terms of where any waste should be emptied, this should be done into a designated composting area, where it can then be allowed allowed to break down over time.
Legal Considerations
In the UK, compost toilets are legal, but waste disposal must comply with environmental regulations.
Whatever system you opt to go for it you are looking to go down this route, ensure your system follows best practices, such as keeping waste away from water sources and using a proper composting method to break down pathogens.
Building your own compost toilet is a straightforward, sustainable way to manage waste. With minimal effort, you can create a hygienic, odour-free system that benefits the environment, your garden and also your wallet.