• Skip to primary navigation
  • Skip to main content
  • Skip to primary sidebar
  • Skip to footer
DIY Doctor
MENUMENU
  • DIY Doctor menu logo
  • Home
  • DIY Projects
    • All Projects
    • Brick, Block, Marsonary and Concrete
    • Damp, Condensation, Rot and Woodworm
    • Doors, Windows and Conservatories
    • Electrical
    • Fencing, Decking, Paving and Patios
    • Floors, Walls, Ceilings and Lofts
    • Garages, Sheds and Outbuildings
    • Gardening and Landscaping
    • General Building, Self Build and Renovation
    • General Repairs and Cleaning
    • Green Living and Eco DIY
    • Ground work, Foundations and Drainage
    • Heating, Central Heating and Boilers
    • Joinery and Carpentry
    • Materials, Fixings and Fixing
    • Painting, Decorating and Finishing
    • Planning Regs, Project Management and Safety
    • Plastering, Plasterboard and Rendering
    • Plumbing
    • Roofing and Gutters
    • Tiling and Tiles
    • Tools, Appliances and Access
    • DIY Tips
  • UK DIY Forums
  • DIY Videos
    • Bathroom DIY Videos
    • Building Foundation Videos
    • Building Videos
    • Carpentry and Woodworking Videos
    • Damp and Damproofing Videos
    • Decorating Videos
    • Electrical Videos
    • Fitting Blinds Videos
    • Flooring Videos
    • Gardening Videos
    • Green and Eco Friendly Videos
    • Hand and Power Tools Videos
    • Heating and Central Heating Videos
    • Kitchen Videos
    • Plastering and Drylining Videos
    • Plumbing Videos
    • Security Videos
  • Find Tradesmen
    • Find a Tradesman
    • Contract Download
    • Working with Tradesmen - Ultimate Guide
    • Home Improver Protection
    • Price Doctor
  • Tool Store
    • Tool Store
    • Bookstore
    • Tool Reviews and Product Reviews
  • Blog
    • Blog
    • DIY Competitions
  • About us
    • About DIY Doctor
    • What we do
    • Trade Shows and Exhibitions
    • Master Classes
    • Contact Us

Home > DIY How To Projects and Tutorial Guides > Countersinking and Pilot Holes – How to Countersink Screw Heads and Drill a Pilot Hole in Wood and Metal

Countersinking and Pilot Holes – How to Countersink Screw Heads and Drill a Pilot Hole in Wood and Metal

Countersinking and pilot holes through timber and metal. In this DIY guide find out exactly what a pilot hole is and why you should use them to prevent timber splitting when screwing in screws and to allow you to screw into metal. Additionally find out how to countersink fixings and screw heads so that they sink below the surface of the material you are fixing to prevent binding and allow you to fill screw heads and hide them.

Don't want to do this job yourself? Let us help you find a tradesman local to you

TwitterFacebookPin ItBuffer
Project MenuProject Menu
  • How to Tutorial
  • Video
  • Find Tradesmen
  • Help

What is Countersinking?

Countersinking is to enlarge and/or bevel the side of a hole to allow any given fixing to be sunk below the surface of that hole.

When the fixing has been put in, the countersink can then be filled and sanded to allow the surface to be completely flat with no visible signs of fixing.

What is a Pilot Hole?

A pilot hole is a preparatory hole drilled to allow easier passage of a larger object. In this case a pilot hole is drilled to allow a screw to be driven in making its passage through the timber easier.

Because the pilot hole has a diameter of less than the screw itself, the thread of the screw can still bite into the surrounding timber making a perfectly secure fixing.

Some timbers, especially when cut into narrow or thin strips, are prone to splitting when nailed or screwed. Pilot hole and countersinking prevent this happening.

If the fixing, even a nail, does not have so much timber to displace as you force it through the timber, it is much less likely to split.

Because of a countersink, it can slip down below the surface of the timber, there is little chance of it splitting as the conical shape of the underside of the screw head touches the top of the timber.

Counter Sinking a Pilot Hole

Counter Sinking a Pilot Hole

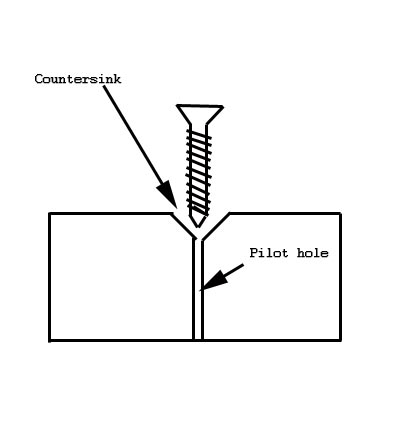
How to Drill a Pilot Hole and Countersink a Screw Head

Measure the diameter of the screw, for example a number 8 screw has a diameter of 3mm, from outside of thread to outside of thread.

Drilling a Pilot Hole

A sensible size for the pilot hole is therefore 1 or 1.5mm. This will still allow the thread to cut its way through the timber without splitting it, while getting great grip on the timber. A bradawl or gimlet can be used to mark the point to place your small drill bit.

Insert the drill bit into a drill or cordless drill driver and position the tip of the bit on to the mark you have just made.

In terms of depth – it really depend son what material you are drilling (tip: to know how far you are drilling down, mark the point to stop on the drill bit with some insulation tape):

  • Soft Wood: Drill down to about 1/2 to 3/4 of the total length of the screw or fixing to be inserted
  • Hard Wood: Drill down to the length of the screw or just beyond
  • Concrete: Again, as with hard wood, drill down a little deeper, around 1/4 to 1/2 an inch more than the length of the screw or fixing
  • Stated Depth Screws and Fixings: This is really a "as it says on the tin" thing. The screw or fixing in question will have the depth of the hole needed to take it stated by the manufacturer on the packaging

Pilot holes are used almost all the time through metal as it is impossible for most screws, even run-of-the-mill self tapping screws, to force their way through. Countersinking is used also to get the head of the screw flush with, or below, the surface.

It is an excellent idea, when fixing to a concrete lintel for example, to drill a series of pilot holes, one through the other and getting slightly larger every time, until the required hole size is met.

Trying to drill a very large hole through both concrete, hard masonry and metal, will quickly blunt the drill as cutting (drilling) with a large surface area is very much harder than with a small one.

Drill bit set
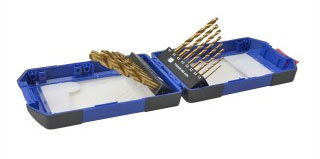
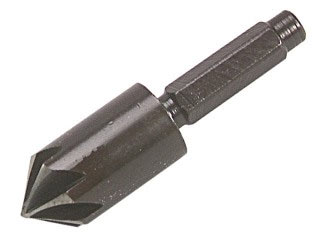
Drill bit set – Available from our store

Drilling a Countersink

Countersink bits are available for this job. As mentioned above, the idea of countersinking is to sink the head of a screw or fixing below the surface of the material you are fixing to.

This really has two purposes, the first is so that the head of the screw does not catch or bind on anything e.g. in the case of screwing shelves in a cupboard down, you don’t want the screw heads at the front to bind and catch the door of the cupboard when pushed closed.

The second is if you want to hide a screw head, the countersink hole will allow the head of the screw to sink below the material it is inserted into and can then be filled over and painted.

To drill a countersink, place the countersink bit in your drill and push down lightly on the pilot hole. For those who prefer a hands on approach, a hand held countersink tool is also available.

Drill down a little at a time until your desired depth. It’s a bit hard to give exact depths as this will depend on the size of the screw head and the size of your countersink bit.

The essence here is really to widen the mouth of the hole so that screw head sinks down. In most situations as you screw the screw or fixing down, the biting action of the threads of the screw will pull the head down below the surface anyway.

Countersink drill bit

13mm countersink drill bit – Available from our store

All project content written and produced by Mike Edwards, founder of DIY Doctor and industry expert in building technology.

TwitterFacebookPin ItBuffer

Video

Back to the Top

Find a Reliable Local Tradesman

Back to the Top
Don't fancy doing this project yourself? We work with the industries best to ensure that we recommend only reliable and trustworthy tradesmen.
Let DIY Doctor help you find a tradesman

Find a tradesman now!


More Help

Back to the Top
Related Projects That May Help You:
  • Different Types of Screwdrivers – Learn About the Various Screwdriver Heads, Blades and Bits and What Screws and Fixings They Should be Used With
  • Size of Screws and Metric to Imperial Screw Conversion Chart and How to Identify the Diameter and Length of Imperial and Metric Screws
  • Types of Drills, Drill/Drivers and Hammer Drills – Learn About all the Different Types of Drills and Drivers and Their Features
  • 3 Easy to Follow Techniques to Unwarp and Straighten Warped Wood
Give us Some Feedback!
Was this page useful:
We read and respond to all feedback by email. To allow us to do so you will be added to our email list, however you can unsubscribe at any time using the links at the bottom of any of our emails. Find out more in our privacy policy. Any DIY questions should be posted to our Forum
Sign me up to the DIY Doctor Newsletter:

Primary Sidebar

DIY Doctor deal of the week

DIY Utility Kit:

Build your own work bench!

RRP Price: £49.99

Special Price: £39.95

Get it here now

See our other deals now!

Master Basic DIY - By DIY Doctor

Our Book - Master Basic DIY

Grab your copy now for all the DIY help you need right at your finger tips!

Buy it Here!

Signup for our Newsletter

Keep up to date with our DIY projects, tips and latest deals

Sign Me Up!

Our Sponsors

Find out about advertising on DIY Doctor

Advert

Other Similar Projects
  • Different Types Of Screwdrivers - Learn About The Various Screwdriver Heads, Blades And Bits And What Screws And Fixings They Should Be Used With
  • Size Of Screws And Metric To Imperial Screw Conversion Chart And How To Identify The Diameter And Length Of Imperial And Metric Screws

Footer

DIY Doctor

Site Menu

  • About Us
  • Contact Us
  • Blog
  • Media/Press
  • Community Work
  • DIY Projects
  • DIY Videos
  • Superstore
  • DIY Tips
  • DIY Suppliers
  • UK DIY Forum
  • DIY Webinars

Other Stuff

  • Advertise
  • Competitions
  • T and Cs
  • Privacy Policy
  • Cookies
  • NHIC
  • Sitemap

DIY Doctor Social Channels

Follow us on Facebook
Follow us on Twitter
Follow us on YouTube
Follow us on Pinterest
Follow us on Tumblr

DIY Doctor are members of:

© DIY Doctor Ltd 2021 All Rights Reserved