Fabrics have been used in home décor and furniture since humans first existed. Fabrics of all kinds are the most well-used material in a home, from your chairs and sofas to your bedspreads and curtains. People are always coming with new and innovative ways of decorating a home.
Recently, we have re-discovered upholstered wall panels. Wall Panelling has been around for a while and was very popular in the 70s and 80s, but this is a whole new take on it and we are very excited.
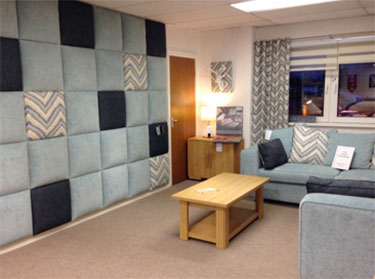
Multi-fabric wall panels matching the décor of the room – Image courtesy of onlinerecovers.co.uk
What are Fabric Upholstered Wall Panels?
Upholstered wall panels or padded wall panels as they are also known are pretty much what they sound to be. A panel of wood that is padded with foam and batting and then covered over with fabric.
This is a similar method to upholstery but rather than a chair or sofa that is being covered, it is a panel of wood.
The fabric used is entirely up to you (although certain materials are better for this than others), as is the density and thickness of the foam, and the shape and sizes of the panels.
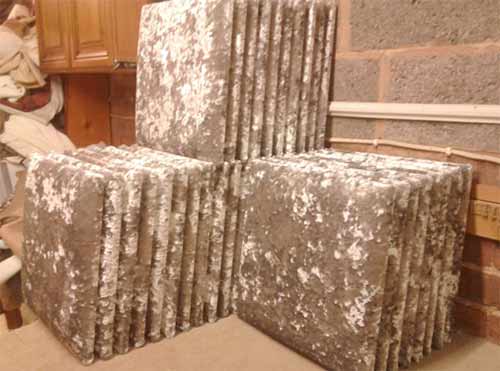
Fabric wall panels ready to be installed – Image courtesy of wordupmag.com
Decorating a room with fabric wall panels is a great way to make a room feel cosier and more sophisticated.
The most popular use of upholstered wall panels is in the bedroom on the wall behind the bed. Doing this both acts as a headboard for bed and also creates a feature in the room which can really help to bring the room together and add that finishing touch.
Upholstered wall panels are also popular in other rooms – it all depends on what type of aesthetic and ambience you are trying to create.
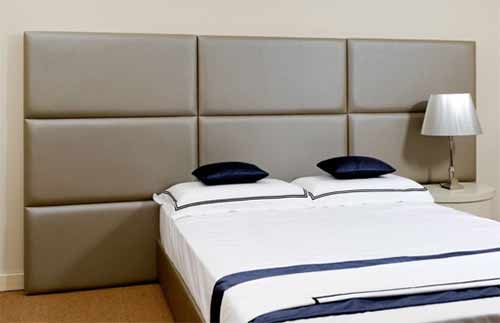
Padded fabric wall panels installed as a headboard behind a bed – Image courtesy of Pinterest
When drafting your design for your fabric wall panels keep in mind that the panels do not necessarily have to cover the entire wall and it is entirely up to you how you go about this.
As with everything creative, there are countless variations on this and the internet can be a great source for inspiration if you are having a hard time figuring out what you want. The panels can come in all as many sizes and patterns as you want.
One method may be to stack and line the panels in a grid format or to perhaps mix and match with different sized rectangles and squares to get an asymmetrical, contemporary feel.
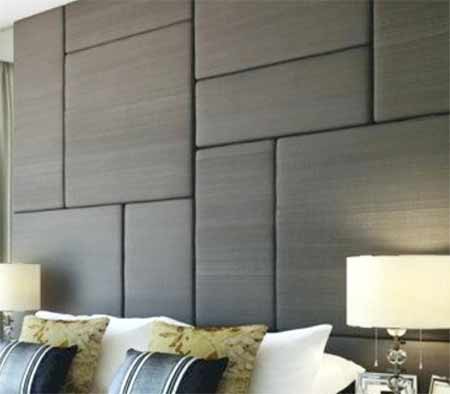
Padded fabric wall panels in different sized rectangles – Image courtesy of Pinterest
If you wanted something more traditional, especially with a headboard or the backing of a seating area, you might want to “tuft” your panels.
Tufting and Types of Tufts
Tufting is a method of upholstery that has been around for years. It is used to create interest to an otherwise plain piece of furniture.
The most well-known examples of tufting are on sofas, armchairs, and footstools. Tufted headboards are also very popular.
Different methods of tufting offer a different feel and ambience, which is also dependant on the fabrics used and the furniture itself.
Whether a piece of furniture feels contemporary or classic, tufting can be used to bring about an air of luxury and quality which is largely due to the foam padding and the ripples and waves that tufting creates.
There are four main methods of tufting:
- button
- blind
- diamond
- biscuit
The last two refer to the shape that the tufting makes, a diamond pattern or a square, whereas the first two refer to the finish – whether or not you tuft with a button. These are used in conjunction with one and other, for instance, you could have a diamond button tufted headboard or a blind biscuit tufted sofa (and vice-versa).
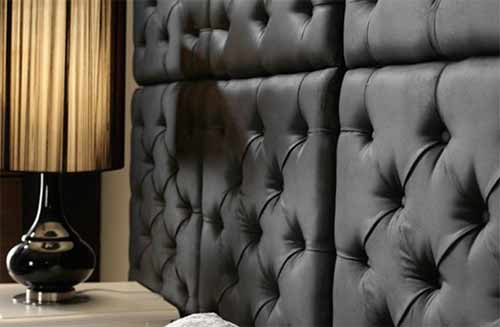
Diamond Button Tufted Headboard – Image courtesy of Pinterest
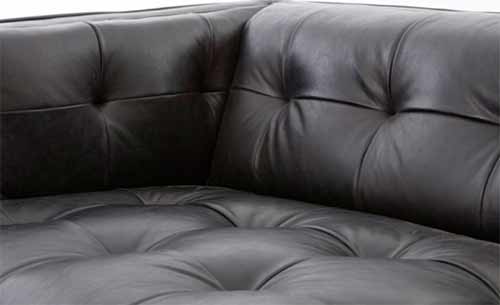
Biscuit Blind Tufted Leather Sofa – Image courtesy of Wayfair
There is a fifth method – which is a fairly new and modern concept – called channel tufting. These are long “rolls” of tufting, rather than a diamond or square, and can be either horizontal or vertical.
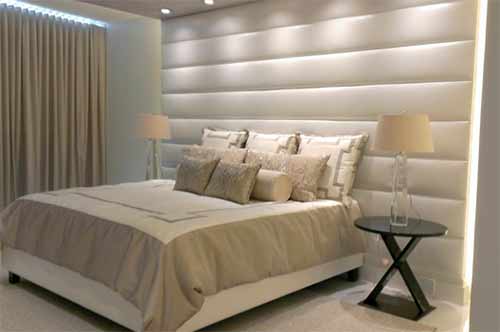
Channel tufted headboard – image courtesy of Pinterest
Materials Used When Making Upholstered Wall Panels
The type of fabric you use for your wall panels is entirely up to you but usually, fabrics such as wool, fleece, or knitted fabrics are that good for upholstery as they can unravel easily and are more susceptible to damage. They are also difficult to clean.
The colours, patterns, and weaves are all dependent on your personal taste and the style of the room. There are of course certain types that look better than others for a particular room or the overall design of the room.
For example, black leather would look very out of place in a baby’s room, but completely at home in a sleek, modern master bedroom.
If you are going to be tufting, the selection of fabrics becomes smaller as the fabric has to stand the strain of being pulled taut by the buttons and string.
The most popular fabric for this is obviously upholstery fabric, which is designed and created especially for upholstery.
There are a wide variety of colours and patterns available for upholstery fabric and it is made with comfort and ease in mind.
There are other fabrics that can be used if you wanted something different, such as velvet, leather, satin, and chenille. These are becoming widely popular for tufting due to their opulence and quality.
Once you’ve chosen your fabric, and whether or not you are going to be tufting, the next thing you need to consider is the type of padding you are going to be using.
Upholstery foam is the most popular choice as it is already designed for upholstery and the variations in thickness and density mean you can tailor your wall panels to fit you.
For instance, three-inch high-density foam will make your panels thick and firm, great for a headboard, but in a seating alcove, you may want a foam with a little more “give” so a low or medium density would work better as it would feel plush and soft.
However, upholstery foam can be quite expensive, especially if you are buying large quantities of it, but there are other alternatives.
A mattress topper is a great source for foam as it comes in different sizes; single, double, queen, and king.
It also comes in various densities depending on how firm or soft the topper is, but can be a little thin for wall panels.
However, as they are much cheaper than upholstery foam, it won’t break the bank to buy two or three and layer them over one another.
Choose what works best for you and keep in mind that you will have to cut the foam to size yourself if you buy a mattress topper.
If you have selected to button tuft your panels then you are obviously going to need buttons.
The size of the buttons doesn’t really matter, but usually, buttons that work best for tufting are between 3/4 of an inch and an inch and 1/2 (12-20mm).
Most of the time the buttons for button tufting are created by covering the button with the same fabric that you are using to cover the panels, but a button in a contrasting or complimentary fabric, or even metal, can modernise the overall look of the wall panels.
The best way to get buttons in the same fabric as the panels is to make them yourself. You can get button making kits at any craft or fabric shop, just remember to buy enough extra fabric for the buttons. It is also a good idea to buy extra buttons for practice in case you mess up a few.
You also need to consider what type of wood your boards are going to be made from.
As the boards themselves won’t be seen, using a cheaper alternative to hardwood such as Plywood, MDF or OSB is great to save you some money.
The thickness of the panels is up to you, but remember that these panels are going to be hung up and so the thicker the board, the heavier the panel. We recommend a thickness of 16mm or 18mm, still sturdy without being overly heavy.
How to Create and Upholster Non-Tufted Wall Panels
The method for creating an upholstered or padded wall panel is relatively easy and shares a lot of the same steps as upholstery.
There are differences between tufted and non-tufted wall panels, and in this step-by-step guide, we will explain first how to create a non-tufted wall panel, and then any additional and/or adjusted steps needed for button tufting.
Materials and Tools Used in Creating Tufted Wall Panels
- Wood board – 16mm or 18mm
- Foam (in chosen density and width)
- 6oz batting
- The fabric of your choice
- Buttons or button making kit
- 2ft of string or twine per button
- Foam adhesive
- Scissors
- Pencil and marker
- Tufting needle (or doll needle)
- Staple gun and staples
- Tape measure (normal and fabric)
- Electric kitchen knife (or regular serrated bread knife)
- Rubber mallet
- Sandpaper
- Drill with 10mm drill bit and 30mm holesaw
- Level or straight edge
- Clamps
- Table saw or circular saw
Step 1- Decide how you are Going to Panel Your Wall
First, determine what it is you are going to be doing, decide how much of the wall you want to cover with your upholstered panels and measure the height and width of the wall.
Choose how you are going to be panelling your wall; Squares? Rectangles? A mixture of both?
Draw up a plan with all your measurements and keep in mind that the wood panels will not rest flush against one another due to the batting and fabric that will be pulled around and under, so remember to make allowances for that in your measurements.
The general rule of thumb is about a centimetre between each panel and (if you are going wall to wall) half a centimetre between the panel and the adjacent wall, but of course, check with your fabrics beforehand to make sure.
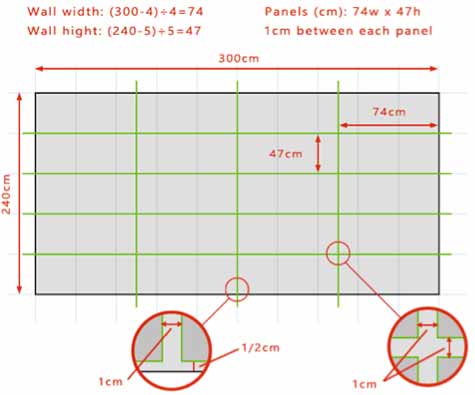
An example of measurements for fabric wall panels on a wall 3m by 2.4m
Step 2 – Decide how you are going to Attach the Upholstered Panels to the wall
Decide how you are going to be attaching the panels to the wall and buy/gather the necessary equipment.
Remember to check what type of wall you are drilling into. Normal screws will not be sufficient in a masonry wall, and a with a stud wall you need to know where the studs are so that you can drill into the stud and not through the plasterboard.
Take a look at these projects on fixing to masonry walls and how to fix to a plasterboard wall for a better idea on how to go about doing this.
Step 3 – Get Your Tools Ready
Gather together your tools from the list above to make sure that you have everything you may need.
It is at this point that you need to check if you have enough staples to cover all of your panels, and if you are tufting, all of your buttons and string.
If you are making buttons from the same fabric that you are using to cover the panels, this would be a good time to do so that they are ready when you need them later on.
Step 4 – Measure and cut Panels to Size
Now that you have decided how you are going to panel your wall, take the measurements for the width and length of your panels and cut your boards to size.
You can do this yourself if you have a table or circular saw, but if not then you can get your boards cut to size and any DIY shed or tool store.
If you do decide to cut them yourself, remember to wear safety goggles and a mask so that you don’t breath in any dust.
A good tip to get clean lines is to use a level or straight edge to help guide the saw as you cut, that way you won’t veer off course.
Lightly sand down the sides of the board to prevent the fabric from catching on any rough edges and possibly tearing.
Step 5 – Measure and Mark Foam
Measure and mark your foam and, using either a regular bread knife or an electric kitchen knife, cut the foam to size.
The foam must be the same size as your backing board. If you want, trim the top four edges at a diagonal line for a really rounded finish. This step is optional as the batting will help round out those corners anyway.
Step 6 – Measure and cut Fabric and Batting to Size
Measure out the fabric and batting and cut to the size you need. If you are unsure of how much you need, then always err on the side of caution.
It is always better to cut away excess fabric than it is to be left with something that is too small.
The best way to calculate how much fabric you will need is to first measure the surface of your panel (length and width), then add on the height of the foam and an extra two inches to cover the width of the board and excess to tuck under and staple.
The batting will have the same measurements (for both tufted and non-tufted).
If you are going to be tufting keep in mind that parts of the fabric will be pulled down through the tuft holes, so remember to take that into account when measuring your fabric.
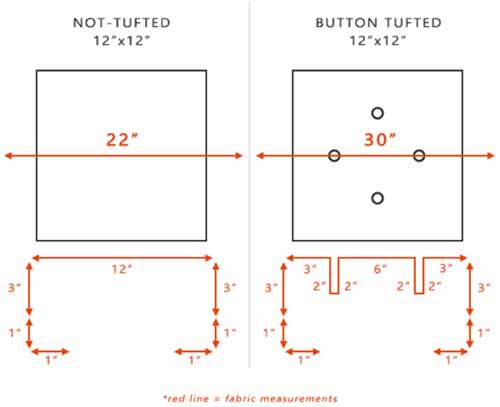
Working out the fabric measurements for tufted and non-tufted 12 inche by 12 inche wall panels
Above we have an example of fabric measurements for a 12” by 12” panel with 3” high-density foam.
As the board is square in shape, we only need to work out one length of measurement as it will be the same all around, however, if your panels are rectangular then you will have to work out both the length and width of your fabric.
Notice that the measurements for the diamond tufted panels are different from the non-tufted to allow for excess fabric to be pulled down through the foam.
Due to the high density of the foam, and the gathering of the fabric and batting around the button, there will be less “give” in the foam, so the buttons will not pull all the way down through the foam to lie flush against the board.
This means that only an excess of about two inches of fabric is needed. However, it is always best to double check so remember to purchase extra foam and fabric for testing.
Draw out the pattern on the extra foam and quickly cut out the holes, then use a fabric tape measure (more malleable than a regular tape measure) to push through the holes to measure how much fabric will push down through the hole and over the diagonal surface.
These measurements will tell you how much more fabric you will need. If you have more tufts or are using thicker or thinner foam, then remember to adjust your measurements accordingly.
Step 7 – Fix the Foam to the Board
Adhere the foam to the board. Spray a quick coating of spray glue on both the board and the foam and let it sit for a few moments until it becomes tacky to the touch.
Then lay the foam on the board and press the two together firmly. It does not have to be stuck down perfectly as this is just to hold the foam in place so that it does not slide around or become loose when you are laying and pulling the fabric.
Step 8 – Lay Batting Over Foam
Lay the batting over the foam and pull it down and under to staple it to the board.
Start in the middle of one side and staple before doing the same on the opposite side.
Now you can turn your board over so that the foam and batting are underneath and staple down the rest.
Start in the middle and work your way out and then do the corners. Make sure not to pull too hard on the batting so that it doesn’t tear or become distorted, but enough to lay flat over the foam without it being loose and baggy.
Cut away any excess batting underneath, about two centimetres or so away from the staples should be enough.
Step 9 – Iron Fabric and Remove Wrinkles
Iron your fabric to remove any wrinkles and lay it good-side down over a clean surface and place the padded board on top, foam down.
Adjust the board until it is centred on the fabric with an equal amount of fabric on all sides, and if your fabric has a pattern or a weave make sure before you start stapling that it is straight as it will be very noticeable if the fabric is crooked.
Step 10 – Pull Fabric Tight and Staple
Starting on one side in the middle (if your panel is rectangular then on one of the shorter sides), pull the fabric gently but firmly out and around and staple it loosely to the board.
To staple loosely, angle the staple gun to 45° so only one side is touching the board and then pull the trigger.
This will mean that only part of the staple is embedded into the board and it will keep the fabric in place but is also easy to remove without damaging the fabric if adjustments are needed later on.
Do not pull on the fabric too hard as it may become distorted and stretched, or be pulled out of place.
As with the batting, repeat this on the opposite side of the panel and then on the other two sides. With the fabric pinned in four spots, flip the board over to make sure that the fabric is straight and not wrinkled or warped. Adjust if needed.
Step 11 – Staple Remaining Fabric to Board
Turn the board back over and loosely staple the rest of the fabric to the board, but leave the corners for now.
As with before, pull on the fabric until it is taut but not too tight and staple down at a 45° angle.
Start in the middle and work your way around. If your fabric is patterned or weaved then it is a good tip to switch which side you are working on periodically as this will help keep everything straight and level.
Also, remember to lift or flip the board over every so often to check that the fabric is even and not warped in any way.
You do not need too many staples at this point as this is just temporary so the more staples you put in now, the more you will have to take out later.
One staple every three or four inches or so (depending on the size of your panel) should be enough. Staple down the fabric on all sides up to about an inch away from the corners.
Check once more that fabric is level, smooth, and undistorted. If needed, make adjustments.
Step 12 – Staple Fabric Firmly in Place
Once you are happy with the look, turn the board back over and now staple the fabric firmly to the board.
Do this by holding the fabric taut as you remove the previous staple and replace it with one that lays flush against the board.
As always work your way out from the middle. For extra security, go over the staples with a rubber mallet to make sure that they are properly embedded into the board.
This time, be generous with the staples. They do not need to lay right next to one another, but one every other centimetre or so is best. Use more if your fabric is thick, such as leather.
Step 13 – Firmly Fix the Corners
When you get to the corners, there are a few different ways to do this and it is all about personal preference.
The most popular is to fold over and staple the fabric similar to when you wrap up a gift.
Have a play around with different corner fold and decide on which gives you the finish you prefer.
Use plenty of staples to hold down the corners as you will probably be stapling through multiple layers of fabric and batting.
Step 14 – Trim off Excess Fabric
Once you have finished stapling your fabric and are happy with the finish, trim away any excess fabric and turn the panel over to smooth out and brush down the fabric.
Repeat these steps for all of your panels and you are ready to hang them up on your wall.
How to Create and Upholster Button Tufted Wall Panels
Step 1 to Step 6 – See Above
For tufted wall panels, steps one through six are the same as for the above, so simply work your way through them and then scroll back down to this point.
Step 7 – Mark out Tuft Holes
Before adhering the foam to the board, first, mark on the board where your tuft holes are going to go.
By now you should already know what kind of pattern you are going to do – biscuit or diamond – and have a plan for how you are going you are going to lay it out.
Below we have an example (following the previous one based on panels that are 74cm x 47cm) of how you could lay out biscuit and diamond tufting.
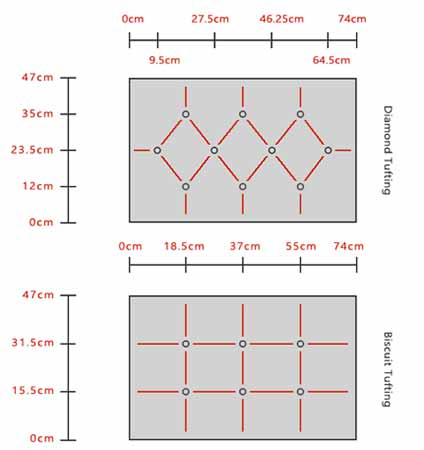
Working out the measurments and design plan for biscuit and diamond tufting
With diamond tufting, symmetry is key, both for aesthetical purposes and practicality reasons. Due to this example panel’s size, only three rows of buttons are needed to create a diamond tufting pattern, and they are alternating three by two by three.
Divide the length of the panel (74cm) in half to get the middle measurement and then in half again to get the measurements for either side.
For the space between each row, do the same to the hight of the panel (47cm) to get the half and quarter measurements.
For biscuit tufting, only two rows of buttons are needed for this sized panel, and with three columns the measurement for the length is going to be the same as the diamond tufts.
However, for the hight of the rows, the panel will be divided into thirds. Divide the hight length (47cm) by three to get the measurement for the rows.
These are just an example. The measurements for your panels and wall will need to be adjusted to fit.
Step 8 – Dril out Tuft Holes
Once you have marked on the board where you tufts are going to be, drill a hole where you marked so that once the foam and fabric are in place you can pull the button down using a tufting needle and string.
We recommend using a 10mm drill bit (see tools list above) which gives you enough room to pull the string through without it being too large.
Use a smaller drill bit first (3mm is enough) to create a pilot hole to hold the 10mm drill bit in place and stop it from sliding around the board.
Remember to wear eye protection and then lightly sand down the edges of the holes to soften any rough edges. It is also a good idea to sand down the surface of the panel so that the adhesive creates a stronger bond.
Step 9 – Stick Foam to Board
Follow step seven from the previous guide to adhere the foam to the board.
Before adding the batting, use your tufting needle to poke under through the hole in the board and up through the foam so you can mark on the foam where the holes are, then cut the hole through the foam.
We recommend using a holesaw drill bit as that will give you a precise and clean circle which will give you a more professional finish overall.
An electric knife will work as well, as long as you are careful and make sure you don’t cut the hole too big.
The hole only needs to be slightly wider than the diameter of the button, so for example, if your buttons were one inch (25mm) in diameter then the hole would only need to be 1/8 of and inch or half a centimetre wider, making the hole about 30mm.
Step 10 – Fix Batting in Place
Follow step 8 from the previous guide, and once the batting is secure use your finger to find the holes underneath and use scissors to cut a cross-shape where the holes are.
Step 11 – Lay out Fabric and Thread Buttons
Next, you will need to work on a surface where you can reach under the board to be able to thread the needle.
Keep the board foam-side up and lay the fabric over it. Smooth it out and if your fabric has a pattern or weave make sure that it is level and even.
Thread the string through the buttons and tie a couple of knots at the base of the button so that the string does not come loose, and then thread the string through the needle and pull so that the button is flush with the eye of the needle.
Find the holes with your finger and push the needle through the fabric down through the holes in the foam and board till it pokes out underneath and then pull the needle through. When the button catches on the fabric, the needle will pull the string through and out the other end.
Do this for all the holes but do not pull on the string just yet. As you go, keep checking that the fabric is straight and even, as at this point when you can see the fabric begin to rumple and bunch where the button is you can start to arrange the fabric into loose pleats.
Step 12 – Pull on Strings and Tighten Buttons
Once all the buttons have been threaded through and you can start to pull on the strings to tighten the button down.
Don’t pull too hard so as not to pop the string, but enough to create the tuft.
The tufts can be as deep or as shallow as you want, just remember to adjust the fabric to even out the pleats as you go.
Use a pleating tool to help you even out the pleats and get crisp results. A blunt butter knife also works.
Pull on the sting until you get to your preferred depth and either duck under the board or flip it up so that you can staple the string down.
If you choose to flip the panel up it is best to have a helper to hold the fabric in place and to keep the board steady… you only have so many hands!
Step 13 – Staple String Firmly in Place
Staple the string in a zigzag manner so that the string does not pull loose and unravel. Be generous with your staples and don’t worry about it looking messy as no one will see this bit anyway.
Do this for all the buttons, arranging and fixing the fabric to make the pleats as you go.
Step 14 – Finish Outer Pleats and Staple Fabric
Once all the buttons are stapled down and the tufted pleats have taken shape, it is time to finish off the outer pleats and staple the fabric to the backing board.
Unlike with the previous guide, there is no need to tack the fabric down with loose staples as the buttons are holding the fabric in place.
Instead, arrange the fabric so that the outer pleats run straight outwards and smooth and tug the fabric down over the foam and under the board and staple fabric to the middle of the board. Do this on all four sides.
Step 15 – Staple Fabric and Deal With Corners
Flip the panel over (making sure that the surface underneath is clean and won’t damage or dirty your fabric) and then follow step 13 and 14 of the previous guide.
Smooth and tug on the fabric until it is taut, make sure that the outer pleats are still straight, and staple to the board. Then tuck in, fold over, and staple down the corners.
Use a rubber mallet to really embed the staples (do the same to the staples holding the string) and cut away any excess fabric. Turn the board over and smooth/brush out the fabric.
And there you have it. Beautifully upholstered wall panels for your wall. For a first time upholsterer, this might take a bit of practice, so it may be a good idea to get a little extra of everything so that you can practice and test out different designs and layouts. But the most important thing is to remember to have fun with it!
Happy DIY-ing!!

