With many homes today having internal plasterboard stud walls it’s only a matter of time before something will need fixing to one.
Unfortunately fixing to plasterboard isn’t quite as easy as fixing to a solid masonry wall. Find out all you need to know about how to fix to plasterboard using our tips from the pros below.
Issues With Fixing to Plasterboard
Unfortunately fixing to plasterboard isnt as simple as fixing to a masonry wall mainly due to how brittle plasterboard can be.
When using wall plugs, as a screw is screwed into one it expands and bites into the sides of the hole it’s inserted into holding it in place, but as plasterboard is soft, the expansion of the plug simply widens the hole you have put it into and in no time at all it will work loose and fall out.
Due to this it is necessary to use fixing specifically designed for use with plasterboard to ensure that, once fixed in place, it actually stays there, particularly if it’s large and heavy.
On the subject of weight, it’s important to mention that certain plasterboard fixings are made specifically for hanging heavy objects on plasterboard, so if this is the case for you, then ensure you use the correct fixings for the object you’re installing.
There is a huge amount of different plasterboard fixings available today, each one claiming to be the best, but in actuality some definitely work better than others. Below is collection of the best plasterboard fixings that we know work well as we have used them ourselves on site.
What is the Best way to Fix to Plasterboard?
Despite the fact that there is a fixing for every occasion and every item you would want to install, the best and most secure way to fix to a plasterboard surface doesn’t involve using any such fixings.
Instead, it relies on locating and fixing into the timber studs used to construct typical interior studwork walls. As such timbers are part of a large frame, once everything is screwed together and fixed at the base and top it forms an extremely strong and rigid structure, capable of supporting heavy weights and large objects much better than using fixings.
So, if you can, use a stud detector to locate the studs and fix to these using standard screws and even if there aren’t any studs in the area you’re fixing to, despite the work, sometimes it’s even better to cut a section of the plasterboard away, install stud work where its needed and then make the wall good afterwards.
However, if you are working with dot and dab plasterboard walls or other types of wall without studs there is also a solution, more on this below.

Timber stud wall that’s ideal for fixing heavy objects to
Types of Plasterboard Fixings and How to Use Them
Here follows a ranage of plasterboard fixings that, over the years, we have found to be the best and most secure, however none are suitable for lath and plaster, so see our fixing to lathe and plaster project here for more information.
Additionally, before starting any work it is always a very good idea to run over the area that you are about to work on with a stud detector to make sure that there are no pipes or wires that you are about to drill or screw into.
Redidrive or Self Drive
This little beauty is called the Redidrive. It is one of the strongest and most reliable of all plasterboard fixings.
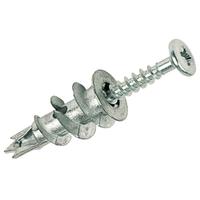
Redidrive or Self Drive plasterboard fixing
The principle is simple. A pilot hole of 2 or 3mm is drilled into the board and the Redidrive bottom section is screwed into the hole. This is done without the screw in as the top of the Redidrive casing has a Philips head so it can be driven in using a drill/driver.
Drilling a tiny pilot hole will warn you if there is anything behind the board and also stop any movement when you insert it. When the Redidrive is fully inserted up to it’s collar, you simply screw whatever you need to fix to the wall using the screw provided by screwing it into the centre of the fixing.
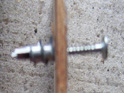
Redidrive screwed into wall with screw inserted ready for fixing
It is not absolutely necessary to drill a pilot hole as the casing has a pointed shaft which will make its own hole when pushed and screwed. However if you have managed to choose a spot where there is a timber stud behind, the Redidrive will snap when it hits the timber and leave you with a hole you do not want.
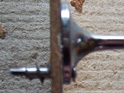
Face of the Redidrive when it has been screwed into the plasterboard
What to Use it For
Redidrives can be used for a variety of tasks when fixing to plasterboard including fixing small items and larger items such as shelves, light TV brackets and also heavier items such as kitchen cupboards and wall units.
How to Use it
- Measure and mark the fixing location
- Use a 3mm drill bit and drill a pilot hole
- Pop the Redidrive on to a drill/driver and position point on pilot hole
- Slowly drive fixing into plasterboard until face of fixing touches face of plasterboard surface
Nylon Toggle Plasterboard Fixing
Another good quality and reliable fixing for plasterboard is the nylon toggle.
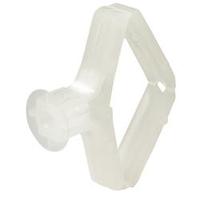
Nylon toggle for fixing to plasterboard
This is inserted through a pre-drilled hole in the desired fixing location after squashing it flat. In most cases it will need to be an 8mm hole, but the manufacturer will state this on the packaging.
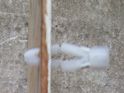
Inserting plastic toggle into hole
When a screw is inserted through the front it goes through the hole in the back of the fixing and as you screw it up, it pulls the back up to squeeze the fitting against the back of the plasterboard, clamping it in place. Once again anything can be screwed to the wall now.
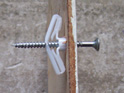
Nylon toggle screwed up
This fitting is also very strong but, if used on their own, heavy items can tend to "tilt" the actual fixing in its hole and while they will not fall off, can become a little loose after a while, so they are best to use in pairs or more.
What to Use it For
Ideal for shelf brackets which create a pulling force from the wall as well as a weight force downwards as the wings on the rear of the board help to spread the weight increasing the holding strength of the fixing.
How to Use it
- Measure and mark fixing location on plasterboard wall
- Drill 8mm hole (or hole size directed by manufacturer)
- Squash fixing flat and push through hole in wall
- Screw in screw through front of fixing into the hole in the rear
- Screw up screw and draw wings into rear of board, clamping it in place
Metal Hollow Wall Cavity Fixing
Next comes the hollow wall anchor or cavity fixing. Again, this is a strong fixing that is capable of supporting some heavy weights, but used individually these are not ideal for fixing heavy objects as they can turn and tilt.
As with the nylon toggle above and the spring toggle below, anything that creates a pulling force away from the wall such as a shelf is ideally held at the top using these fixings as they resist and support pulling forces very well.
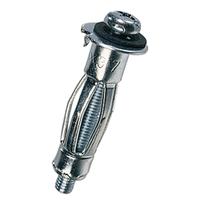
Hollow Wall anchor
They also work in a similar way to the nylon toggle in that, when a screw is screwed through the front it pulls the centre of the fixing backwards that then splays the centre of the fixing outwards, clamping it up to the back of the board.

Hollow wall anchors in board
fixing location and an anchor pushed in the hole. As the screw is turned it pulls up the body of the anchor. This grips the back of the plasterboard as you can see by the top picture.
What to Use it For
As with the other similar fixings, these can be used for a range of jobs from light weight jobs to heavier tasks such as shelves and wall units.
How to Use it
- Measure and mark location of fixing
- Drill correct sized hole for fixing as directed by manufacturer
- Push fixing through hole and screw up screw
- Remove the screw, insert through the item you’re fixing and screw it back up
Rubber Anchor Nut
There is one hammer in fixing which we use a lot. Its very easy to use, simply hammer in and it will take a fair bit of weight.
These are very similar to the hollow wall anchors above in how they work. Once a hole has been drilled in the plasterboard and the fixing pushed through, the centre screw is then screwed up which crushes the fixing up and the wrinkles then clamp it against the back of the board.
Although not as strong as the other fixings above, they can support a bit of weight.
Rubber Anchor nut
What to Use it For
This is a medium grade fixing and is not really suitable for large, heavy objects and is more suited to holding very small cupboards, small, lightweight shelves, utensil clips and the similar.
How to Use it
- Mark the install location on the wall
- Drill the correct size hole for the fixing (as directed by the manufacturer)
- Push the fixing into the hole
- Insert and screw up the centre screw to crush the rear of the fixing up and hold it in place
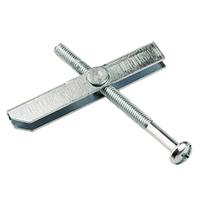
Spring Toggle, Butterfly or Snaptoggle Plasterboard Fixing
Next, we have the Spring (or gravity) toggle or Butterfly fixing. These fixings are again quite similar to nylon toggles and anchor nuts in that they have wings that press against the back of the plasterboard to hold your item in place.
The installation is also pretty much the same. A hole is drilled, the butterfly wings are held together while the unit is pushed into the hole, the screw is tightened and it clamps your fixture to the wall.
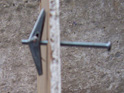
Spring toggle in position
What to Use it For
This is quite a strong fixing so again can be used for fairly heavy items such as medium TV brackets, larger shelves, kitchen wall cupboards etc.
How to Use it
- Mark the point where the fixing is to be installed
- Drill a hole, the right size as stated by the manufacturer
- Hold the wings of the fixing flat and push it through the hole
- Screw the screw up to draw the wings into the back of the board and clamp the item to the surface
Unscrew the screw, pop it through the item your fixing and then screw it back in the fixing
Snaptoggle Fixing
Very similar to the spring and butterfly toggle fixings in that they have a spring out wing (single in this case as opposed to double above).
A hole is drilled in the wall and the fixing is folded down and pushed through the hole and once all the way in it springs open and is then drawn up against the back of the board to clamp the object you’re fixing in place.
Snaptoggle plasterboard fixing
What to Use it For
These fixings are available in different sizes or more accurately the folding wing comes in different lengths. Essentially the longer length the wing is the more it will support, but even the smaller variations are capable of holding quite a bit of weight.
The smaller fixings can be used for shelves, wall units etc. where as the larger ones can be used for heavier items such as large TV wall brackets, sinks and the like.
How to Use it
- Mark fixing point on wall
- Drill correct sized hole as specified by manufacturers at the point marked on the wall
- Slip the fixing through the hole of an item you’re trying secure to the wall
- Fold the wing down and push the fixing through the hole
- Screw the screw up and clamp the item to the wall
Rosett Cavity Fixings
These fixings are very similar to the rubber anchor nut in terms of the way they work. Once pushed through a pre-drilled hole, the centre screw is tightened. As it’s tightened it pulls the end of the fixing forwards, scrunching it up.
When tightened fully, the scrunched section builds up behind the board and firmly holds the object and fixing on the wall.

Rosett plasterboard fixing
What to Use it For
This fixing is described as a heavy-duty fixing, but we would say it’s probably not as capable as some of the others listed above. Despite this they are capable of supporting shelving, wall units and the similar.
A good feature of these fixings is that they can be removed from the wall and re-fitted elsewhere. They can also be used with chipboard and the similar, with thicknesses up to 30mm in depth.
How to Use it
- Mark fixing point on the wall
- Drill hole size specified by manufacturer
- Push fixing through hole
- Withdraw screw and pop it through item you’re fixing. Screw in screw and tighten fully
Plastic Plasterboard Plugs
These are basically the same as a wall plug you would use in a masonry wall only it’s slightly adapted for use with plasterboard and similar sheet materials.
As a screw is screwed into the fixing it forces the wings open that in turn then grip the sides of the hole on the back of the board.

Plastic wall plug for use with plasterboard
What to Use it For
These fixings aren’t terribly strong so should only be used for light weight items such as pictures or maybe a coat hook
How to Use it
- Mark fixing on wall
- Drill correct sized hole for fixing as specified by manufacturer
- Push fixing in hole
- Pop screw through item you’re fixing
- Insert screw and tighten until solid
GripIt Fixing
The GripIt fixing is a fairly new innovation and is available in 4 different coloured types, each type specific to a certain weight it can support:
- YellowUp to 71kg support
- RedUp to 74kg support
- BrownUp to 93kg support
- BlueUp to 113kg of support
As you can see form the above, these are extreme heavy-weight fixings, capable of carrying quite huge loads
To use them a hole the width of the fixing body is drilled using a flat drill bit and the fixing knocked in. Once inserted, pop a screwdriver in the centre of the fixing, apply some pressure and turn. This opens the wings at the rear and holds the fixing firmly in place

GripIt plasterboard fixing
What to Use it For
These fixings are built for heavy-duty work and for holding large, heavy weights so their main roll is to be used for items like sinks, large and heavy TV brackets, large heavy shelving etc.
How to Use it
- Mark fixing point on wall
- Drill hole in wall using flat drill bit the same size as the body of the fixing
- Knock fixing into hole
- Push screwdriver into centre of fixing and turn to open wings
- Screw fixing screw into centre of GripIt fixing, securing your object to the wall
Corefix Fixing
Although strictly a specific plasterboard fixing, Corefix fixings were designed specifically for use with dot and dab walls.
Due to the gap between the face of the wall and the plasterboard, which can be a couple of inches in some cases, there can be a lot of stress applied when using other types of fixings and the screw carrying the weight is essentially unsupported which can cause it to bend and sometimes snap.
Corefix fixings solve this issue by providing a longer neck on the wall plug that also contains a metal sleeve that slots into a collar in the wall plug. The sleeve bridges the gap between wall and plasterboard and transfers the stress back to the wall, fully supporting the screw and preventing any bending and breaking.

Corefix dot and dab plasterboard fixing
What to Use it For
Corefix fixings are ideal for use with any large, heavy objects that need fixing to dot and dab walls such as large TV brackets, kitchen floor and wall units, sinks, large heavy shelving units and the similar.
The manufacturers claim that 4 Corefix fixings can support up to 250kg!
How to Use it
- Mark fixing point on wall
- Drill 10mm hole in plasterboard using a 10mm flat bit
- Using a 10mm masonry drill bit, drill a hole in the wall to the required depth
- Knock in Corefix fixing until the top of the wall plug hits the face of the plasterboard
- Position object in place and screw the supplied screw through and into the wall plug securing it in place.
When fixing to plasterboard walls, whether its a studwork or dot and dab wall it is essential that you use the correct fixings for the item you are securing in place, as if you don’t it will inevitably fail and fall off.