Laying a land drain, or French drain is the easiest method of dealing with surplus water in your garden.
Perforated plastic drainage pipe (80mm) can now be bought from many garden centres and all builders merchants in 25 rolls. This type of pipe is easily laid in small trenches and surrounded by shingle (small stones) to allow water through but filter out silt. The pipe can be joined using a waterproof repair tape also available from builder’s merchants.
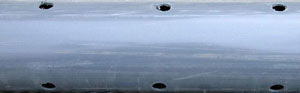
Perforated drainage pipe
Land Drain Pipe can also be bought in clay sections but the introduction of plastic has made their use, for the domestic application, virtually obsolete. Pipe can also be bought which only has holes half way round.
This, for drainage purposes, is laid with the holes uppermost to allow water in from the surface and then to allow it to get carried away completely. We do not advocate the use of this in an English Garden as (See the drought warning below) a fully perforated pipe will allow a more even distribution of the water from wetter, to drier parts, on its journey to the outlet.
With the introduction of what is commonly called Weed Fabric into the market place, it is now possible to wrap the pipe in weed fabric which should stop any silt getting into the pipe. Many builders, ourselves included, actually line the trench with Weed Fabric or Geo Textile Fabric to give it its proper name, to stop any silt getting into the trench. This gives the land drain a much longer life as silt can build up in a matter of weeks and clog all of the voids which are vital to proper drainage.
The Geo Textile Fabric will also stop, or at least dissuade, any local roots seeking out a greater water source. A root system can clog or even break a land drain system quite easily. Geo Textile fabric is a polypropylene mat used to suppress weeds and control soil erosion while allowing the controlled passage of water and air.
Land Drains and French drains can also be used to direct water to a part of your garden which needs more water than others. This is particularly useful for gardeners. A French Drain is simply a land drain but without the pipe although this terminology is getting somewhat mixed these days with many people referring to Land Drains as French Drains.
Building a Soakaway in your garden
Land drains in gardens are usually drained to a central point and this is usually a soakaway. A soakaway is simply a hole in the ground filled with rubble and coarse stone with a drainage pipe laid to it removing surface (rain) water from other areas. The soil in which the soakaway is placed must be granular with good drainage properties. It is pointless sinking a soakaway in clay unless there is a more porous layer underneath. The diagram below is not to scale.
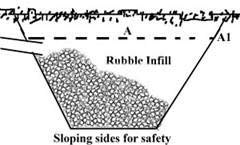
Soakaway cross section
A Soakaway must be at least 5 metres from any habitable building, by local authority regulations. The pipe flowing to them should be of at least 75mm diameter which is the minimum pipe size for any surface water drainage. 80mm is the recommended size.
This pipe should be laid to a fall of 1 in 100 which means for every 1 m of pipe length the slope should be about 10mm or 1cm. However gradual the slope, water will find its way down it.
The size of the soakaway should be a minimum of 1m x 1m square x 1m deep below the bottom of the incoming pipe. The stone infill should surround the pipe and finish approximately 100mm above it. An impervious layer should then be placed on the stone such as thick polythene, tarpaulin, or even a bed of concrete (A1 in the diagram above). Topsoil can then be placed on top of this layer to restore the garden level (A). If you can afford it we also suggest lining the soakaway with weed fabric. As the soakaway needs to be 1m deep below the bottom of the incoming land drain it makes sense to measure the distance of the land drain you intend to lay and work out, using the fall of 1:100, how deep the bottom of the pipe will be when it gets to the soakaway.
For example, if your soakaway is to be placed at the bottom of the garden and your garden is 30m long, the pipe will be 300mm deeper when it gets to the soakaway. If the pipe starts in a trench 300mm deep the bottom of the pipe will be 600mm below the ground when it gets to the soakaway. This means, in total, your soakaway is 1600mm or 1.6m deep.
The turf, if any, should be removed carefully and stored for replacement. Good soil should be saved to be placed on the top of the soakaway to re-turf. The waste soil can be used to make a built flower bed somewhere else in the garden.
Scaffold planks can be hired from your local tool hire shop and used as a run to get the waste soil into position either in the garden or to a skip. Repeated running through lawn and garden with a wheelbarrow can leave a mess especially in ground which we already know is damp!
Care should be taken when digging a hole this deep and we suggest digging the sides back at a fairly shallow angle to avoid any of the sides caving in. Wet soil weighs over 1 tonne per cubic meter and it is extremely dangerous to carry out any excavation over 600mm deep without either shoring up the sides of the trench or raking (digging at an angle) them back. There are no rules to say that a soakaway has to be a perfect cube and your safety is more important than the few extra barrow loads of rubble required to fill a bigger hole.
Laying the Land Drains
To ensure that all applicable parts of your garden are drained, the most effective method of laying land drainsis to lay them in a herring bone pattern (see diagram). The pipes should be laid so that no point in the garden is any more than 2m away from a pipe. The maximum distance between pipes is therefore, 4m. The centre line, or spine, of the drain takes the water to the soakaway and all of the other lines, or ribs, feed into the spine. To set this formation out it is as well to buy a bag of sand and, after measuring the distances involved, sprinkle sand down each line of pipe you want to insert.

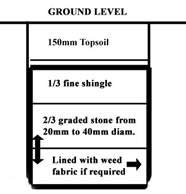
Land drain showing levels of filling
Excavation of the trenches should ensure that any turf is cut carefully and stored to be re-laid later. Dig the trenches three times the width of the pipe to the required gentle fall to get the water to the soakaway or outlet.

Herring bone drainage layout
In terms of how deep the trench for a land drain should be, it should be deep enough to ensure the correct fall from each land drain to the soakaway, but you should also ensure that you have around 300mm to fill over the top of the pipe. This will allow for planting flowers, shrubs, turf and the similar.
After lining the trench with weed fabric, lay the pipe in the centre. Surround the pipe with small stone which is available from the builder’s merchants and garden centres. Clean stone with an average diameter of 20mm is fine.
When the pipe is surrounded by an equal thickness of stone, i.e. there should be a top covering of stone equal to, or greater than the side covering, the weed fabric should be folded over the top. As stated above, you shoudl try to ensure at least 300mm of topsoil is laid over the top of the pipe to lay your turf on. This area can then be rolled to assist with regrowth.
French Drains
A cheaper method of achieving land drainage which is, historically, used to remove surface water from the perimeter of a house or patio, is a French Drain.
French drain cross section
A French Drain is a Land Drain without the pipe. It is excavated in the same way, filled with stone in the same way and backfilled in the same way. The construction only differs in so much as it is much more important, with a French Drain, to excavate the bottom of the trench to the exact slope required all the way to the outlet.
For more information on French Drains and how to construct them, see our project here.
With a land drain there is a certain amount of flexibility in so much as the pipe level can be adjusted by some of the bedding.
One further word of warning is required here. The land drains or French Drains you have put in, are there to remove water from areas of your garden. When laid properly they will still be doing this in drier spells and can cause parts of the garden, especially in prolonged dry spells, to scorch. You may notice the lines of the land drains as staying greener and more lush much longer as this is where the water is!