A French Drain is a low environmental–impact solution to installing drainage for areas around walls, driveways and gardens.
Installing a French Drain is fairly easy and you should be able to manage to build a drainage system like this with a few materials, and either a hired mini digger, or some serious hard work with a shovel and wheelbarrow.
Here we introduce you to our 10 step guide – How to Make a French Drain.
Why Install a French Drain?

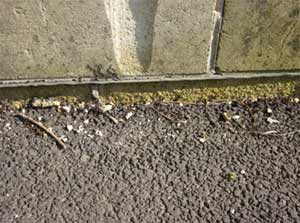
The surface of this wall is damaged below the DPC where water has not drained away
You can build a French drain to relieve a build–up of water against a house wall which would otherwise lead to damaged external masonry and damp internal walls (see picture above).
You may decide to use Geotextile sheet to protect the wall of the building where you are installing the French Drain. Find out more about using Geotextile Sheet in our French Drains and how they work Project.
You can also use it to drain areas of the garden, or at the edges of hard landscaping and drives to take water away from the site and into a suitable Soakaway or sewer.
How to Make a French Drain – A Step By Step Guide

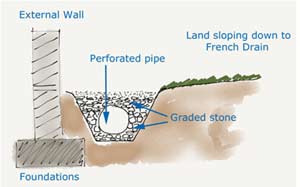
French drain – detail showing a cross section of the drainage pipe and graded stones
Before you start work
- Plan where the water will drain off to – For more information see our French Drains How they Work project and our Guide to Foul and Surface Water Drainage. If you are going to connect your French Drain to a Soakaway you might also want to check out our project that deals with Soakaways.
- Plan and mark out the route of your trench – When installing any drainage, try to plan the trench so it will avoid obstructions such as a shed or trees. Use line marker spray or a string stretched between two small battens in the ground to mark the route you have chosen for your trench.
- Decide where you will place the waste soil – there is no point in piling it up against a wall as that can cause damp. Generally, if you want to dispose of it, you need to hire a skip.
- Check the depth of the buildings foundations – The French drain should be no deeper than the foundations of the adjacent buildings and where foundations are shallow you should dig the trench 1m away from the wall.
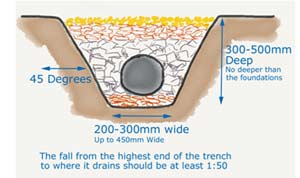
- Plan Your French Drain – Generally a trench of about 200-300mm wide is suitable in most cases, but if you have a large amount of water to drain you may need a trench of up to 450mm wide. The trench should be about 300-500mm deep, and dug so that it slopes at a ratio of 1:50. That means that for every 2 meters of trench length, it should fall 40mm.
- Digging your trench – You can do this using manual labour, or you could hire a mini digger to make the job much easier. The sides of the trench should slope away from the building at no less than a 45 degree angle to ensure the surrounding ground remains stable.
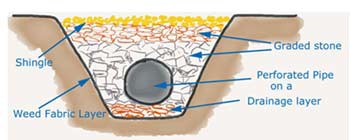
- Filling the French Drain – To prevent the pipe being clogged with ‘fines’, you can line the trench with weed fabric, and if you are using it allow an overlap of some 300mm on either side of the trench to fold in before the top layer goes on.
- If you are using a perforated land drain pipe in the bottom of the trench, lay some coarse gravel in the trench first, then lay the pipe, making sure it is straight and has a 1:50 fall down to the end of the drain.
- Half fill the trench with a layer of coarse rubble made up of recycled crushed brick, or railway ballast, without fines, followed by a layer of coarse gravel to just below the top of the trench. Fold over the layer of weed fabric to prevent soil making its way into the drain and then finish off the French drain.
- Finishing the French Drain – To finish the drain you can top the trench off with fine ‘pea’ shingle which is quite decorative. Alternatively you can happily turf over the French drain on top of the weed fabric, although you may find that that the grass dries out very quickly in dry weather.

How to Make a French Drain – Dimensions

Building a French Drain – Filling the Trench
Ensure your Soakaway stays within building regulations
Please check with the local authority that your soakaway stays within the building regulations and is 5 metres away from your property.

