If you have come to this project straight from the search engine you may have missed part 1. Please click back and view Part 1 before reading on.
Complete downstairs system
Connecting Waste Pipes to Main Drainage on the Ground Floor
Your waste pipe has been marked to finish at the face of the wall. When a bend is glued onto this pipe it will stand far enough away from the wall to enable you to fix pipe clips to the wall to keep the waste system solid.
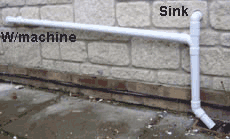
The image above shows a typical installation with the waste pipe from the washing machine meeting up with the waste pipe from the kitchen sink in a Y junction. Both wastes then go down into a back inlet gully which in turn goes into the foul drainage run and onto a foul water manhole. The end of the pipe is concreted into the gully but the end can still be seen through the grid.
Access gulley
Different Sizes of Plastic Waste Pipe
In order for the pipe you have fitted to get down into the gully you must fix a bend to it. Waste drainage in this country is either 32mm, 40mm 0r 50mm. 50mm is generally used in public toilets and won’t be seen a great deal in domestic situations. 32mm is generally used for hand basins and low volume outlets and 40mm used for showers, baths and sinks.
Solvent Weld or Push Fit?
To make life difficult there are also two types of pipe! One type is called "Push fit" and the other "Solvent weld". Push fit is the real DIY type where all of the fittings have rubber collars on and the pipes simply push into them. This should be simple, but it isn’t. It is a lot more expensive than solvent weld and the rubber collars have a habit of pulling off at the most inappropriate of times, we recommend solvent weld every time.
Its considerably cheaper and so much easier to work with. Basically its a tin of glue with a brush built into the lid. Paint the glue on both ends of the joint, push them together and they are welded for life. They will never leak and you can blow them as hard as you like with any type of pipe unblocking equipment and the welded joint will never move.
Layout Your Waste Pipe System Before you Stick it Together
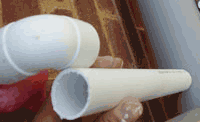
One thing to remember, where ever possible lay out your system in a dry dummy run. When you glue it together it is permanent so any mistakes cannot be undone and you need to start again. The first image below shows a joint being welded and the image below that shows the completed joint.

Solvent welding 32mm waste pipes together

Solvent Welded joint
Solvent welding leaves the whole job looking much neater than push fit as the joints do not stand out and the whole system looks a lot more professional.
Starting Your External Waste Pipe Run
For our scenario in part 1, we now need to glue a bend onto the pipe we have in the wall. You have already taken it out so give the end of the pipe a wipe and wipe the inside collar of the bend. Apply glue, push the two together with a little twisting motion and you have a solvent weld joint. Put the pipe back through the wall and connect it back to the under-sink drainage.
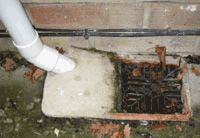
The pipe can now go down into a back inlet gully. These gullies are used so it is possible to watch the water pouring out into the gully. This makes it easy to see if there is a blockage or not. It is the same principle as a toilet overflow. The quicker you can see there is a problem, the quicker you can put it right and the less damage caused.
Adding an Access Plug to Prevent Blockages in Your Pipework
In the system we are working with we have a pipe coming out of the wall from the washing machine and immediately turning right to meet the other drainage. If there was a blockage it would probably occur right on this bend as this is where the water is most constricted.
For this reason the bend needs to be accessible and this is done by using an access plug. In the examples shown below, instead of a bend being fitted to the end of the pipe, a T junction is welded on. The access plug is welded into the end of the T junction and the pipe into the other end. Now the entire length of the pipe run can be rodded in the event of a blockage.
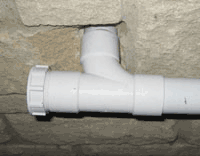
Access plug for removing blockages in waste pipes

Access plug lid off
This concludes the instructions for connecting waste pipes together on a ground floor level and now we get to the slightly more difficult job of connection a waste pipe upstairs to the existing soil and vent toilet pipe. If your toilet pipe is cast iron take a look at our projects on how to connect plastic pipes to cast iron pipes or how to change your soil and vent pipe from cast iron to plastic.
Connecting Waste Pipes to a Soil and Vent Pipe on Upper Floors
For an upstairs installation nothing changes until the pipe has the bend on and it is all sticking out of the wall. Then it needs to be connected to the nearest soil and vent pipe (SVP).
Measure a length of pipe, allowing for the piece that is welded into the collar of the bend, and mark the position on the SVP where it needs to be fitted.
Line up waste pipe with SVP
Cutting a Hole in a Soil and Vent Pipe and Fixing the Strap on Boss
Drill the hole out with a hole saw. You will see down the page that we are fitting what is called a strap on boss to the pipe which will make a watertight connection between the waste pipe and the SVP but the strap on boss has a small lip on the underside which fits snugly into the hole you are now drilling so don’t just drill the hole to the diameter of the waste pipe, it needs to be bigger to suit the lip on the boss.

Glue strap on boss into position
Measure the diameter of the lip and drill the hole. Because a hole saw bit has a normal pilot drill bit in the centre it is easy to line up and the pilot bit stops the drilled circle of plastic falling into the pipe. Brush some glue around the hole and push the boss into position. Tighten the strap under the pipe.

Strap on boss in position
Fit a Rubber Gasket
As well as the strap on boss you will need a rubber gasket. Rubber gaskets come with two sizes of hole. 32 and 40mm allowing you to use the same size of strap on boss for both types of pipe connection. Ignore the pink blob in the below image, this is expanding foam used to keep the pipe in place as it comes out of the wall.

Pipe ready to be fitted with rubber gasket in place
The top of the pipe, and the collar of the wall outlet can now be glued and the pipe can be fitted between the bend and the strap on boss. You will need a little room to play with here and its a good idea to have the wall outlet pipe still loose at this time. We had not finished connecting the soil and vent pipe so we had some movement there.
Cutting the Waste Pipe and Joining to the Soil Pipe
When cutting the pipe to fit between the bend, or other fitting, make sure you do not cut it too long. If any of the pipe sticks down into the soil and vent pipe it could possible catch a piece of toilet paper and start a blockage.
If you have ever had to rod a drain you will be amazed at how easily a blockage can form. The other reason for not cutting it long is because without a lot of movement in the other parts of the pipework its really hard to squeeze it into the collar at one end and the strap on boss at the other!

Pipe in gasket and finished
Compression Waste Fittings
There is one more type of waste pipe we should tell you about and its called the compression type. This type uses joints and fittings which can all be tightened up onto either 32 or 40mm pipe and it is useful if ever you have to join the two or you need to join solvent weld pipe to pushfit pipe as these are not compatible in any other way.
The drawback is that compression fittings are even bulkier than push fit fittings and we try not to use them at all if we can help it. Having said that, there is always one straight compression coupling in our bag in case we have to make a difficult connection.
We hope our waste fitting projects have gone someway in solving the mysteries of getting waste water out of the house! Happy plumbing.