Having a nice lawn area is a real asset to any home and during the warmer summer months becomes the focus for family get togethers and all manner of other events.
Creating and maintaining a good quality lawn can be quite a challenge so to these ends, in this guide we look at what’s involved.
Why Sow a Lawn From Seed?
Sowing a lawn from seed is a budget-friendly choice compared to laying turf. While grass seed takes longer to establish, it is significantly more economical for covering large areas. This method is ideal for those looking to save money while achieving a lush, expansive lawn.
Grass Seed and When to Grow a Lawn
Wondering when to sow grass seed for the best results? Timing is crucial for a healthy lawn.
The UK offers ideal conditions for growing grass: long summer days, mild weather, and regular rainfall, which helps keep grass seed moist after germination and prevents scorching from the sun.
For optimal results, consider your location. While grass seed will generally germinate and thrive throughout most of the UK during all seasons except winter, specific timing can vary. For instance, Cornwall might have a different ideal sowing time compared to Falkirk.
The best time to sow grass seed is typically June, July, and August. Grass seed sown in autumn tends to establish better than in spring. If you can’t sow before October, it’s best to wait until April the following year.
As soil cools and light levels decrease in late autumn, seeds may lie dormant and rot. Therefore, autumn sowing is often easier, with warm soil from summer, higher moisture levels, and less intense sun, reducing the risk of scorching.
Also, consider your schedule. If you’re away during summer, a newly seeded lawn may suffer without regular care.
Types of Grass Seed and UK-Specific Advice
Choosing to sow a lawn from seed rather than laying turf allows you to match the grass type to your garden’s conditions and how you plan to use the lawn.
For ornamental lawns, opt for finer grasses. These usually include a mix of low-growing, fine-leaved slender red fescue (Festuca rubra) and bentgrass (Agrostis stolonifera). This mix is ideal for a visually appealing lawn meant for occasional use but might not withstand heavy use from pets and children.
If you need a durable lawn for active children or pets, choose a hardwearing mix. These typically contain perennial ryegrass (Lolium perenne) and strong red fescue (Festuca rubra), similar to the grass used on sports fields.
For shaded areas, look for a shade-tolerant grass seed mix. These varieties are designed to thrive with less sunlight.
To create a drought-tolerant lawn, consider incorporating clover or microclover into your grass seed mix. While some lawn purists may prefer a pure grass lawn, clover can enhance drought resistance and promote eco-diversity. Additionally, grass-free lawns, which include a variety of plants, require less mowing and offer year-round interest.
Most seed manufacturers provide recommendations on the best conditions and uses for their grass seeds. Always check the packaging to ensure you select the right seed for your specific needs and garden conditions.
Fast Growing Grass Seed for a “Quick Lawn”
Modern agriculture has developed fast-growing grass seeds that can quickly transform bare ground into a lush lawn within a season.
Germination time for lawn seed varies due to factors like soil temperature, moisture, and soil type. For a quick lawn, choose a fast-growing variety and ensure optimal growing conditions.
Grass seed can take 5 to 30 days to germinate, depending on the variety. Check the packaging for details on germination time. Opt for seeds that promise rapid germination, and be prepared to invest a bit more for premium quality.
If even the fastest-growing grass seed isn’t quick enough, consider laying turf. It provides instant results. For more information on laying turf, check out our project on How to Lay Turf.
For the quickest fix, artificial turf is an option. Learn more in our guide on How to Lay Artificial Turf.
Preparing the Ground for Grass Seed
To ensure your grass seed thrives, proper ground preparation is essential. Clear the area of competing plants, balance the soil nutrients, and remove large stones, roots, and obstructions for a smooth lawn surface.
If your ground has existing grass or unwanted plants, remove them. Dig out any plants you wish to keep and relocate them in your garden.
To eliminate unwanted plants, you can dig them out by hand, which is labor-intensive, or use machinery like a digger or rotavator for larger areas.
An alternative method is to cover the area with black plastic sheets to block light and kill existing weeds, though this requires planning and patience. Applying a weedkiller is another option, which also helps reduce future weed growth in your new lawn.
While Glyphosate is a widely recommended systemic weedkiller, it has major environmental and health concerns so always go with a natural alternative if you can, there are many available.
Nutrients for a Healthy Lawn
Boosting soil nutrients is essential for optimal grass seed growth. Lawn nutrients differ from those needed for flowers or vegetables.
Before sowing, test your soil with a DIY kit or send a sample for professional analysis. Key factors to check are soil pH and nutrient levels of Nitrogen (N), Phosphorus (P), and Potassium (K).
Ideal pH for grass is 6-7. Optimal Nitrogen should be in the 20s ppm (70-100 pounds per acre), Phosphorus should be 40-100 ppm, and Potassium should exceed 250 ppm.
These values guide you in selecting the right fertilisers to balance soil nutrients for healthy grass growth.
Based on test results, consider the following soil improvements:
- Add humus and organic matter to improve heavy clay, sandy, or nutrient-poor soil.
- Apply a suitable fertiliser, even if nutrient levels are adequate.
- Use dolomitic or ground limestone to reduce soil acidity.
- Incorporate sandy loam topsoil to improve clay-heavy soil.
- Add river sand to lighten heavy clay soil.
- Enhance sandy soil or shallow soil (less than 4 inches deep) with loam topsoil.
Lawn Seed Calculator
Estimating the right amount of lawn seed doesn’t need to be precise, as grass will spread once it starts growing. Use our lawn seed calculator below to simplify the process:
| Lawn conditions for grass seed | From | To |
| 1 square meter of bare ground | 30g | 40g |
| 1 square meter of bare ground with existing weed seeds to “out-compete” | 38g | 40g |
| 1 square meter of patchy existing lawn | 20g | 30g |
Lawn Seed Spreader Guide
For a lush, even lawn, evenly distributing grass seeds is crucial. Aim to apply around 30-40g of seed per square meter. Here’s how to achieve that:
- Measure and Prepare: Measure your lawn area and weigh the appropriate amount of seed. A cup can help ensure you get the dosage right.
- Even Distribution: Gently shake the cup from side to side while walking backwards over the prepared ground. For extra evenness, sow in multiple directions. Mixing the seed with sand or fine grit can help if you find it hard to spread evenly.
- Marking Large Areas: For larger lawns, create a grid using garden stakes and string at 1-meter intervals. This grid will help you distribute the seeds evenly within each square.
- Using a Seed Spreader: For larger areas or easier distribution, consider using a lawn seed spreader. Simply fill it with seed and push it along the ground to evenly distribute the seeds.
Tools and Products For Seeding a Lawn
In order to successfully seed a lawn, you will need the following tools and products:
- Grass seed – around 30g per square meter of your lawn to suit the conditions of your new lawn
- Garden canes and string to mark out the area
- A rake to prepare the ground for the grass seed
- A turf iron, or petrol powered turf cutter
- A good lawn weedkiller if you are intending to use chemical processes
- Any soil improvements you might want (see list in “Nutrients for a healthy lawn” above)
- A rotavator – you can buy or hire these
- A garden hand fork
- A lightweight roller, like a lawnmower’s roller or a water filled roller (half-fill it)
- A garden hose with a fine spray hose attachment
- Something for measuring amount of grass seed
- Grass seed spreader (not essential, but helps with distribution)
Multi purpose grass seed

Weedkiller
A Guide to How to Seed a Lawn
Sowing grass seed can establish a new lawn or repair damaged areas caused by thatch, moss, or heavy wear. It’s also ideal for addressing sparse spots due to shade or water-logging. Whether you’re covering a small patch or a large area, the method remains the same. Follow our step-by-step guide for seeding a lawn to achieve excellent results.
Step 1: Soil Nutrients for a New Lawn
Prior to sowing grass seed, ensure your soil is nutrient-rich for optimal growth. Refer to the “Nutrients for a Healthy Lawn” section above and conduct a soil test before proceeding.
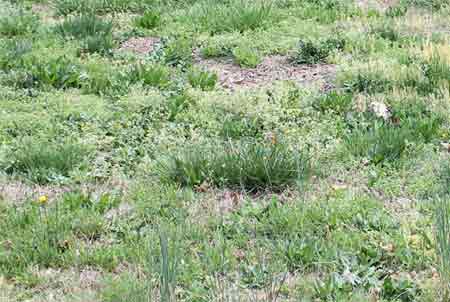
Patchy grass with weeds
Step 2: Weed Removal
If your lawn area has existing plants, it’s essential to remove them. Refer to the “Preparing the Ground for Grass Seed” section above. If your ground is clear of plants, proceed to Step 3.
To remove weeds, either manually dig them out or apply weedkiller following the manufacturer’s instructions. Allow time for the weedkiller to take effect, typically around 2 weeks for chemical weedkillers.
After the weedkiller has worked, use a turf iron or petrol-powered turf cutter (available for hire) to cut out the turf. Cut squares of turf using the iron, lift them out, and set them aside. You can compost the removed turf if desired.
Step 3: Ground Preparation
If your ground is bare, begin here at this step. Prepare the soil by rotavating or double digging, typically done with a rotavator.
Ensure the soil is dry enough for rotavating to prevent smearing on the rotavator blades. It should have a crumbly texture.
Rotavate the soil to a depth of 15-20cm, covering the area thoroughly from both angles (vertically and horizontally).
Break up large clods of earth with a fork and remove any large stones and roots churned up. The extent of this step depends on your desired lawn appearance, but thoroughness now prevents disturbances later.
Step 4: Enhancing Soil for Seeding
Introduce soil enhancements like lime, sand, or humus, along with extra soil if needed. Apply these evenly across the area as per the packaging instructions, then rotavate once more for uniform distribution.

Sand added to the base
Step 5: Weed Control for New Lawns
Consider applying another round of weedkiller to tackle any weed seeds disturbed during tilling. Alternatively, sow additional grass seed at a density of 40g per square meter to outcompete weed growth. This ensures ample space for grass seedlings to thrive while making it challenging for weeds to compete for nutrients, light, and moisture.
Step 6: Preparing the Ground for Seeding
Now, it’s time to sow your seeds! Ensure the ground is moderately dry, with a moist, crumbly texture. If desired, apply fertilizer at this stage.
Begin by gently raking the surface of the ground to achieve a crumbly finish.
Next, perform what’s called “heeling” by shuffling backward across the ground in half steps, compacting it slightly. Start from one side, moving in strips like mowing a lawn. Check for flatness and adjust as needed. Then, rake the ground again.
If you’re meticulous, heel the ground in the opposite direction for additional compaction. Finish by raking once more.
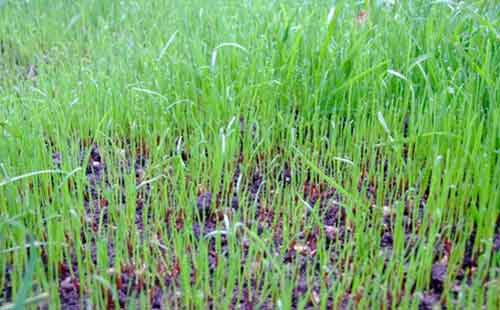
Step 7: Seeding Your Lawn
Calculate the required amount of seed and evenly spread around 30-40g per square meter of your lawn area. Refer to the “Lawn Seed Spreader Guide” above for assistance.
Ensure you use fresh, high-quality seed within the manufacturer’s recommended date. Using old or low-quality seed may result in poor germination or disease. Give your lawn the best start by using fresh, quality seed.
Rake lightly over the seeded area and then roll with a lightweight roller. Water lightly using a fine spray from a garden hose to thoroughly moisten the seed.
Refer to the “Watering Your New Lawn” section below. Consider using prickly twigs or other methods to deter birds until the seed starts to sprout.
Watering Your New Lawn
To ensure successful germination without washing away the seed, lightly water the lawn area with a garden hose equipped with a fine spray attachment. Water twice daily for the first two weeks after sowing, then once daily for the following two weeks.
In the second month, water twice a week, reducing to once a week in the third month. Adjust watering frequency if signs of drying appear, especially in hot weather.
Prevent seedling dehydration and sunburn by watering early morning or evening, avoiding midday sun. Adapt this guide to your local weather conditions post-sowing for optimal results.
Use the guide below to help schedule your watering routine.
| Watering Guide | Daily | Daily | Every 3 days | Once a week |
| Week 1 | Before 10am | After 6pm | ||
| Week 2 | Before 10am | After 6pm | ||
| Week 3 | After 6pm | |||
| Week 4 | After 6pm | |||
| Week 5 | After 6pm | |||
| Week 6 | After 6pm | |||
| Week 7 | After 6pm | |||
| Week 8 | After 6pm | |||
| Week 9 | After 6pm | |||
| Week 10 | After 6pm | |||
| Week 11 | After 6pm | |||
| Week12 | After 6pm |
Mowing Your New Lawn for the First Time
Mowing a new lawn is crucial for its even growth, but timing is key to avoid root disturbance.
Wait until grass shoots are about 5cm tall, usually within 2 weeks post-sowing, before mowing. Set your mower to its highest setting to trim no more than 2cm off the grass. Take wide turns and avoid tugging at the delicate plants, as roots are still establishing.
Leave the grass about 3-4cm long to minimise stress and prevent drying out. Be cautious with weed removal and choose weed killers suitable for new lawns, if necessary.
Carefully mow new grass or you can damage it
Ongoing Lawn Care: Mowing Tips
Once your new lawn establishes dense roots, it will thrive, especially with proper soil conditions and nutrition. Start regular mowing around the fourth cut, typically between weeks 10-14, depending on growth speed.
Opt for a lawn mower that collects clippings to minimize raking and avoid using a scarifier in the first growth season to prevent root damage.
When to Use Your New Lawn
You can typically start using lawns with faster-growing grasses within 8 weeks, but it’s generally advisable to wait around 10 weeks. When you begin using it, do so lightly for the first couple of months. Enjoy your new lawn!
Seeding a lawn can be a challenging job, requiring a fair bit of care and attention, but if you take the time to do it correctly then you are sure to achieve a luscious and full bodied lawn that will last for many years.