Nothing quite says British like a lush, green lawn — Wimbledon’s Centre Court, the iconic Lords, the quads in Oxford, and the elegance of Croquet. The list is endless, and the beauty of a well-kept lawn is deeply embedded in our culture. So, with this in mind, is it sacrilegious to consider a fake lawn?
For the traditionalists, this might be where you step away. If you’re committed to the genuine article, check out our lawn care section for comprehensive advice on maintaining and sowing a real lawn. However, if you’re feeling a bit more adventurous, stick around! We’ll explore the advantages of artificial turf before delving into the DIY guide on laying it yourself.
Is Opting for Artificial Grass a Letdown?
What is Artificial Grass or Turf?
Simply put artificial grass is synthetic, man-made grass designed to mimic the real thing. Its primary goal is to capture the appearance and feel of natural grass while eliminating drawbacks like wear and the need for regular maintenance.
Just like anything else, there’s a variety of artificial grass types, and its quality and durability are closely linked to its cost.
The forefront of artificial grass technology is focused on creating realistic and effective playing surfaces for sports. However, if you’re in the market for material for your home lawn, these advanced types may not significantly impact your decision as there is an abundance of choice for domestic lawns.
Artificial turf sellers typically offer options tailored for various domestic uses, ranging from durable to aesthetically pleasing varieties. Some even come with “mowing“ stripes. Options include designs that cater to pets, rooftop terraces, balconies, temporary grass needs, and even indoor lawns and other requirements.
A frequently asked question is, “How long does an artificial lawn last?” The answer varies, but you can generally expect a lifespan of at least 10 years. With proper care and maintenance, there’s no reason it can’t endure for up to 20 years.
Advantages of Artificial Grass Lawns
Artificial grass lawns offer a range of benefits, with the standout advantage being their low-maintenance nature. While they may not be the real deal, there are instances where opting for synthetic turf makes practical and some level of financial sense, especially when considering factors like scale.
Here’s a breakdown of the key advantages artificial turf has over traditional lawns:
- Effortless Maintenance: Once installed, an artificial lawn demands minimal care – no mowing, watering, edging, feeding, or weeding. In our increasingly busy lives, this translates to one less worry and task to juggle.
- Durability and Cleanliness: Artificial lawns are resilient and stay clean. They’re a practical choice when you want to prevent mud and grass from being tracked into your home, especially with kids, grandkids, or pets around.
- Aesthetically Pleasing: Fake lawns maintain their appearance longer, resisting browning in summer droughts and withstanding the impact of pets or enthusiastic activities. Realistic options with UV protection ensure colour longevity, and they remain flat and weed-free with minimal effort.
- Water Conservation: Say goodbye to watering your lawn regularly during summer months. Artificial turf doesn’t require water to stay vibrant, reducing the need for fertilisers and herbicides, contributing to a more environmentally conscious approach.
- Challenging Growth Areas: In shaded or high-traffic areas where natural grass struggles, artificial turf thrives. It’s a practical solution for smaller town gardens, ensuring a usable and attractive lawn in challenging conditions.
- Cost-Effective: Compared to alternatives like paving, artificial lawns offer a budget-friendly solution. When weighed against the ongoing efforts and expenses of maintaining real grass, the value becomes subjective based on time and personal preferences.
- Specialised Applications: Certain areas benefit more from fake grass, such as dog runs or “catios”, where it remains intact and permeable. It’s also ideal around swimming pools, protecting against saturation and mud. Temporary use for events or as a low-maintenance “green roof” adds to its versatility.
- Convenience for Travellers and Landlords: If you’re frequently away, artificial turf eliminates concerns about lawn care. No need for cutting, watering, feeding, or weeding – a relief for those who don’t want to burden someone else with the task while they’re absent.
If you have a small, heavily trafficked, or shaded grass area, particularly with children or pets, synthetic turf is a smart choice. For those with limited time or interest in lawn care, fake grass is a practical and appealing alternative.
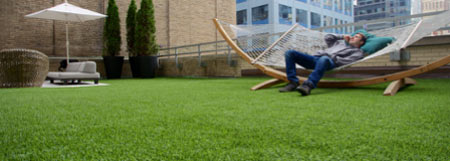
Fake or artificial grass can look surprisingly real
Choosing the Right Synthetic Grass for Your Needs
When we talk about artificial, synthetic, or fake grass, we’re basically referring to the same thing. We’ve even thrown in the term Astroturf, which was one of the early pioneers in artificial grass for sports pitches and has become a common name for the uninitiated.
Despite the interchangeable terms, there’s a variety of synthetic turf out there. You might not need to dive into all the technical details, as brochures and websites usually categorise them based on their best uses. Here’s a brief overview:
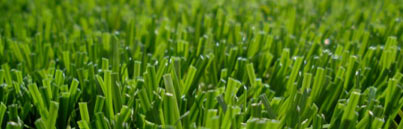
The turf itself is effectively a carpet made of millions of synthetic grass blades. The material and construction of these blades determine the characteristics of the artificial turf.
The grass length, or pile, can range from 4-10 cm (approximately 2-4 inches), influencing the overall appearance and feel of the turf.
Most types feature blades coated with a fine layer of silicon, enhancing the texture.
The main synthetic grass types include:
- Nylon: Durable and stiff, nylon pile artificial turf can withstand heavy traffic. While it’s expensive, it may not replicate the exact feel of natural grass, but it looks quite realistic.
- Polyethylene: Softer and more budget-friendly, this material is ideal for domestic use but may not be as durable as nylon, especially in high-traffic areas.
- Polypropylene: The softest option, polypropylene synthetic grass is inexpensive and pliable. However, it’s less durable, especially in high temperatures, and tends to be lighter, making it easier to work with.
Manufacturers often combine these materials to achieve the optimal texture and durability for specific uses. Constant innovation introduces new materials to meet evolving demands and create the perfect characteristics for a variety of applications.
Artificial Grass Finishing or Dressing
When it comes to artificial grass, it’s not just about getting it fitted – the finishing touches matter just as much. One critical factor is how the artificial grass carpet is finished or “dressed” as it’s known in the trade.
Dressing involves applying a silica (sand) material over the artificial grass carpet. This process helps each grass blade maintain its natural look and rigidity. Without proper dressing, the grass can quickly deteriorate, appearing worn and tired.
There are several ways to dress artificial turf, and here are the most common options:
- Sand Filled Turf: This original type uses sand to maintain the surface and support the synthetic blades. While durable, it requires more sand and maintenance to keep a level surface.
- Sand Dressed Turf: Using less sand, filling only about two-thirds of the pile height, this option provides an easier-to-maintain, flatter surface, making it preferred for sports pitches.
- Water Based Artificial Turf: As the name suggests, this type uses water instead of sand. The significant benefit is reduced abrasiveness, making it ideal for sports pitches as it’s safer in case of falls.
- Rubber Crumb Infill Turf: Designed for sports enthusiasts, this turf is filled with a mix of sand and rubber crumb, providing extra cushioning. It’s even suitable for playing rugby.
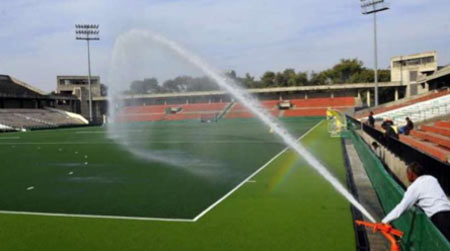
Discover water-filled artificial turf used on a playing field – Image courtesy of Pakistan Point
In the majority of cases, you are most likely going to use a sand dressed of filled turf with a mix of materials depending on the usage that your synthetic lawn will expect to get.
Understanding these dressing options is key to achieving the perfect artificial turf. Whether you’re envisioning a lush lawn or a sports field, choose the right dressing technique to ensure success.
Choosing the Right Foundation for Your Artificial Grass
If you’re new to the world of artificial grass, you’re probably wondering: What surfaces can it be laid on? Can I just put it on top of my existing lawn?
The simple answer is no. Placing artificial grass sheets directly on an existing lawn won’t work well. The uneven surface with bumps and dips will prevent the sheets from sitting correctly, causing raised edges and gaps underneath.
Additionally, along the edges and joins, you’re likely to encounter issues with weeds and unwanted growth, giving your lawn a shabby and unkempt appearance.
Instead, it’s essential to lay artificial grass on a firm, solid surface such as asphalt, concrete, or a similar base. If you’re considering laying it over an existing lawn, follow these steps:
- Dig Out: Remove the existing lawn.
- Aggregate Layer: Line the area with around 75mm of compacted type 1 aggregate, ensuring thorough compaction.
- Sharp Sand Layer: Add a 30-40mm layer of sharp sand, compacting it down as well.
Compacted sub base prepared for laying an artificial lawn
Following these steps will provide a robust foundation for your new lawn, ensuring it has the best chance of lasting as long as possible.
Tools and Products Needed for Laying Artificial Turf
In order to successfully lay an artificial grass lawn or surface you will need the following tools and products.
- Enough of your chosen artificial grass to cover required area
- Utility knife or similar with spare blades
- Tape measure
- Spirit level
- Shovel or turf cutter
- Compactor/vibrating whacker plate
- Grass jointing tape (should be supplied with kit)
- Grass pins or nails (should be supplied with kit)
- Grass glue (should be supplied with kit)
- Type 1 aggregate to cover area to 75mm thick (if laying on soft ground/lawn)
- Sharp sand to cover area to 30/40mm depth (if laying on soft ground/lawn)
- Timber sleepers, bricks etc. to provide hard edge (if needed)
- Sand to dress grass
- Stiff brush
A Step-by-Step Guide on How to Lay Artificial Turf
When it comes to laying artificial turf, you’ll be working with either an existing hard surface or a loose, unbound surface. If you have a hard surface, the process is a bit simpler as you can directly adhere the fake grass, but ensuring proper drainage is crucial.
Let’s begin by addressing how to prepare and lay artificial turf on an unbound surface, like an existing real lawn.
Before you start, ensure the area has good drainage. If not, installing synthetic turf won’t solve the problem, and the area will still have poor drainage. Check out our drainage section for guidance on improving drainage.
Now, let’s dive into the steps for laying your artificial turf:
Step 1: Prepare the Ground
Start by digging out the area where you plan to install the artificial turf. Dig down to a depth of 50-100 mm (2-4 inches).
The depth of excavation depends on the soil type and the amount of hardcore needed. You want a solid sub-base that still allows for good drainage. A safe bet is usually around 75mm (3 inches). Level the bottom roughly to achieve a flat surface.
Step 2: Define the Edges
Now, let’s outline the edges, especially if there’s no existing curb or hard surface to mark the boundary. Here are two effective methods:
- Wooden Batons: Use 4”x1” (100x25mm) treated wood to create the edges. Position these at the level where the artificial grass will be laid. You can secure the grass directly to these batons using screws or nails. Either bury the ends under the soil, place them beyond the soil, or use edging stones. For curved edges, cut notches into the baton, bend it, and hold it in place with 300mm (1-foot) stakes.
- Concrete Blocks: Along the edge, lay concrete blocks. Learn how to do it here in our laying bricks and blocks project. Similarly, when the time comes, you can fix the fake grass to the blocks. However, it’s usually best to stick it down rather than using screws or nails.
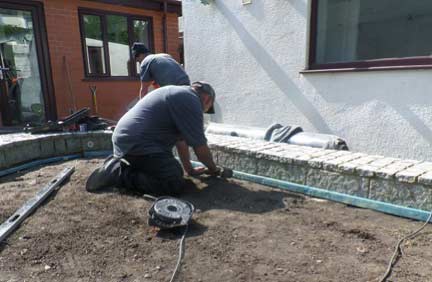
Positioning the batons in preparation for artificial turf – Image courtesy of The Grass Factory
Step 3: Lay the Sub-Base
Now, let’s get the sub-base in place. We’ll provide approximate depths, but keep in mind they may vary based on your specific situation.
Levelling the sub-base up to the edging stones – Image courtesy of Lazy Lawn
Here are the two elements of the sub-base:
- Hardcore: Spread and level 50mm (2 inches) of type 1 hardcore, also known as coarse crushed aggregate. Compact it with a heavy roller or wacker plate is best.
- Sand: On top of the compacted hardcore, add a layer of builder’s sharp sand to a depth of approximately 25mm (1 inch). Avoid adding too much sand, as an excess can shift under the artificial grass, causing uneven surfaces. Level and compact this layer as well.
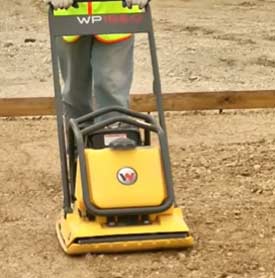
Use a Wacker Plate to compact the sub-base under the artificial grass
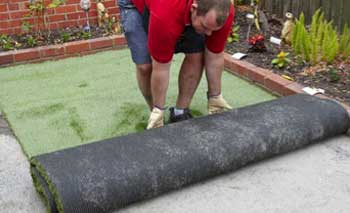
Step 4: Roll out Your Artificial Lawn
Now it’s time to roll out your artificial grass, but before you do, consider laying a weed fabric layer, which you can secure to the edges with U-pins. This not only prevents disturbance to your flattened and level base but also facilitates the smooth positioning of your fake grass.
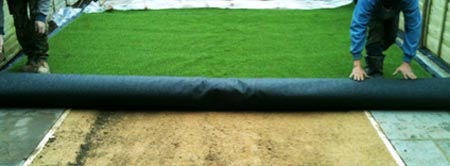
Rolling out the fake grass over the surface
TIP: For added cushioning, you might want to place a shock-absorbent material under the grass. Lay it out and cut it to size with a utility knife.
Shock absorbent material laid under the artificial turf – Image courtesy of DIY Network
Roll out the grass and position it over the area you’re covering. Allow it to sit for 24 hours or until any creases have naturally smoothed out, saving you from pulling or stretching during the fixing process.
TIP: Take this moment to decide the direction of the grass pile. Look for arrows on the back indicating the direction, but also observe the colour effect from different angles. Ensure you’re satisfied with how it will be laid.
Consider the joins as well. Make sure the pile runs in the same direction on each side of the join to avoid an obvious and disruptive seam. More guidance on joining pieces is covered below.
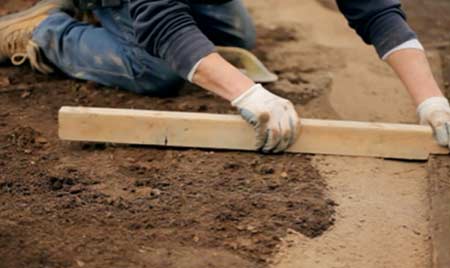
Step 5: Shape Your Artificial Lawn
After the grass has settled, it’s time to shape it to fit your space. Before you start cutting, ensure the pile direction is consistent and meets your satisfaction. Once you make the cut, there’s no turning back!
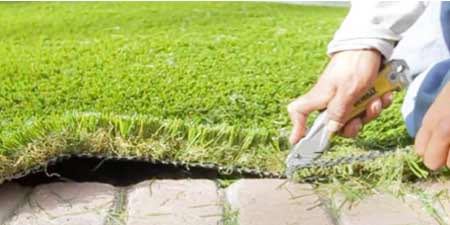
Trimming the synthetic grass – Image courtesy of Synthetic Grass Warehouse
Use a sharp trimming knife, and keep several blades on hand as a dull blade won’t give you a clean cut.
Cut right to the edge, ensuring the grass meets the edging stone or curb without any gaps. If you’re working near a baton or block, you can leave the excess to be buried or wrap it around the baton.
Step 6: Connecting Sections of Artificial Grass
If you find yourself needing to connect two sections of artificial grass, you’ll require joining tape and adhesive from your artificial turf supplier. Ensure you have enough, as it tends not to go very far.
Here’s the process for creating a seamless join:
- Place the two sections of grass to be joined next to each other, with the grass pile facing up. Align them properly, making sure the pile runs in the same direction.
- Fold back each side and cut the edges, slicing down the middle of two rows of tufts.
- Check the fit by offering up the two sides. Any gap at this stage will persist when glued, so ensure a perfect fit.
- Fold back both edges and lay the jointing tape in the gap, following the instructions to ensure the tape is positioned correctly.
- Apply adhesive to the jointing tape. Depending on the adhesive, you may need a spreader to ensure even distribution.
- Fold back the sides of the grass being joined one at a time, ensuring a seamless alignment.
- Apply pressure on the joint until the adhesive cures. Wipe off any glue that comes into contact with the grass immediately.
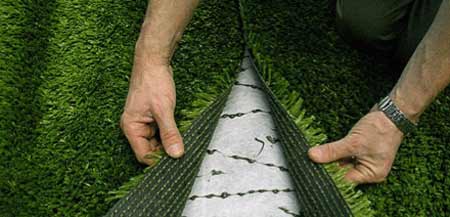
Making a join between two pieces of artificial grass – Image courtesy of Artificial Lawn Company
TIP: Getting the right amount of adhesive is crucial – too little won’t create a solid join, and too much may seep through the grass, affecting its appearance.
Step 7: Securing the Artificial Turf
Once your artificial turf is laid out and cut to size, it’s time to secure it in place. When fixing it to batons, you can use galvanised screws or grip nails. For other areas, rely on U-pins, as mentioned earlier.
Place fixings approximately every 50cm (20 inches), but adjust the spacing if needed.
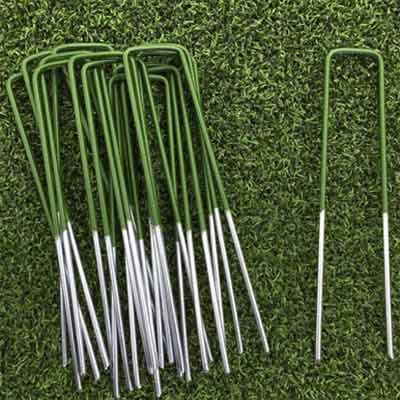
U-Pins used for securing synthetic grass carpet
When adhering fake grass with adhesive, adhere to the manufacturer’s guidelines. There are specific adhesives designed specifically for securing grass, which can be found on Amazon and other retailers.
Step 8: Final Touches and Dressing
With the turf securely fixed, the final step involves dressing, if necessary.
Most artificial turfs used in domestic settings may require some dressing, which involves adding and brushing in sand over the whole surface.
Not all synthetic grasses require this, so don’t fret if it’s not needed. Generally, areas with higher foot traffic are more likely to benefit from dressing, as it helps the grass maintain its upright position.
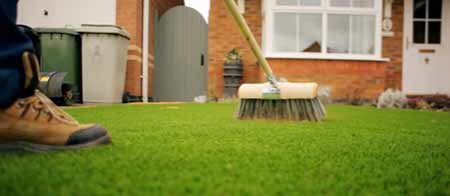
Dressing your lawn by brushing in some sand – Image courtesy of Lazy Lawn
The type of dressing sand needed will be specified, usually kiln-dried silica sand at around 5-8 kilograms per square meter. Spread it evenly and brush it in using a stiff broom or clean yard brush.
And with that, your artificial turf installation is complete! Now, sit back, relax, and enjoy your new lawn.
How to Install Artificial Turf on a Hard Surface
We also promised a quick guide on laying artificial turf on a hard surface, so let’s dive right in.
First things first, ensure your surface has proper drainage, ideally with at least a 1:200 slope. The type of surface doesn’t matter — whether it’s concrete, asphalt, or a patio, artificial turf can be securely fixed onto it.
Laying artificial turf on a concrete base – Image courtesy of Bunnings
TIP: If your surface isn’t perfectly flat, the bumps may show through the artificial grass. You can address this by using an underlay (like shock-absorbent material) or marine ply fixed to the hard surface, providing a smooth base for the grass.
Here are the steps for laying artificial turf on a hard surface:
- Clear any debris and sweep the surface clean; you’re sticking the turf directly to it, so cleanliness is crucial. Refer to the tip above if the surface isn’t flat.
- Lay out your artificial turf, allowing time for creases to settle.
- Stretch out the grass and cut it to size. You can choose to stick first and then cut, whichever suits you best.
- Apply adhesive (recommended by the manufacturer) to the hard surface. For smaller areas, sticking the perimeter may suffice, but for larger spaces, it’s best to apply adhesive across the entire area.
- Press down on the synthetic grass carpet until the adhesive cures, using a roller or weight. Use the right amount of adhesive for a secure fix, but avoid excess that may seep through the turf carpet and glue the grass pile down.
- Complete the dressing and finishing steps as outlined above.
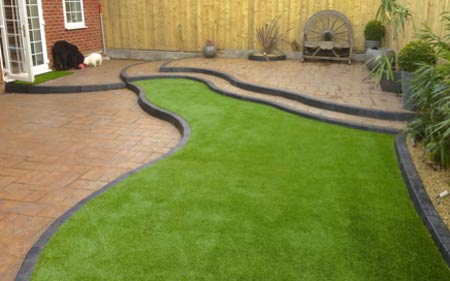
An impressive artificial grass lawn – Image courtesy of Emperor Roofing and Landscaping
Surprisingly, laying artificial turf on a hard surface is a bit easier, skipping the need for sub-base preparation.
How to Care for Your Artificial Grass
Ensuring your artificial grass remains in top-notch condition and has a long lifespan requires proper maintenance. Neglecting this aspect might result in only a few years of use. Here’s a simple guide to keep it well-maintained:
- If your grass is dressed, regularly top up the dressing materials to maintain the recommended amount.
- Clear away any debris on the surface, such as leaves, to keep it looking tidy.
- Occasionally, hose down the entire surface to eliminate spills and other substances. Follow this by using a stiff brush to revitalise the grass pile.
- Promptly remove any weeds that manage to surface, along with addressing any moss buildup.
- For pet owners, swiftly clean up and wash the surface to eliminate any pet waste and potential odours.
- In case of spills, promptly wipe away as much as possible. Use a suitable cleaner or degreaser to eliminate any remaining residue.
- If any joins fail or start to lift, glue them back down as soon as possible
By following these steps, you’ll ensure your artificial grass stays lush and appealing for an extended period.
Despite it being fake, artificial turf is actually a great solution, and a project that you can certainly do as a DIY enthusiast.
OK, so it’s not real grass, but there are definite advantages to something that does not die, never needs watering and only limited tending. In this busy world artificial turf is a fantastic home improvement project.