Cracks that appear in the home can be very annoying and un-slightly and although in most cases they are just simple settlement cracks they can be a sign of something much more sinister.
In this project we take a look settlement cracks in the home and how to identify what’s caused them and then how to fix them.
Common Causes of Cracks in the Home
Cracks in walls or ceilings are very common and usually caused by normal movement within your home. Most small, hairline cracks happen when materials expand and contract due to changes in temperature and humidity.
Your home contains many different materials and each one reacts differently to moisture and heat. For example, timber swells when damp and shrinks when dry. If plaster is fixed directly against a timber window frame, especially in a humid bathroom, daily movement can cause the plaster to crack.
External factors can also cause minor cracks. Homes near busy roads may experience vibrations from traffic, which can result in small cracks over time.
New-build homes often go through a “settlement” period where the structure naturally adjusts. This can create very fine settlement or shrinkage cracks, typically less than 0.5 mm wide. These cracks are usually cosmetic but should still be monitored, as they can sometimes indicate early signs of deeper issues.
While hairline cracks are often harmless, larger cracks, especially in brickwork or external cavity walls, can signal serious structural problems such as foundation movement or the need for underpinning.
In the case of larger cracks or anything suspect, you should always get these inspected by a structural engineer or specialist.
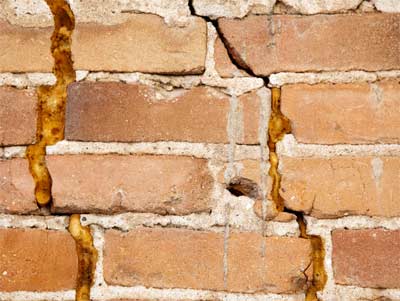
Settlement cracks in outer cavity wall of property
Types of Cracks
When assessing serious cracks in your home, there are two main types to look out for. These larger cracks can indicate structural movement or underlying issues that may need professional attention.
It’s also important to note the direction of the crack, as this can help identify the cause and the severity of the problem.
The most common types of crack are as follows:
Horizontal Cracks (including diagonal or stepped)
Horizontal or stepped cracks often appear along the mortar joints of brick or block walls. They can run straight or diagonally in a staircase pattern, each indicating different structural stresses.
Straight horizontal cracks are usually caused by sideways pressure, for example, from soil pushing against a retaining or basement wall. Poor drainage and water build-up behind walls can make this worse. Diagonal or stepped cracks typically signal foundation movement, such as subsidence or settlement, where the ground beneath the property has shifted.
Another frequent cause is wall tie failure. When wall ties corrode and expand, they force mortar joints apart and create visible cracks. Read more about replacing cavity wall ties here.
In some cases, these cracks may extend into the foundations. Because they are often below ground level, you’ll need to look for related signs such as uneven floors or internal wall movement.
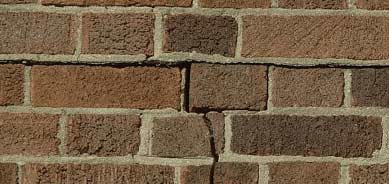
Horizontal settlement crack in wall
Vertical Cracks
Small vertical cracks on internal walls are common and usually harmless. They’re often caused by natural movement in materials like plasterboard or brickwork as your home expands and contracts over time.
However, larger vertical cracks, typically 3mm wide or more, appearing on external walls can be a sign of serious structural issues. These often indicate settlement or foundation movement, where part of the foundation has sunk or shifted. As the ground drops, it pulls the wall apart from the rest of the structure, creating a visible split that should be investigated by a structural engineer.

Vertical stepped settlement crack in wall
If a crack suddenly appears in your property, no matter how small, it should be checked as soon as possible for peace of mind and safety.
Be aware that paint, plaster or render can often hide the true extent of a crack, making structural damage seem less serious than it really is.
If large or widening cracks appear, contact a qualified structural engineer or professional contractor immediately. The issue could compromise the safety of your home and potentially affect neighbouring properties.
How Settlement Damage to Foundations Can Happen and Cause Cracks
As settlement damage is a major cause of many cracks found in the home including settlement cracks, here follows the most common causes.
Poor Drainage, Flooding and Rain
When the ground around a property isn’t properly graded, rainwater can collect instead of draining away. Faulty or damaged guttering can make this worse by allowing water to overflow and pool near the foundations.
Over time, this excess moisture seeps into the soil, creating voids or soft patches. In clay-rich ground, it can cause the soil to expand and contract, leading to foundation movement and structural cracking.
Leaks
Plumbing, waste pipes and other pipework often run beneath a property. If a leak develops, water can quickly saturate the surrounding soil, weakening the foundations and reducing their load-bearing capacity.
Trees
Large, mature trees near your property can create structural issues. Their root systems often extend far beyond the visible canopy and can absorb significant moisture, causing soil shrinkage.
As roots grow and shift, they may also loosen surrounding soil, potentially affecting the stability of foundations and nearby structures.
Prolonged Drought
Extended periods of dry weather can cause soil to shrink and settle, reducing support for foundations. This can lead to shifting and structural movement in your property.
Incorrectly Compacted Soil Fill
During construction, soil is often replaced to create a level base for footings. If this fill isn’t properly compacted, it can settle under the building’s weight, leading to foundation failure.
Tell–Tale Signs of Serious Settlement Damage
Alongside visible cracks, there are other clear warning signs that your home may be suffering from serious settlement or foundation movement:
- Internal Doors – If your doors become stiff, jam or show uneven gaps around the frame, your property may have twisted or shifted due to structural movement.
- Window Frames – Warped or hard-to-open windows or cracking glass, often indicate the building is flexing under stress from movement or subsidence.
- Nail and Screw Heads – Known as “nail pops,” raised screws or nails near cracks suggest internal walls and ceilings are being pulled apart. A few isolated ones are normal, but multiple pops with visible cracks could point to serious structural issues requiring inspection.
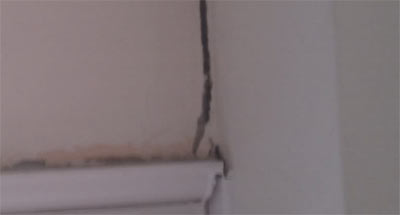
Settlement crack above door frame
Cracks in Walls – Are They Still Active?
Sometimes cracks appear suddenly and then remain unchanged for years. This can happen if the ground shifts once, perhaps due to soil collapse, a void filling in or a minor geological event and then stabilises.
Ongoing movement, however, is a warning sign. The UK experiences hundreds of small earthquakes every year, according to the British Geological Society. Most are too weak to feel but can still cause minor ground movement that leads to cracks in walls.
Repeated movement is often linked to drainage or water supply problems, such as leaking pipes or collapsing sewers. Always check for these first. Learn how to trace and fix leaks here.
Below are three simple DIY methods for checking whether a wall crack is still moving. For greater accuracy, you can also use a professional tool such as the Avongard Tell-Tale crack monitoring gauge.
This clear plastic gauge tracks both horizontal and vertical crack movement with a precision of ±1.0mm (or ±0.5mm by interpolation). Each change is recorded on the supplied monitoring card, helping you spot ongoing structural shifts early.
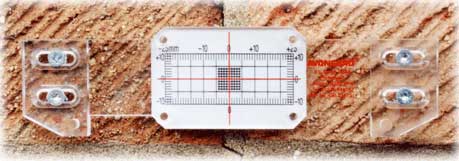
Crack monitoring gauge
DIY Methods of Crack Monitoring
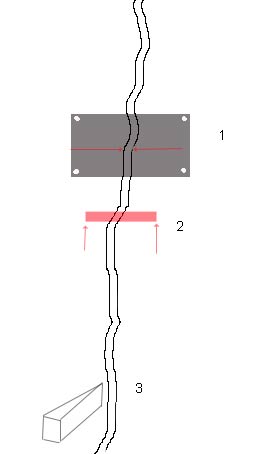
Example of a crack in a wall with DIY monitoring methods installed
The image above shows a typical wall crack, which can appear either inside or outside a property.
1. Glass Method:
Attach a small piece of glass (about 9 x 4 inches) over the crack using screws or a strong adhesive like Araldite. Drill small holes in the corners for the screws, but don’t overtighten. Use rubber washers to prevent breaking the glass. If the crack widens over time, the glass will fracture, showing clear evidence of movement. Check it regularly, and if movement occurs, contact a structural engineer immediately.
2. Duct Tape Method:
Apply a strip of heavy-duty duct tape across the crack. Mark each end with a pencil line. If the crack expands, the tape will stretch or shift, showing visible movement. Inspect it often and seek professional advice if the gap increases.
3. Timber Wedge Method:
Gently tap a dry timber wedge into the crack. Avoid forcing it in too hard, as this can cause more damage. If the structure continues to move, the wedge will loosen or fall out, indicating ongoing movement.
These DIY methods are simple ways to monitor cracks and detect movement early. However, for precise and reliable results, it’s best to use a professional crack monitoring kit designed specifically for this purpose.
Methods for Repairing Subsidence and Settlement Problems in Foundations
If your property shows signs of subsidence or settlement, it’s vital to act quickly. Leaving the issue unresolved can lead to serious structural damage and costly repairs later on.
Foundation repair methods vary depending on the extent of the damage and the advice of a qualified structural engineer. In most cases, repairs are carried out using one of two main techniques designed to stabilise and strengthen the affected foundations.
Slabjacking (Mudjacking or Grout Pumping)
Slabjacking, also known as mudjacking or grout pumping, is a method used to lift sunken foundations, driveways or concrete slabs. It works by pumping a concrete mix into empty spaces beneath the affected area, filling voids and raising the surface back to its original level.
This technique is ideal when surrounding soil is too unstable for piling, as it avoids further disturbance. However, slabjacking should not be used where soil may expand, as this can push the concrete upward again and cause new damage.
Mass Concrete Underpinning
Mass concrete underpinning involves digging deep sections alongside an existing foundation and filling the void with concrete. Each section is poured and allowed to cure before moving to the next, gradually strengthening and stabilising the foundation.
Piling as an Underpinning Method
Piling uses concrete or steel piles to stabilise foundations. Holes, usually 10–20 feet deep and about 12 inches wide, are drilled to reach stable ground. Reinforced steel bars are added for strength, then concrete is poured and allowed to cure.
Hydraulic jacks lift the property back to its correct level, and spacers are placed on the piles to support the foundation. Once stable, the foundation is rebuilt to connect with the property.
Pile and Beam Underpinning
The pile and beam method involves drilling piles on either side of the foundation and placing a concrete or steel beam beneath it. Each end of the beam rests on a pile, distributing the load evenly. Adding more beams increases the weight the foundation can safely support.
Screw (Auger) Pile and Bracket Underpinning
Steel piers often use screw bases, called auger or helical piles, which twist into the soil like a corkscrew. Once in place, brackets are fitted to support the foundation.
Another type, push piers, are galvanised steel sections driven into the ground with a hydraulic ram to provide stable support.
Before attempting any repairs, always get a full survey and expert advice from a structural engineer or foundation specialist. They will recommend the safest and most effective repair method for your property.
Piled Raft Underpinning
For properties with deep foundations requiring full underpinning, piles are installed in a grid around the building.
Tunnels are then formed between the piles, and a concrete or steel ring beam connects them.
This ring beam carries the building’s weight, distributing the load evenly across all piles for maximum stability.
Mini Piles Through Floor Slab
Sometimes the floor slab may settle even if the main foundations are stable, particularly on clay soils or poorly compacted sub-bases containing organic material.
Remedial work involves removing the floor screed and drilling holes through the slab in a grid pattern, usually every 600mm to 1.5m, to depths specified by a structural engineer (typically 3m or more).
Grout is pumped into the holes, bonding the slab and underlying ground. Once set, a new floor screed is laid to restore the correct level.
Large and Small Cracks in Walls and Foundations and How to Repair Them
After fixing the root cause of settlement or subsidence using the methods above, the next step is repairing visible damage such as cracks or splits in brickwork and blockwork.
Successful structural repairs may close some gaps, but any remaining cracks should be reinforced and filled to restore strength and prevent water ingress or further movement.
Vertical Cracks
Vertical cracks in masonry are best repaired by stitching the crack using specialist crack stitching bars, either Helical-threaded or epoxy-glass rods.
First, cut a bedding joint across the crack and remove all dust and debris with specialist extraction equipment to ensure a strong bond.
Insert the rods and inject a polyester or epoxy resin to secure them into the masonry. Once the resin sets, fill the joint with a soft mortar mixed with a shrink-proofing agent to accommodate minor future movement.
Horizontal Cracks in Foundations
Horizontal cracks require professional assessment to determine the cause before repair:
- Wall Tie Failure – Replace corroded or damaged wall ties. See our detailed guide here.
- Applied Pressure – Cracks from external pressure may require steel bracing, carbon fibre straps or building a new retaining wall to relieve soil pressure. A structural engineer should determine the safest solution.
- Poor Internal Drainage – Check plumbing and waste pipes for leaks. Repairs may require a qualified plumber, especially if pipes are embedded in concrete.
- Faulty External Drainage – Ensure soil, paths, and landscaping slope away from the property. Install French drains or repair gutters to prevent water accumulation. Consult a qualified builder if needed.
- Settlement and Subsidence – If foundations have dropped, underpinning or other stabilisation methods may be necessary to restore structural integrity and correct alignment.
Once the underlying issue is resolved, repair the crack itself in 600mm sections. Remove one brick course above and below the crack, clean out old mortar, and repoint with fresh mortar. Note: Only work in 600mm sections at a time to maintain stability.
Filling Minor Settlement Cracks in Walls and Plaster
Minor cracks in walls and plaster are usually easy to repair. Start by cleaning the crack and surrounding area using a small brush and, if available, a vacuum to remove dust and debris.
Apply a good quality filler like Polyfilla with a spatula, pressing it gently into the crack. Smooth it flat against the wall for an even finish.
Allow the filler to cure for a few days. Once dry, sand any raised edges until smooth. If small dips or pits remain, repeat the process to achieve a seamless surface.
Repairing Cracks in Sills and Copings
Repair here depends on the crack size and whether the sill or coping is load-bearing. You will need A Structural Engineer to confirm this.
For most small cracks, widen the gap slightly and fill it with mortar, pressing it in and smoothing it flush with the stone for a natural finish.
For wider or load-bearing cracks, a structural repair may be needed. This often involves stitching similar to vertical crack repairs:
- Cut channels at 90° to the crack, about 1 inch deep, using an angle grinder with a stone disc.
- Insert threaded or Helical bars into the channels.
- Fill the channels with grout or resin, smoothing as close to the stone face as possible.
This method strengthens the stone while keeping a flush, clean appearance.
In most cases, settlement cracks should if they are small should not be something to worry about, however if they are large or can be seen to be getting visually worse, then this is something that will certainly ned to be checked by a structural engineer.