In this guide, we show you how to easily spot and locate water leaks in your home quickly to minimise damage and expense.
We’ll outline common sources of leaks and how to identify them through clear signs like damp patches, stains, or pooling water. By recognising these indicators, you can trace the leak to its source and act before it causes serious damage.
What Are Water Leaks and How Do They Start?
Water leaks occur when unwanted water escapes from your plumbing system, roof, household appliances, mains supply and even sewer and seeps into areas it shouldn’t.
Even a small leak in any of these systems can lead to damp, mould and in time, structural damage if it’s not dealt with quickly.
Leaks usually begin with wear and tear. Over time, pipes can corrode, seals around taps and toilets may weaken, roof tiles or flashing can become damaged by bad weather and mains water and sewer pipes can become cracked, damaged or worn. In some cases, leaks are caused by blockages that put extra pressure on pipes or by poor installation of plumbing or guttering.
In UK homes, common sources of leaks include dripping taps, leaking toilets, cracked water tanks, burst pipes during freezing weather and damaged roofs or gutters. Spotting these problems early is vital, as untreated leaks can increase your water bills and lead to costly repairs.
By understanding what causes leaks and where they are most likely to start, you can take preventative steps and deal with issues before they become major problems.
How to Test for Water Leaks in the Home
Testing for water leaks in your home is easier than you might think and can be done simply by checking your water meter. First, turn off all taps and appliances that use water in your home, then look at the meter. If the dial is still moving, it’s a strong sign that you have a hidden leak.
To be 100% sure, after initially checking your meter, leave everyone off still for 15 minutes and check it again. If the numbers have increased then there is a leak somewhere.
Another simple test is to inspect toilets, as they are one of the most common culprits. Add a few drops of food colouring to the cistern and wait 10–15 minutes without flushing. If the colour seeps into the bowl, you’ve got a leak in the flush system.
Although such leaks are normally very small, they are constant and you would be amazed just how much water they can waste over the course of a year!
Additionally, don’t forget to check taps, pipes under sinks and appliances such as washing machines or dishwashers. Look for damp patches, water stains or mould growth, which can all point to a slow leak. For roofs and gutters, inspect during or after heavy rain to see if water is entering the property where it shouldn’t.
One final method to be aware of is that if you notice cold or damp patches on walls, floors or ceilings, a damp meter can confirm whether water is present. These handy tools detect hidden moisture that may not be visible to the eye.
Using one is simple: press the prongs into the wall surface, and the screen will instantly show if damp is present and how severe it is. If you don’t have a meter, you can still check by running the back of your hand over surfaces to feel for cooler or wetter spots.
A damp meter gives quick, accurate results, helping you pinpoint potential leaks before they cause serious damage.

Use a damp meter like this one to find the area of your wall or ceiling affected by the leak
A hygrometer is another useful tool for checking damp. It measures moisture in the air, helping you see if condensation rather than a hidden water leak is the cause of damp patches.

A hygrometer measures the dampness of the air inside your house – a high reading may indicate that condensation is the issue rather than a water leak
If you suspect a leak but can’t trace it, consider using a moisture meter or contacting a plumber. Acting quickly is important, as even small leaks can lead to bigger problems like damp, mould, and higher water bills.
Who is Responsible for Leaks on Your Property?
When it comes to water leaks, responsibility depends on where the actual leak is located. As a homeowner, you are usually responsible for all pipework, fixtures and appliances inside your property boundary. This includes pipes under your garden, driveway and all internal plumbing.
Water companies are typically responsible for the supply pipe up to the boundary of your property, as well as the public mains in the street. If a leak occurs outside your boundary, it is usually their duty to repair it. However, if the leak is within your boundary, even underground, unfortunately the repair responsibility and expense fall on you.
Landlords are responsible for repairing leaks in rented properties, unless the damage has been caused by a tenant’s misuse. If you are renting and notice damp, mould or obvious water damage, report it to your landlord or letting agent straight away to avoid the problem getting worse.
If you are unsure whether a leak is your responsibility or the water company’s, contact your supplier. Most water providers offer free checks and advice to help determine the source of the problem and who must fix it.
Can You Get a Leak-Allowance or Compensation for Leaks?
Yes, in many cases UK water companies offer what’s known as a leak allowance. In most This is a reduction on your water bill if you have had an underground leak on your property and can show it has been properly repaired. The allowance helps cover the cost of the wasted water that escaped before the issue was fixed.
To qualify, you will normally need to provide proof that the repair has been carried out by a qualified plumber or contractor. Some water companies also require you to submit meter readings before and after the repair, along with any invoices or photos of the work.
If the leak was on your supply pipe within your boundary, responsibility lies with you as the homeowner, but many suppliers will still offer partial compensation once repairs are complete. If the leak was on the public main, your water company should cover the cost in full.
It’s also worth checking your home insurance policy, as some insurers will cover repair costs and may liaise directly with the water company to claim any allowance or refund on your behalf.
If you suspect a leak, act quickly. The sooner you report it and get it repaired, the more likely you are to qualify for financial help and avoid higher water bills.
Common Causes of Leaks in the Home and How to Trace Them
Once you’ve confirmed damp, the next step is to find the source of the water so that you can get it fixed. Use the checklist below to trace some of the most common causes of leaks and decide the best fix.
1. Leaking Mains Supply
Leaks can come from your property’s mains supply or even a neighbour’s. In some cases, broken mains pipes further up the street can lead to flooding in basements. Contact your water supplier and ask them to check your supply for evidence of leaks.
Just to note, only neighbours beside you or uphill are likely to affect your home.
2. Test the Water
If water is seeping through walls or floors, your supplier can test it to see if it’s groundwater, mains water or sewage. By doing so, this helps narrow down the actual source of the leak. You can find your local water supplier here.
3. Leaking Foul Water Pipes
To test drains, block the outlet in your manhole with a bung, ensuring it’s fully sealed (available from builders’ merchants) and then fill a sink or toilet with water and mark the level the water initially sits at.
If it drops overnight, there’s a leak and you’ll need a drainage expert. You can search for one on the National Association of Drainage Contractors website. Don’t forget to remove the bung after testing.
4. Dye Testing for Surface Drains
Add drain dye and water into the system. At night, check for glowing dye where the leak shows, a simple way to trace surface water leaks.
This is a simple test that can be done yourself through purchasing a few basic products from your local DIY store or plumbing centre.
You simply mix up the dye to manufacturers specifications, pour it into your toilet, sink, drain or other area you suspect to be leaking or just want to test and then follow the drainage path looking for evidence of the dye.
5. Fixtures and Appliances
Leaks in kitchens and bathrooms often come from appliances or fittings. Check washing machines, dishwashers, baths, showers, sinks and toilets while they’re in use. Small drips from pipe joints or seals are easy to miss but can cause major damp over time.
In most cases, if the leak is due to a faulty appliance then it’s best left to a professional with the necessary experience to repair that appliance, as many can now be repaired rather than simply binned and replaced.
If the leak is emanating from a pipe or joint supplying the appliance then in most cases, this can be repaired by yourself with a little DIY knowledge.
Appliances are a common source of kitchen and bathroom leaks.
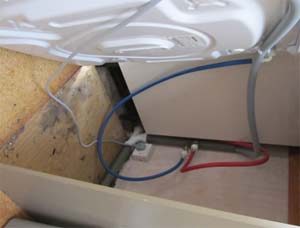
6. Central Heating System
Water on the floor may be from heating pipes or radiators. Inspect visible pipework and radiators, especially near damp patches. A plumber can run a pressure test to find hidden leaks, including underfloor heating pipes.
Once found, the faulty item, whether it’s a burst pipe, faulty valve, fitting or similar can then be replaced.
If it’s something most serious such as boiler, then you will need to get a qualified GasSafe engineer to get the issue sorted.
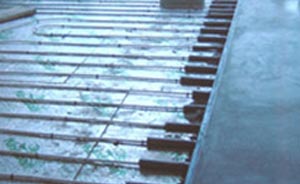
Check heating pipes carefully, including underfloor systems.
If no leaks are found, the damp may be due to condensation or penetrating moisture rather than a pipe leak. See our Diagnosing Damp project to identify the type of damp affecting your home.
After Fixing Water Leaks
Once the source of a leak has been repaired, the next step is tackling any damage left behind. This often means restoring plaster, paint, wallpaper and treating mould or salt deposits before redecorating.
Removing Black Mould
Leaks can leave behind black mould on walls and ceilings. If plaster is affected, remove it back to the brick, allow the area to dry fully, and clean with an anti-mould solution. Once treated, replaster and finish with paint or wallpaper that contains an anti-mould additive to stop regrowth.
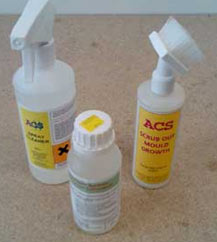
Clean damp areas thoroughly with an anti-mould solution.
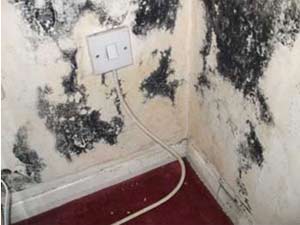
Leaks create the damp conditions mould needs to thrive.
Dealing with Salt Damage
Leaks often draw salts out of brickwork, leaving white, powdery patches on plaster and paint. If plaster is sound, strip the decoration, let the wall dry, apply a salt neutraliser, then redecorate. If plaster is damaged, remove it completely, treat the wall and replaster before finishing.
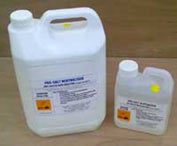
Salt neutralisers stop white deposits from reappearing.
For serious salt contamination, fit a mesh membrane before replastering for long-term protection. See our Mesh Membrane Project for guidance.
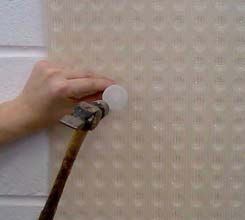
Fitting a mesh membrane can stop salts from appearing in your wall when a water leak is present behind or in the wall
If you suspect a leak at home, act quickly. Even a small leak can escalate into costly repairs, from structural damage to mould growth. Finding and fixing the source early prevents bigger problems and saves money in the long run.