Yale Lock Security
The following is an email we received from one of our users:
Hi
Years ago some smart alec security sales man opened my Yale type door lock with a credit card letting our cat out at a dodgy hour. It irritated me no end. I withheld the option of paying him to fit a security lock but it did make me think. I knocked 3 small nails into the door frame leaving a minute gap between the lock on the door and the frame to stop a card sneaking through the gap. I keep trying it but have never been able to get a card through any door I owned, just impossible. Cheap, but very effective? I do also have a five lever lock as well these days of course. Martin Feldwick
Twisted Timber
If you have ever tried to nail two pieces of timber together that were twisted or bowed, you will see that the following tip is really useful. I won’t bore you with text, the picture says it all.
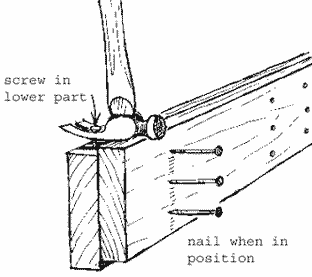
Nailing a bowed piece of wood to straighten it out
laying Floorboards
We get a great many questions about laying floorboards and how best to keep them tight. There are a couple of tricks below. The first one uses a brick carrier that can be hired for a few pounds a week. Nail a batten on the first board you lay, and use that as a lever to pull the boards tight. You can adjust the brick carrier, and when you run out of adjustment, move the batten.
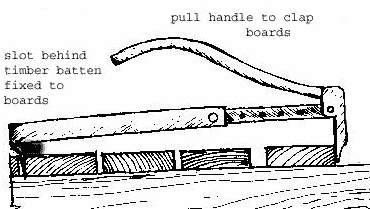
How to lay floorboards tightly using a brick carrier
The second trick requires holes to be drilled in the top of the joist every so often and the boards are simply levered into place.
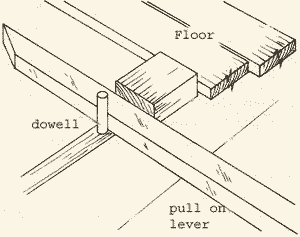
How to lay floor boards using a lever to ensure they are kept tight together
Plumbing a Door Frame in a Stud/Plasterboard Wall
If you are building a stud wall, it is so important to have the door frame plumb. Hanging the door is a nightmare unless this is accurate. Just chisel a sliver from the top of the frame and wedge the plumb line in. You will then have a plumb reference for both sides of the frame.
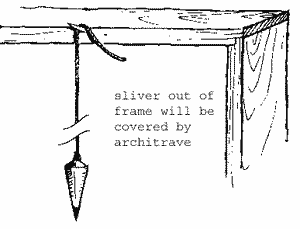
Hang a plumb line from the door frame to ensure that it is straight and square
Neat Hinges
To make sure you have a neat cut around the hinges on your new door, use the tip below.

Use a stanley knife to mark the cuts around a door hinge to make sure it is tidy finish
You Need Hands
If you have some awkward nailing or fixing to do, shelves in the airing cupboard, dado or picture rails. Holding timber, drill, screwdriver, hammer, screw, nail, pencil and coffee all at the same time gets a bit tricky, especially in confined spaces!
Take your timber and pencil, offer the timber to the job and mark where you need the holes. Drill them at your bench (or the upturned bucket in the garden) countersink if screws, and push the nails or screws in so they stay in the holes. Put the timber back to the job and you will only need the two hands. Providing you have drunk your coffee!
Secret Nails
If you have no choice but to nail, and you don’t want to see the nail head, use a very sharp chisel and carefully chisel up a small sliver of the timber and drive the nail in underneath. Then glue the timber back.
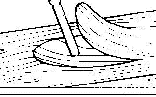
Image of how to hide a nail head in a piece of timber
Preventing Timber Splits
The following tip was submitted to us by John:
When knocking a nail into wood near to the end of the plank, to stop the wood splitting, invert the nail and hit it once to compress the fibres of the wood then hammer the nail in the correct way into the indent, A tip passed down from my Dad forty odd years ago
All article content written and produced by Mike Edwards