Cutting Pipes
If you need to install some plastic drainage for new basins, sinks or maybe toilet pipes or gutters, the ends of the pipes need to be cut square, which is not as easy as it seems. Wrap a piece of paper around the pipe and line up the edge. Tape it and it will give you a square edge to cut to.
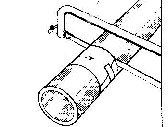
Tip for Cutting a Pipe in a Straight Line
Noisey Pipes
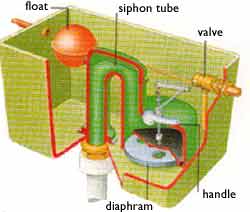
A Cross Section View of a Toilet Cistern
One of our most frequent questions is how to stop "water-hammer" when water has been drawn from a system. First it is important to know how it occurs. The entry of cold water into your tank and toilet cisterns is controlled by a "ball valve". As hot water is drawn from your emersion, so cold water rushes in from the cold tank to replace it. When you flush the loo, the same thing happens in your cistern. The incoming flow is regulated by a float, which rises with the water to shut off the valve when the tank is full. This float is generally in the form of a plastic ball on the end of an arm.
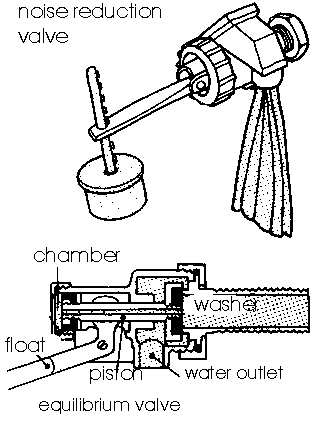
Cistern Noise Reduction Valve
When the mains cold rushes into the tank/cistern it causes ripples on the surface, the float bobs about, opening and closing the valve. It is this vibration within the valve and on the float arm which, when reverberating along the pipe, initiates the cause of water-hammer. The velocity of the water flowing through the valve means that when it is shut there is a build up of pressure behind the valve, as more water tries to push on through the pipe. This increase in pressure causes a pressure wave to form which travels back down the pipe. The wave then travels up and down the pipe until the energy is dissipated through friction, this is why there is a ‘hammering’ effect.
There are a few ways to ease this problem, "professional" ways and DIY ways, none are difficult, but the first thing to make sure of is that wherever a pipe is up against a joist, rafter or other surface, it is fixed securely. The first and most effective professional way is to install an equilibrium valve instead of the standard valve in your tank or cistern.
This valve works by allowing some water to get at the back of the piston washer to stop the arm jumping about. The noise reduction valve above it is a further alternative, this allows incoming water to disperse below the water line and reduces the "waves", it slows the vibration down but most often will not stop it. The cost of a noise reduction valve is about £7.00, with arm and ball and an equilibrium valve is approx £33.00. The noise reduction valve does make a considerable difference to the noise your system makes when filling up.
The DIY way is very effective but slightly cumbersome. Take an ordinary yoghurt carton and attach it to your float arm with some galvanised or stainless steel wire, which will not rust. Suspend the carton just below the water line. When full of water it has enough weight to stop the vibration, but not too much to stop the arm lifting gently.

Yogurt Pot Attached to a Ball Cock to Create a DIY Noise Reduction Valve
If your pipes are not hammering but just making creaking noises, this is normally caused by the friction of the pipe moving on the joist or rafter. Get some heavy duty polythene and fix it between the two surfaces and reduce the friction.
To cure an air lock, this was sent in by Dave Maynard: See also our DIY Curing an Air Lock Project
When needing to pass mains cold water pressure across to air locked hot water supply using kitchen mixer taps: Easier than trying to find another tap and having to use a long hose which may, anyway, not fit the shape of some taps. Simpler than playing around with washing machine hoses.
Procedure 1
- Squeeze the single mixer tap outlet so that the palm of your hand covers
it firmly. - Turn on the hot, then the cold, (this order is important to prevent confined mains pressure from forcing your hand away from the tap outlet). The cold supply, now unable to exit from the hand blocked tap outlet, will instead flow across to the hot water pipe causing a backflow in the hot water system, clearing the airlock.
Note: If you have a similarly non-mains pressured COLD supply i.e. also fed from a header tank and which also has an airlock: Same as just described but this time you need to use the mains pressured water to purge the non-mains pressured COLD supply, which, unlike the hot supply, is probably inaccessible from downstairs and therefore nowhere near any mains pressured water.
To do this you firstly need to create a path between the hot water supply and the non-mains pressured cold water supply.
Procedure 2
Prior to starting the tap squeezing exercise, and if you have a non-electric shower mixer tap in the upstairs bathroom:
- Unscrew the showerhead from the pipe
- Place 2 or 3 layers of plastic bag over the end of the pipe to form a strong membrane
- Re-screw the shower head with the membrane still in place
- Go to the header tank and turn ONLY the hot outlet OFF. Leave the cold one ON.
- Go back to the shower taps and turn both hot and cold ON, with the diverter in the SHOWER position.
- Go back downstairs and carry out the procedure initially described i.e. using hand pressure over the mixer taps.
The mains pressured water will now back flow up into the hot water system but then flow across to the non-mains pressured cold water system via plastic bag blocked mixer in the bathroom thus clearing any air locks in the non-mains pressured cold supply.
If you don’t have a shower mixer as described, but do have separate hot and cold taps e.g. sink taps, then steps 1) to 3) can be replaced by just connecting a hose across the two taps. Step 5) would omit the requirement to set the diverter.
All article content written and produced by Mike Edwards