Water underfloor heating or underfloor hot water heating as it’s sometimes known is suitable for all types of property, whether domestic or commercial, and it can be easily linked into any heat source including solar, and also geothermal heating systems, or even an existing or new central heating system.
Underfloor heating has plenty of benefits compared with the more conventional radiators that we’ve all been used to and it is suitable for all types of property. It’s possible to heat a small conservatory, kitchen or bathroom or heat the whole house in this manor.
There are many companies out there that supply and fit underfloor heating systems. Most companies will supply all the elements necessary to install in your home along with a qualified fitter to carry out the work for you. Some companies also offer DIY kits so that you can install your self.
How Water Underfloor Heating works
Underfloor heating uses radiant heat. This ensures that you feel comfortable even at a lower air temperature than that produced by a more conventional, convection heating system (wall mounted radiators). With underfloor heating, the whole floor is heated. This means that no matter where you are in the room it’s all at an even temperature.
Water underfloor heating comes in the form of a series of piping loops that are laid underneath a surface (tiles, laminate flooring etc….). This then effectively turns your floor into a giant radiator!
The pipework to run the system is connected to your existing heating system via a manifold. The manifold is normally located in an easy to access position in case maintenance or repair is required.
Instead of high temperature water being required (as in wall mounted radiators) lower temperature water can be used (normally around 50°C) due to the fact that the heating surface is much bigger and unlike a conventional heat source (wall mounted radiators) it does not need to give off as much heat per sqm in order to heat a given space to a required temperature. This has quite a few benefits in that the boiler then becomes much more efficient as it does not need to heat the water as much and in turn becomes cheaper to run and is kinder to the environment.
Another benefit of underfloor heating is that there is nothing to show around the home except the room thermostat. There are no radiators to decorate and no difficult decisions on where to put your furniture so that it doesn’t get ruined in front of a radiator, This gives you complete design freedom. It is also an ideal solution for areas with high ceilings.
There are quite a few different options and situations to look at if you are considering underfloor heating, with some being more suited to certain situations/needs than others. Below you will find a selection of the most common setups:
The Different Water Underfloor Heating Setup’s
Single Zone Underfloor Heating System
Warm water is circulated from the boiler to a zone valve which is operated electrically and treated as one zone (typically in this setup this will include any room that features underfloor heating that is all connected to the same system e.g. you could have UFH in your living room, kitchen and dinning room all on the same loop and this will be treated as one zone)
If you currently have a combination boiler running your heating system you will also need to zone your radiators in order to achieve the best possible operating scenario
If, however, you have a boiler that also runs and heats a hot water cylinder these should already be zoned (1 zone for hot water and 1 zone for radiators). If this is the case you will only need to add the UFH (underfloor heating) manifold separately with a zone valve which will make your system a 3 zone system.
In this scenario, when you activate the heating (or your programmable room thermostat turns the heating on) water will pass through the system and heat the given floor area
Multi Zoned Underfloor Heating System
A multi-zoned system works in a very similar manner to a single zone system only the difference comes in the fact that there is no need for a zone valve for your underfloor heating system. However you will need to zone your hot water cylinder and radiators.
In place of the zone valve there would feature a wiring centre that would then independently provide control to underfloor system separately from your radiators and hot water system
In this situation, your programmable thermostat/time clock will activate all of the underfloor heating thermostats and then individual rooms can then be controlled via a programmable room thermostat – in essence you will then have the ability to control the temperature and starting time of heating in any room with the feature. When a thermostat is turned on, an electronic valve that is fitted to the top body of the manifold opens and in turn will also activate your pump and fire up your boiler.
Every loop on the manifold is then capable of independent control which as you may have guessed means typically 1 loop per room (but this can sometimes depend on the size of the room)
Mixing Manifold
Hot water supplied by your boiler is passed through an actuator head (valve) and then passed on into the underfloor heating manifold which then in turn draws water from the underfloor heating pipework. When this happens the cold water that is in the underfloor heating pipework is then mixed with the hot water from the boiler and is then passed through the pump and then over a temperature sensor.
If the water passing over the temperature sensor is detected as being warmer than the temperature that has been set by the sensor (usually somewhere between 20 and 65 degrees), the zone valve will close and also turn off the boiler.
Procedure for Installing Water Underfloor Heating
Most domestic underfloor systems are designed to be very simple in nature and in turn should be quick and relatively simple to install. Due to this the skill level involved in fitting should also be less and thus it makes a great DIY project!!
Pretty much every system should be compatible with all existing conventional heating systems / boilers / radiators etc…. (Please check before purchase) and they should also be compatible with all know flooring and floor covering types you would expect to find in a home (Again, please check your flooring types and confirm with your supplier before purchase). Systems should also be compatible with geo-thermal and solar heating systems.
Every underfloor heating system supplied should come very details installation instructions and also information on how to commission your system once it has been installed (e.g. priming and filling the system etc….).
If you have chosen to go down the DIY route and install the under floor pipe work yourself and you also have some knowledge of heating systems, once the pipe work is laid you can then connect into your existing heating system into the underfloor system manifold. All you should require in order to achieve this are some standard fittings. If you have laid the pipe work but do not feel confident enough to connect into your heating system then you will need to call a plumber in. This should not take him any more than a few hours to complete.
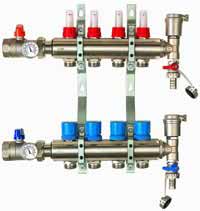
Typical Water Underfloor Heating Manifold
Again if you feel confident enough, once the plumber has completed the connection process you can then fill, bleed and balance the system yourself, if not you may wish to ask the plumber to do this for you while he is there
With all the pipe work laid and connected into your system you will now need to connect the electrical side of things e.g. thermostats etc…. If you have any programmable controllers or zone valves, the underfloor heating system will be connected into these along with your boiler so that you will then have control via your existing heating setup of the new underfloor system
The electrical connections are all made at the manifold controller, which is placed above the manifold. It is here that your electrician will need to wire the thermostats, using standard 3 core & earth cable. This will then link to your boiler and also any programmable controllers and zone valves.
The essence of most underfloor heating systems is simplicity and compatibility. The system should be easy to install and all parts involved in its construction and connection should be available from your local plumber’s merchants
What Existing Flooring Types can I lay Underfloor Heating on Top of?
Water underfloor heating can be laid on a great deal on flooring surfaces that cover pretty much every scenario you would find in your home. Below you will find a list of typical surfaces and a brief description of what is involved in laying your heating:
Solid Screeded Floor
This is quite a straight forward task as much of the work involved in laying the heating pipes will already be completed. Essentially the heating, insulation and screed are laid on top of your structural concrete slab (if you already have one, you may need to check)
Firstly you will need to lay down your DPM (Damp Proof Membrane). Once this task has been completed a layer of concrete will need to be added on top of the DPM to create your structural slab, ensure that this is level and flat.
Once the slab has cured correctly you will then have to lay insulating boards on top on the slab (check with your local building control department for the exact requirements for insulation). Again as in examples above, this will need to be rigid.
Once the insulation has been added you then need to lay the underfloor water heating pipework on top of the insulation and fix using clips.
With the insulation in place and the pipework fixed to it you can then lay your screed on top ensuring that it is flat and level. Once this screed has cured correctly, you can then lay your desired flooring on top.
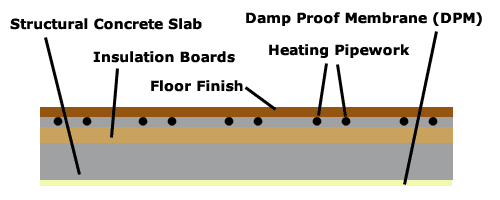
Underfloor Water Heating Pipework Laid in Screed Floor
Solid Concrete Floor
This is a similar method to the one outlined above with the only difference being that the water underfloor heating pipe work is laid within the concrete slab.
The basis of this method is that, firstly, the DPM is laid on a base and then the insulation boards are laid on top of the DPM (check with your local building control department for the exact requirements for insulation). The underfloor heating pipework is then laid on top of the insulation boards and fixed to the boards.
Once this has been done the concrete slab is poured on top of the insulation and pipework and levelled off to give a solid concrete flooring surface
As you may have guessed the main difference between this method and the one above is that only one layer of concrete is poured as opposed to a concrete slab layer and a screed layer outlined in the method above
Already Insulated Concrete Floor
If your existing concrete slab already features an insulation layer, the task of laying your underfloor heating is some what simplified a little.
In this instance you would need to lay a series of 25mm timber battens over the top of the concrete surface (at 400mm centres).
Once this has been done you can then lay your heating pipework in between the battens and fix to the concrete slab using the appropriate clips.
With the pipework laid the final task is to screed over the top of the pipework up to and level with the top of the batten. Once the screed is correctly cured you can then go ahead and lay chipboard over the top
Un-Insulated Concrete Floor
If you are laying on top of an un-insulated concrete flooring base you will need to firstly lay a series of 76mm x 50mm (3” by 2”) timber joists across the surface of the concrete base at 400mm centres and then lay insulation boards between the joists, ensuring a tight fit with no gaps (check with your local building control department for the exact requirements for insulation).
All underfloor heating pipework is then laid on top of the insulation and then screed is added and filled up to the level of the top of the joist.
Once the screed has cured correctly chipboard flooring is laid over the top and your desired flooring choice e.g. laminate on top of this.
Pipework Laid in Screed on top of Concrete Floor
In some instance you may find that your base already has insulation added on top of the DPM with a concrete slab laid over the top of this.
If this is the case then the pipework for your underfloor heating system is laid and fixed directly on top of the concrete base and then a screed is poured over this (normally this will be a 75mm screed).
Once the screed has cured you can then go ahead and lay your desired flooring on top of the screed.
Heating Laid on Timber Floor Using a Screed, in Between Existing Flooring Joists
If you would prefer to lay a screed instead of using metal plates, this would involve you in creating a sub floor.
The first task to undertake is to fix (usually nail) timber battens on either side of your flooring joists (in between each joist). Before you fix the battens you will have to measure the depth of the insulation and then add a further 25mm onto this to ensure that you leave a 25mm gap between the top of the insulation board and the top of the joist in order to ensure that the underfloor heating water pipes and the screed, once laid, are then flush with the top of the joist so that you can then lay flooring boards over the top of this.
Once you have completed this task you will then have ensure your flooring is suitably insulated by cutting some dense, rigid insulation (for example Kingspan, Celotex etc…. check with your local building control department for the exact requirements) and then laying this on top of the timber battens you have previously fixed to either side of your joists so that it fills the open void between each joist. You have to ensure the insulation is fixed tightly and that there are no gaps between it’s edges and the joists that it sits between.
Once this has been achieved you will then have to lay the heating pipework on top of the insulation boards and then clip the pipework to the boards using insulation clips.
With the pipework now laid you can then go ahead and pour your screed over, ensuring that it is flat and level and flush to the top of the flooring joist. Once the screed has dried and is solid you can then lay your chosen flooring on top (usually chipboard first and then for example laminate or tiles on top). IMPORTANT NOTE: If you choose the above option and you want a natural wood flooring finish please ensure that the screed is 100% cured before you start laying and flooring
Heating Pipes Between Timber Joists Using Metal or Aluminium Plates
The first task is to insulate in between all the joists. For this you will need either quilt insulation or board insulation. Once you have insulated you will then have to decided whether you want to use a metal or aluminium plate.
Once you have decided these are then fixed (usually nailed) to the joists. NOTE: make sure that you leave at least a 200mm gap at either end of each pipe run so that you then allow yourself enough room for the pipes to turn 180 degrees in to the next run.
The pipe work then runs in the aluminium plates and when activated they heat the plates which in turn then heats the floor in an even spread across the entire floor surface.
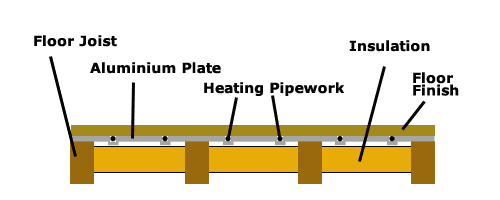
Water Underfloor Heating Pipework Laid in Timber Floor
Heating Laid on top Existing Timber Floor Using Metal or Aluminium Plates
As this suggests, the heating sits on top of an existing timber floor. Similar to the above, the joists still need to be insulated in the same manner using either quilt or board insulation.
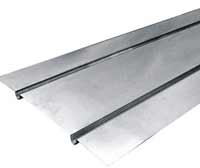
Underfloor Water Heating Aluminium Floor Plate
Once this has been done you then need to lay 20mm batts (timber) on top of the joists making sure that centres are at 400mm. Once you have laid your battens on top of the existing timber floor, as above, you then have to decide whether you want to use a metal or an aluminium plate to lay your pipework in.
Once you have decided the plate is then laid and fixed to the battens and then the pipework is laid on to the plate.
Again, in the above example the same heating principle applies, the pipework heats the plate and the plate then heats the floor in an even spread across the flooring surface