Electrical Safety Warning for Electric Underfloor Heating Mats and Cables
Warning: To complete electrical works you must comply with Electrical Regulations – Click here for more information. Please also see our project on the New Wiring and Cable Colours.
Underfloor heating cables can be stuck to a mat to make installation quicker or they can be laid loose round the room. When laid loose it is normally under a floor screed and the cable itself is larger.
In some high heat loss areas such as conservatories, cable can be laid which will deal with 200W per sq m so please ensure you understand exactly what you are doing or get a qualified electrician to install the floor for you.
With this in mind, a qualified electrician will be required to make the final mains connection and if you are working on a large floor area, the cables and mats will need extra planning because of the load calculations required to stay safe. A completely separate power supply may be necessary for some of the larger installations.
Underfloor Heating Maintenance Costs and Heat Distribution
Underfloor heating is fast becoming the most popular form of heating. In most forms, it is inexpensive to install, economical to run, there is no maintenance and above all, the heat distribution is total.
Using thermostats in separately controlled zones throughout the house, you can easily control the heat to each room and keep your heating costs to an absolute minimum.
Advantages of Using an Electric Underfloor Heating Mat and System
Electric underfloor heating mats are invisible in so much as there are no radiators or heaters showing. They can be used in both domestic and commercial properties in both a new build property and one under renovation, refurbishment and remodelling.
The mats can be installed under almost every floor type, including wood, tile and laminate, making it ideal for refurbishment projects.
Even laid on top of an existing floor and covered with tiles, the floor height is raised no more than 20mm. This means that the movement from one room to another is accomplished with only a small step which can be made to look attractive by means of a small timber moulding glued to the face of the newly heated floor.
You can see from the images below the advantages and ease of installation over normal, radiator type heating. The DIY nature of the electric underfloor mats, especially using the DIY underfloor heating kits available, makes it perfect for most heating purposes in most homes.
How do Electric Underfloor Heating Mats Work?
The underfloor heating mat itself is simply a vehicle by which a single electric wire can be run around the room with no twisting or kinking which could lead to breakages in the cable and circuit. The cable is stuck to the mat and the underside of the mat is stuck to the floor in whichever room you choose to lay it.
As the video below shows, the cable must start and finish at the same point to allow connection to the control box and thermostat.
The electric current flows through the cable causing heat to be generated. The amount of heat depends entirely on the possible output of the cable and the heat settings you use on the thermostat.
A sensor, connected to the thermostat, is also placed under the floor with the mat. The sensor measures the temperature of the floor and tells the control box to start and stop the heating to ensure it stays at the temperature you have set.
It is important that you select the correct type of heating mat with the correct heat outputs for the type of floor you wish to lay your heating mat under.
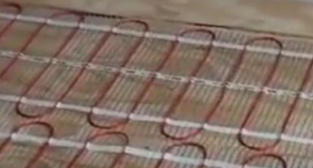
Fitting an electric underfloor heating mat
Guide to the Type of Underfloor Heating Mat Required for Different Floor Coverings
Please seek independent advice from your supplier or installer as to the type of electric underfloor heating mat you require for any particular flooring type. This section is simply a guide to the different wattage outputs of heating mats and where they are generally used.
Talk to the supplier about the best form of insulation under the heating mat, where this is possible. If all heat can be directed upwards by a reflective underfloor insulation then even ore money can be saved.
| Type of floor | Maximum Wattage per sq meter |
| Laminate flooring | 130W/sqm |
| Carpet (on levelling compound or screed) | 160W/sqm |
| Vinyl sheet or vinyl tiles (on – as above) | 160W/sqm |
| Tiles or slabs | 200 W/sqm |
| 50mm screed floor | 160W/sqm (usually in a 7mm cable) |
Do I need Insulation Under my Electric Underfloor Heating Mat?
Not necessarily, especially if you are installing the heating mat in a small room such as a kitchen or bathroom. However, insulating the floor first will stop any heat going downwards and reflect it all back up and give you greater value for money. Decisions like this sometimes depend on how much of a step you are willing to put into the room.
Insulated tile backer boards can be as thin as 6mm and when stuck to the floor offer great insulation and a very firm base. If installed properly and with each edge stuck to the one next to it, these backer boards can replace plywood strengthening panels on timber floors. This then gives you the rigidity you require from a timber floor plus insulation. This is very important when laying tiles onto a timber floor with underfloor heating.
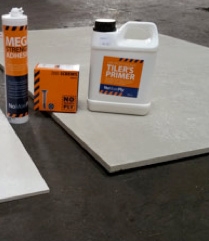
Insulating under heating mats will save you money
Traditional Heating Systems Versus Underfloor Heating – Which is Better?
The Romans invented underfloor heating so it is nothing new! It is however, if installed correctly with the loads calculated properly, the most efficient form of heating available.
The first point in favour of underfloor heating is that it requires very little energy to run. The heating covers the (almost) complete surface area of the floor to heat the room above in a very natural way as heat rises anyway.
A radiator however covers a very small percentage of the walls surface and has to work very hard indeed to throw out enough heat for the rooms volume.
Visually, underfloor heating wins by miles. Who really wants to stare at a radiator on the wall, no matter how contemporary it is? Underfloor heating in all formats, leaves the walls free for things that are really worth looking at.
The last point which swings underfloor heating into the lead is the cleanliness aspect. Radiators gather dust, hide socks and invite people to hang wet clothes and towels on them. This leads to condensation which, in turn, leads to mould.
How to Install an Electric Underfloor Heating System
Firstly, you need to decide how much you are prepared to lift your floor. If this is not a problem it is a good idea to source and fit some insulation backer boards to the floor first. These boards will stop you wasting a lot of heat in the floor. You can see the various kinds of insulation in insulation for your underfloor heating project.
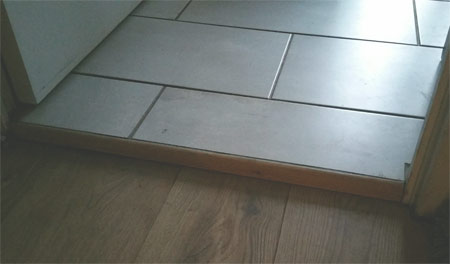
Example of the step that is created after installing underfloor heating and how it can be finished with a timber strip
The area where the floor heating is to be fitted is measured. A sketch is made of the floor to determine the size of the underfloor heating mat needed and marked to indicate where it should be placed, including the position of it’s power supply connections.
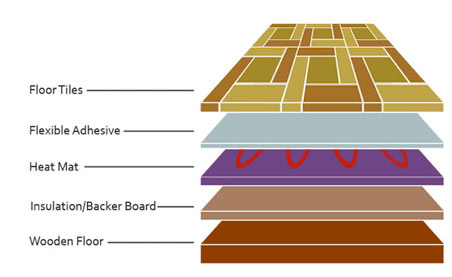
Floor tiles can be laid over electric underfloor heating
The mat must start and finish at the same place as you can see from the video below. The mats are usually 500mm wide and when the end of a room is reached, the mat is cut and swung round to go the other way down the floor.
Mats should not be placed under kitchen units or appliances such as washing machines and dishwashers and laying it right up to the edge of the skirting is pointless, so keep it 150mm inside this line. This will reduce the amount of mat you need and of course, keep the cost down. Additionally, never cut the red heating cable, only the mat
Pay particular attention to where you are going to connect your cables to and make sure you can reach the power point without damaging the floor or walls too much. You will also need to place the sensor in the floor for a thermostat so ensure you understand from the instructions where all of the cables need to go.
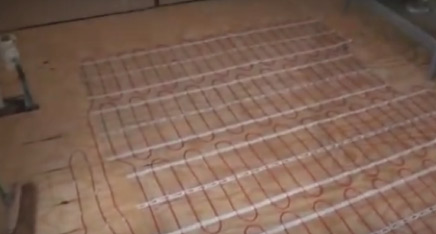
All matting and wiring laid out and planned where it should be fitted before gluing down, including all the wiring for controller and sensor
Once you planned exactly where all items need to be placed it’s time to start gluing the mat down. Spread the adhesive on the back of an underfloor heating mat and ensure a decent covering. The adhesive itself will be good for about 10 – 20 lifts so if you make a mistake you can simply lift the mat and relay.
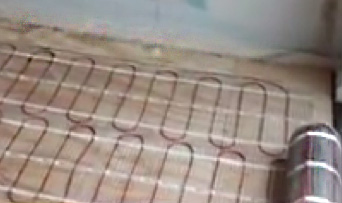
Underfloor heating mat laid on a plywood sub-base and measured so that it does not butt up to the skirting
Use a multi-meter to check you have continuity of current all the way round the heating cable and that the resistance of the cable falls into the allowable limits. These limits will be shown in the installation instructions and you can see how the multi-meter works from the underfloor heating video below.
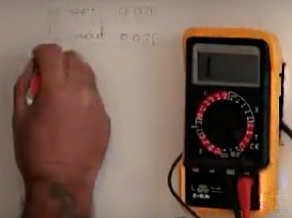
Checking underfloor heating mats for electrical continuity using a multi-meter
As mentioned above, you should have worked out where the cables will start and finish, including the sensor cable, before you started to stick the matting down. Once you have confirmed their placement, chase out the floor to receive them. Before going to the controller, the cables must finish below the level of the actual heating mat.
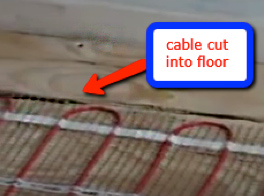
The loose cable to the power supply should be cut into the floor to keep it out of the way and ensure it does not move about
The temperature sensor should be placed to finish no higher than the top of the mat and in the case of the sensor the cable should have a finished height just underneath the mat. The cables will twist while you lay them so to stop them being a nuisance until you lay the floor covering you can glue or tape them down out of the way.
The next job is to work out where the floor sensor will go. This should sit mid-way between two of the underfloor heating cable runs.
The floor sensor will link up to the thermostat and let the system know when the required heat has been reached. The thermostat will then turn the heating off.
Make sure you have worked out where the thermostat will be placed and how you will get the sensor and the power cables to it. The sensor wire will sit in a small piece of conduit which should have the end taped over to avoid any damage to the sensor itself. Check your instructions to see how far into the floor the sensor should be placed.

Avoid damage to the temperature sensor by taping over the conduit end
When all the heating is laid its time to test it to make sure that current is available and continuous throughout the entire run and that the resistance is within acceptable barriers. Watch the video carefully to see how this is done. The continuity should be tested again to make sure the cable is not damaged and the resistance tested (See our video on Ohms Law to understand more about resistance).
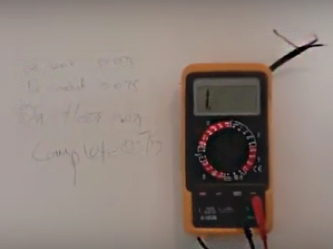
Test resistance regularly when laying your underfloor heating mat
In terms of testing the matting, use a piece scrap of paper to write down your resistance figures regularly throughout the installation, firstly when the box is unwrapped and the matting removed, then when the mat is unrolled and laid out and finally when it is all stuck down. It is also a good idea to test it periodically while you are laying it also. If anything changes at least you can do something about it before it’s too late.
When you are happy that the mat is laid correctly it is time to tile or lay whatever surface you are putting down, on top of it. Again, before you start laying your floor, test the full circuit for resistance and continuity of current one last time.
If you are laying tiles then please use flexible floor adhesive and if laying tiles onto a plywood floor, make sure your adhesive is suitable for wooden floors. We have coated our floor with 3 coats of diluted (30% water/70% PVA to ensure the board is sealed and to give greater adhesion to both the underfloor heating mat and the tile adhesive.
When the floor is laid and dry (e.g. tiles), turn the electricity off at the mains.
Run the sensor cable and the end of the heating cable up to the thermostat box. You have several choices on how this is done:
- placing the cables into surface trunking that runs up to the thermostat box, hiding them within the trunking
- Tapping a hole through the wall and running the cabling into the wall and then drawing or fishing the cables up through the rear of the thermostat housing box through a hole that is drilled through the wall
- Chasing a run out of the wall from floor level up to the thermostat box
Our preferred method is to run the wires through the wall as it keeps all of the cables out of site and leads to a much neater job.
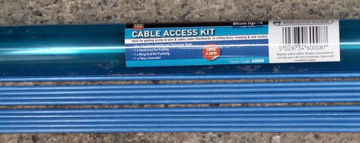
Use a cable access kit to pull wires and cables up through walls
Cable Access kits are available for this kind of cable fishing. If you click on the link you will be taken through to our tool store where you can watch a video on how the cable access kit is used before buying one.
The mains power can now be taken from either a suitable socket or from the consumer unit if your instructions demand this. The mains power must first go to a double pole switch, separating both live and neutral when turned off, and from the double pole switch the power is taken to the control unit or thermostat where it meets the sensor and element cables from the heating mat.
The unit is then wired according to your manufacturers instruction.
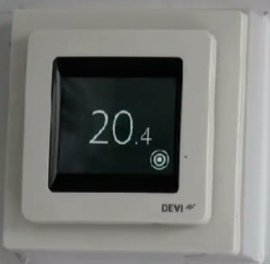
When wired up to your underfloor heating, the thermostatic control unit will enable you to set the temperature of your underfloor heating and also allow you to save energy
Please note: If your unit is not made in the UK the wiring colours may not conform to our colours. Sensor units are usually wired with no polarity but please check every detail of your wiring with a specialist electrician. We strongly advise you to get your wiring checked by a professional and if in any doubt about how it should be connected up, please get a professional electrician to do this for you.
Once all connected, you should be ready to go. Fire up your heating and wait for it to kick in. If all is well you should have a nice warm floor within a few minutes.
Some Common Questions and Answers About Underfloor Heating Mats
Question: Why are there two different types of mat one for timber and one for concrete floors?
Answer: Heating mats are all tested to European standard IEC335/EN60335, it is recommended that no higher than 150W/m2 should be installed on a timber floor. Concrete absorbs heat at a higher rate than timber and outputs of 200W/sqm can be used
Question: Why are some cables on a mesh mat and others are not?
Answer: The underfloor heating mats (on mesh) are very easy to use but limited in their ability to heat floors when the covering (such as concrete or deep slabs) is thick. Thicker floors require more energy to heat them so larger cables (up to 7mm) are used. It is not sensible to stick these to a mat as they are just not as flexible and would probably just come off during installation anyway. The larger cables come on a roll and are manually placed in the room by clipping them down at regular intervals.
Question: Can heating mats be used with all types of flooring?
Answer: Yes. Search for the underfloor heating system that is recommended for your type of flooring and see our page on insulating under the floor heating.
Question: How safe is electric underfloor heating?
Answer: Very safe. Make sure you test your cables all the way through the installation and get an electrician to wire you up to the mains. You should then have no safety issues at all.
Question: Is electric under floor heating expensive to run?
Answer: Most manufacturers will tell you that the cost of running an underfloor heating system in any room is about the same as running the light bulbs used for that room. The truth is it is a little more expensive that that (about 20%) but a lot depends on how long you keep it on for every day and whether the thermostats is used properly.
Question: Who can install it?
Answer: Anyone can legally install the underfloor heating mats themselves, they can even provide the sockets and switches in the wall. In the kitchen and bathroom you must get a qualified electrician to connect to the mains and if you are running the heating from the consumer unit, on a separate circuit, then this must be done by a qualified electrician also. In short, any electric underfloor heating must be fitted by a person competent to do so under current IEE regulations and the building regulations part ‘P’ approved document.
Question: Is underfloor heating guaranteed?
Answer: Most manufacturers offer a 10-year guarantee. Under this (usually) the cable is guaranteed for ten years if installed in accordance with the Installation Instruction booklet.
Question: Will the tiles be affected by the heating and cooling of the underfloor heating?
Answer: Tiles should be laid on a flexible adhesive which, if laid to the instructions and 10mm is allowed over the top of the heating cables, will not be affected at all.
Question: Is it dangerous to lay underfloor heating cables on wooden floors?
Answer: No. Not if the correct wattage cables are used and manufacturers instructions are followed. (including testing the cables at regular intervals during installation) properly.
Question: If I drop something and break a tile, will the cable get damaged?
Answer: Unlikely. The bed of adhesive should protect the cable but we would advise an electrical check after such an event.
Question: What happens if my kitchen or bathroom floor get flooded?
Answer: All reputable underfloor heating cable suppliers only supply waterproof cable with earthing systems that will ensure no danger in the event of a flood.
Question: How long will the electric underfloor heating system last?
Answer: If installed correctly the underfloor heating system will last just as long as all the other wiring in the house.

