• Skip to primary navigation
  • Skip to main content
  • Skip to primary sidebar
  • Skip to footer
DIY Doctor
MENUMENU
  • DIY Doctor menu logo
  • Home
  • DIY Projects
    • All Projects
    • Brick, Block, Marsonary and Concrete
    • Damp, Condensation, Rot and Woodworm
    • Doors, Windows and Conservatories
    • Electrical
    • Fencing, Decking, Paving and Patios
    • Floors, Walls, Ceilings and Lofts
    • Garages, Sheds and Outbuildings
    • Gardening and Landscaping
    • General Building, Self Build and Renovation
    • General Repairs and Cleaning
    • Green Living and Eco DIY
    • Ground work, Foundations and Drainage
    • Heating, Central Heating and Boilers
    • Joinery and Carpentry
    • Materials, Fixings and Fixing
    • Painting, Decorating and Finishing
    • Planning Regs, Project Management and Safety
    • Plastering, Plasterboard and Rendering
    • Plumbing
    • Roofing and Gutters
    • Tiling and Tiles
    • Tools, Appliances and Access
    • DIY Tips
  • UK DIY Forums
  • DIY Videos
    • Bathroom DIY Videos
    • Building Foundation Videos
    • Building Videos
    • Carpentry and Woodworking Videos
    • Damp and Damproofing Videos
    • Decorating Videos
    • Electrical Videos
    • Fitting Blinds Videos
    • Flooring Videos
    • Gardening Videos
    • Green and Eco Friendly Videos
    • Hand and Power Tools Videos
    • Heating and Central Heating Videos
    • Kitchen Videos
    • Plastering and Drylining Videos
    • Plumbing Videos
    • Security Videos
  • Find Tradesmen
    • Find a Tradesman
    • Contract Download
    • Working with Tradesmen - Ultimate Guide
    • Home Improver Protection
    • Price Doctor
  • Tool Store
    • Tool Store
    • Bookstore
    • Tool Reviews and Product Reviews
  • Blog
    • Blog
    • DIY Competitions
  • About us
    • About DIY Doctor
    • What we do
    • Trade Shows and Exhibitions
    • Master Classes
    • Contact Us

Home > Search for DIY Projects by Trade Type > The Complete DIY Guide to all Aspects of Tiles and Tiling Including Easy to Follow Guides and Video Tutorials > How to Grout Ceramic Tile Joints Including Cleaning out old Grout and Then Regrouting With new

How to Grout Ceramic Tile Joints Including Cleaning out old Grout and Then Regrouting With new

In this section we cover everything that you need to know about Grout and Grouting. We have comprehensive information about how to mix the grout then get it in between your tiles. We also cover maintenance topics such as cleaning and reviving old grout or scraping out the dirty grout so that you can replace it. Below we show you our pick of tools for working with Grout, either removing it or applying it.

  • Grouting Wall and Floor Tiles

    Grouting - wall and floor tile grouting - How to grout wall tiles and floor tiles; Guidance on the best way to grout ceramic and quarry tiles including information on what gap you should have between tiles, what grout you should use and how to mix it and how to ensure all joints are totally full


  • Cleaning Grout When Hard

    Tiling - grout removal - A DIY solution on how to clean and remove hard grout from floor, wall, or quarry tiles. When you have left grout too long and it's hardened, we show you how to easily remove it


  • Replacing Grout Between Tiles or Raking Out Tiles for Regrouting Including How to Clean Mouldy Grout Lines

    Tiling - replacing grout in wall and floor tiles - Find out all about raking out grout between tiles and how to replace grout in wall and floor tiles including how to remove old mouldy grout and replace with new


The projects above explain all about selecting, mixing and applying the right grout for either your floor or wall tiles. They also cover cleaning, or removing and replacing the old grout when it gets a little tired.

We have a separate section all about Tiling, which you should look at first if you haven’t completed your tiling.

For specific projects about Bathrooms or Kitchens we have separate sections for all the projects you might want to do in these.

Here we’ll summarise some of the best grouting tools that you can use, for either applying it or removing it.

The Best Tools for Applying Grout

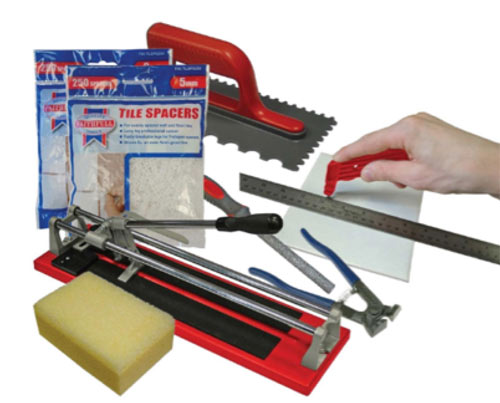
These are the tools that you need to get the grout in between the tiles. You could use different ones but these are the ones that we recommend and will give you a really professional finish – see the grouting project for how to use them in detail.

The tools will vary slightly for the type of tiles that you are working with. Large floor tiles will require larger tools because you are covering a larger area typically. Pick the right size tools for the job but the principle remains the same; you need the best tools for stuffing as much grout as you can git into the joint as you possibly can.

  1. Mixing Tools: What you need will depend on the area you are grouting and therefore the amount of grout that you need to mix. If it is a small area of walls tiles then you can get away with a (clean!) stick and a handy tub or small bucket. For larger areas you will need a builder’s bucket and mixing paddle.
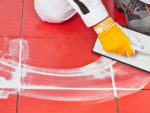
  2. A Rubber Grout Flout or Grouter: This is to get a large amount of grout into the joints quickly. It needs to have a little “give” so that it can be used to push the grout in and will not damage the tiles. Anything can be use such as a Squeegee so long as it gets the grout in there without damaging the tiles. There no need to spend a fortune here, just use what works for you
  3. A rubber grouter
    A rubber grouter or grout float
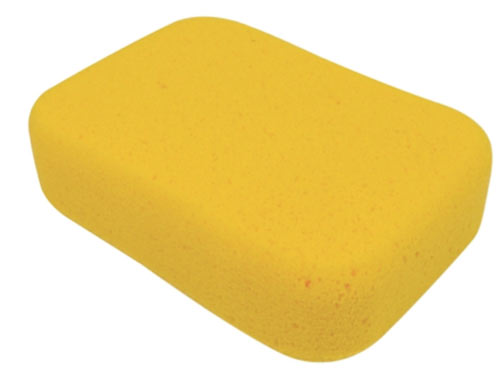
  4. Sponge: Use this with your index finger to push as much grout into the joint as you possibly can. Use your finger so you can feel that the joint is full. There are specialist sponges for grouting. It doesn’t really matter what sponge that you use at all. The specialist sponges will probably last a little longer, but don’t spend a fortune here either. Buy a couple as it useful to have a clean sponge at the ready to give the tiles a quick first clean once you have added the grout
  5. A sponge for Grouting
    A sponge for Grouting
  6. Other useful things: Make sure that you have lots of water! Washing off the excess grout is easier when it is still wet. Dust sheets to cover areas that you don’t want to get the grout on can save a lot of time. Don’t forget the grout – find out more in the grouting project

To make it a little easier we have create a bundle of all the tools that you might need when tiling. Simply select the one that you need (or remove those that you already have) and then you can check out easily.

The complete list of Tiling Tools

The Best Tools for Removing Grout

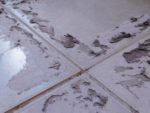
Removing grout is never a pleasant job, so if there is anything you can do to avoid it then we’d recommend it! This is why we cover the options for reviving and touching up your old grout quite so extensively in the project on how to remove grout. If you have to remove the grout because it has cracked or is beyond recovering then here are the tools to do it.

The choice will depend on the area that you have to remove. Ideally you should remove the grout by hand so as not to damage the tiles, but if you have a large area to cover then power tools are the best or quickest way.

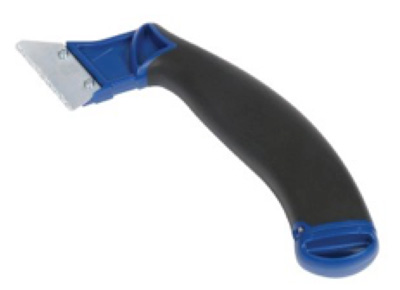
  1. Grout Rake: Grout Rakes are hand tools that have special (diamond) blades which you run up and down the join betweens the tiles to grind away the grout. If it only a small area you don’t need to worry too much, but if you are re-grouting a larger area then pick a grout rake with a sturdy and comfortable handle and replaceable blades
  2. Heavy Duty Grout Rake
    Heavy Duty Grout Rake
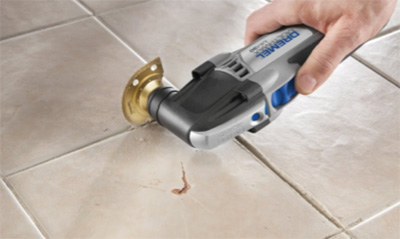
  3. Specialist Grout Removal Tools: There are a number of specialist grout removal tools with blades that oscillate and vibrate so they dislodge or grind out the grout
  4. Vitrex Grout Removal Tool 230v Grout Out
    Vitrex Grout Removal Tool 230v Grout Out
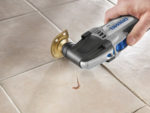
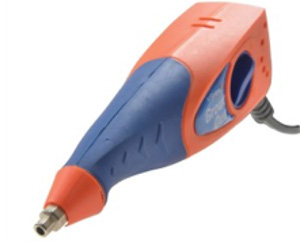
  5. MultiTools: A very popular choice is to use a multi-tool to remove the grout. These are relatively new inventions and a very versatile power tools, as the name suggests. The can come with a range of attachments some of which are specifically designed for removing grout. The nice thing about these is that you will be able to use it for many other projects, but you do have to be very careful not to damage the tiles. You can see our range of multi-tools in our store
  6. A multi function tool removing grout
    A multi function tool removing grout

As with everything DIY, having the right tools really helps to get a job done well. The tools for applying grout are much cheaper and easier to use than for when you decide to remove it.

Give us Some Feedback!
Was this page useful:
We read and respond to all feedback by email. To allow us to do so you will be added to our email list, however you can unsubscribe at any time using the links at the bottom of any of our emails. Find out more in our privacy policy. Any DIY questions should be posted to our Forum
Sign me up to the DIY Doctor Newsletter:

Primary Sidebar

DIY Doctor deal of the week

DIY Utility Kit:

Build your own work bench!

RRP Price: £49.99

Special Price: £39.95

Get it here now

See our other deals now!

Master Basic DIY - By DIY Doctor

Our Book - Master Basic DIY

Grab your copy now for all the DIY help you need right at your finger tips!

Buy it Here!

Signup for our Newsletter

Keep up to date with our DIY projects, tips and latest deals

Sign Me Up!

Our Sponsors

Find out about advertising on DIY Doctor

Advert

Footer

DIY Doctor

Site Menu

  • About Us
  • Contact Us
  • Blog
  • Media/Press
  • Community Work
  • DIY Projects
  • DIY Videos
  • Superstore
  • DIY Tips
  • DIY Suppliers
  • UK DIY Forum
  • DIY Webinars

Other Stuff

  • Advertise
  • Competitions
  • T and Cs
  • Privacy Policy
  • Cookies
  • NHIC
  • Sitemap

DIY Doctor Social Channels

Follow us on Facebook
Follow us on Twitter
Follow us on YouTube
Follow us on Pinterest
Follow us on Tumblr

DIY Doctor are members of:

© DIY Doctor Ltd 2021 All Rights Reserved