Grouting wall and floor tiles can be easy or difficult, depending on timing and confidence.
Grouting is the same for all types of tiles: floor, wall, ceramic, quarry, etc. The key is to fill the joints completely to a good depth, without scratching the tiles. Below, we’ll show how we grouted a floor, but the process is the same for walls.
Proper grouting starts with laying the tiles correctly. Ensure wide enough joints for the grout to penetrate fully, creating a strong bond that prevents water from seeping through. Avoid narrow joints, as they weaken the grout.

Tile spacers inserted into floor tiles leaving 5mm gap
Grout Line Gaps for Wall and Floor Tiles
For wall tiles, a 3mm grout line is recommended, while floor tiles should have a 5mm gap, as shown in the image above.
Wider grout lines allow more grout to be packed in, making the joint stronger and more water-resistant.
There are no strict rules for grout line width, so feel free to use 5mm gaps on walls if you prefer!
Ensure adhesive doesn’t squeeze up into the joints when laying tiles, as this can be difficult to remove later and affect the grout and overall finish.
Can you Grout Over old Grout?
In answer, technically yes you can but would always advise you not to!
To ensure that your grout remains waterproof and in place for as long as possible you have to ensure that it reaches a good depth down into the joint and also sits on a solid base.
If it’s only 1mm or less deep or sits on top of old grout that’s loose, it will fail very quickly, so we would advise if you do need to re-grout any area, first remove All of the old grout first so the new grout has a solid base to start with.
How Quickly can you Grout Tiles?
After laying new tiles, it is always advisable to wait at least 24 hours, ideally 48 hours for the tile adhesive to fully dry first so that you know they are 100% attached to the wall nice and firmly.
Once you have allowed at least 24 hours you can then go ahead and start grouting, again leaving the grout for at least 24 hours, ideally 48, to fully cure.
How Long Should you Leave Grout Before Sponging Over?
Before you start any sponging over of tiles and grout lines to both remove excess grout and force as much grout into the grout lines as possible, you should leave the grout 20 – 30 minutes to start hardening off first.
The main reason for this is that if you try and wipe it off too early, then you will simply just pull it back out of your grout lines, ruining your previous work and potentially allowing water and moisture to penetrate if too thin.
Types of Tile Grout
There are three main types of grout:
- Wall Tile Grout: Usually un-sanded
- Floor Tile Grout: Sanded
- Specialist Grout: Epoxy
Choosing the right grout ensures durability, often lasting as long as the tiles themselves. It also makes application easier and reduces maintenance efforts.
Unsanded Grout
Unsanded grout lacks sand, making it easier to push into tight spaces, and is ideal for wall tiles. However, it tends to shrink more, which can lead to cracks and water penetration. Because wall tile gaps are smaller, shrinkage isn’t a major issue.
Unsanded grout is not recommended for lines wider than 3mm (1/8 inch) due to the risk of cracking. Its sticky consistency, often with added adhesive, makes it perfect for wall tiles by providing extra grip and filling thin grout lines effectively.
Unsanded grout is typically sold as Wall Tile Grout, specifically designed for use with wall tiles or tiles with narrow grout lines.

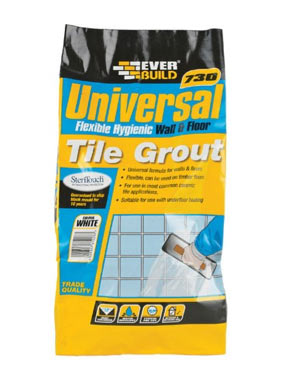
Everbuild Super White powdered wall tile grout
Sanded Grout
For grout lines wider than 3mm (1/8 inch), use sanded grout. While unsanded grout is easier to apply, it can shrink and crack in larger gaps. The added sand in sanded grout prevents shrinkage and reduces the risk of cracks.
Sanded grout contains sand, which can be abrasive and may scratch tile surfaces. Test it on a small, hidden area first, especially with polished tiles like travertine, marble, and granite. This type of grout is commonly sold as Floor Tile Grout.
A universal or floor tile grout
Epoxy Grouts
Epoxy grouts are made from epoxy resins and usually consist of 2 or 3 parts that need to be mixed and then coloured with dye. They can replace either sanded or unsanded grout as they don’t shrink and are more flexible.
Unlike cement-based grouts, epoxy grouts are waterproof, making them ideal for areas where water stands, like shower trays or baths. However, they are more expensive and often unnecessary for most applications. They cure quickly due to a chemical reaction, so you’ll need to work fast. To extend working time, you can freeze half the mixed grout.
Epoxy grouts typically don’t contain abrasive sand, reducing the risk of scratching tile surfaces. Always test on a small, hidden area first. They also require less maintenance to stay clean.
Grout types can blend features from other categories. For instance, “universal grouts&rdquo may have fine sand, combining characteristics of both sanded and unsanded grouts. Always read the manufacturer’s instructions to ensure proper use.
Types of Grout Additives
Modern grouts often contain additives to enhance performance and ease of application, further blurring the lines between different grout types. Here are some common additives:
- Mould Killers and Anti-Fungicides: Ideal for bathrooms, these additives prevent mould and fungus growth on grout, reducing blackening and extending the life of your grout.
- Colours: Grouts are available in various colours to match your tiles and achieve the desired aesthetic.
- Adhesives: Additives like PVA improve adhesion, especially useful for wall tiles where gravity can be a challenge.
- Flexibility and Waterproofing: Additives like SBR provide extra flexibility for surfaces with potential movement (e.g., tiles on wood) and offer waterproofing for areas with constant or intermittent water exposure.
Grout Mix for Tiles in Water
Grouting tiles that will be constantly immersed in water requires special considerations. First, consider tanking the area for added waterproofing. For details, see our tanking project guide.
You have two main options: waterproof epoxy grout or unsanded grout with a waterproof additive. Follow the manufacturer’s instructions for epoxy grout. Here, we’ll focus on the second option.
Use unsanded wall tile grout mixed with a 1:1 solution of SBR and water. Let it set for at least 24 hours before use. If grouting a swimming pool, wait three weeks before filling it with water. Avoid grouts that are not rated for immersion, as SBR will not compensate for this.
Choosing the right grout mix ensures easier application and long-term maintenance. We recommend using powder grout that can be mixed to the desired consistency. Pre-mixed grout can be difficult to work with, especially adhesive-grout combinations, which tend to stick to everything and pull out of joints easily.
Tools and Products Used for Grouting
To successfully grout freshly laid tile grout lines you will need the following tools and products:
- Plastic builders bucket x 2
- Dust-sheets to cover the mixing area; you don’t want to be chipping dried grout off anywhere you don’t need it, if you can help it
- Water hose or an adequate supply of water
- Grout powder – Either Floor Tile Grout for floors or Wall Tile Grout for walls
- Ready mixed grout – If not using the above powdered grout
- Any additives; See above, but you might need additives to colour or to change the properties e.g. water proofing, anti-mould etc.
- Gauging trowel
- paddle mixer
- Notched trowel
- Bucket trowel
- Grouting sponge
How to Grout Tiles
Now that we have looked at the different types of grout and all the other aspects involved, it’s now time to actually get some grout laid, read on to find out how.
Step 1 – Mixing the Grout
As we have covered, there are two main types of grout: ready-mixed and powdered. Powdered grout is usually cheaper and often performs better, so we recommend using it.
Powdered grout mixes easily by hand using a small container and trowel. For larger quantities, you can use a paddle and electric drill for efficiency.
You’ll need two clean buckets: a large one for mixing and a smaller one for rinsing sponges. Add water to the mixing bucket first, then slowly add the powder while stirring. This makes the mixing process easier.
Follow the manufacturer’s instructions for the water-to-powder ratio, usually around 1.1 – 1.3 litres of water per 5kg of powder. Mix until you reach a creamy, thick consistency, like custard without lumps.
Lumps can block joints and prevent proper grout application, so ensure the mix is smooth.
Top Tip: If using multiple bags, use the same batch number to maintain consistent colour.
The mix should be workable but not too runny. It needs to be soft enough to push into joints without running back out. Let the mixed grout settle for a few minutes before applying – a perfect time for a quick break!
Top Tip: Do not grout while tile adhesive is still wet. As we have said, leave for at least 24 hours, ideally 48 hours!

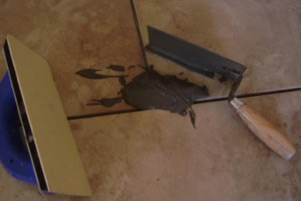
Mixing tile grout in a bucket using a paddle mixer
Step 2 – Laying Grout into Tile Joints
With your grout mix ready, apply it to the floor with a trowel, or to wall tiles using a slightly damp sponge.
Don’t worry about the mess; it can be cleaned up later.
Using a grout float or, as we prefer, a damp decorator’s sponge, press the grout into the joints, ensuring they are fully filled right to the top.
Once the joints are filled, scrape off excess grout and spread it over an un-grouted area to minimise waste.
Continue this process for the entire area, ensuring all grout lines are fully filled for maximum protection.
Top Tip: Test a small area first to ensure compatibility.
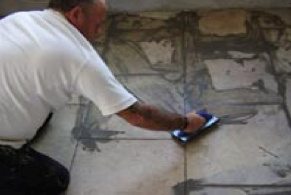
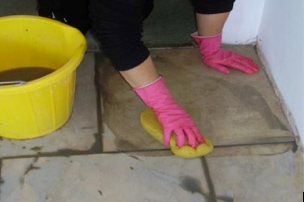
Step 3 – Removing Grout from Tiles
While working, monitor the grout on your tiles to prevent it from drying too quickly, which can make it difficult to remove.
Use a clean, damp sponge to wipe away excess grout from the tiles and joints. The grout should be firm enough to require a bit of scrubbing.
If the grout is too soft, the sponge may pull it out of the joints. If it’s too hard, cleaning will be more challenging. For hardened grout, check our guide on removing stubborn grout.
After cleaning, let the surface dry. It may look clean initially, but a residue will form as it dries. Wash this off, rinsing your sponge frequently while you do.
After two or three washes, let the surface dry completely. A fine dust may appear; wipe it off with a clean, dry cloth to finish the job.
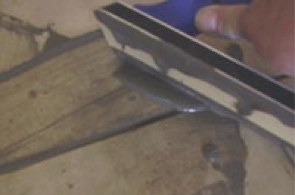
Before the grout dries, use a scraper to smooth out any cracks and press in any thin areas. This will make the grout lines look neat and even.
Top Tip: Avoid grouting outdoors if rain is expected within 6-8 hours. Rain can wash away fresh grout, wasting your efforts and materials.
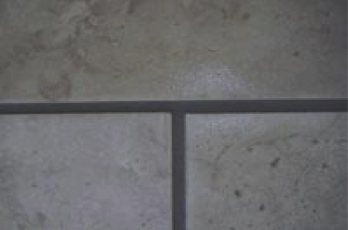
Finished and completed tile joints full of grout
Step 4 – Sealing Your Grout and Grout Lines
In most cases, sealing grout after application isn’t necessary. Modern grouts often come with fungicides to prevent mold and additives to enhance water resistance.
If you used epoxy grout, it’s already waterproof, so no sealer is needed.
For grouts mixed with waterproof additives like SBR, sealing isn’t required either.
With cement-based grout, sealing is optional. While it can add extra protection, the grout naturally repels water.
Grouting any freshly laid tiles is an absolute must to ensure that your tiled surfaces remain fully water proofed and able to prevent water and moisture from reaching surfaces below them, so ensuring that grout lines are fully filled with good quality grout is an absolute must.