• Skip to primary navigation
  • Skip to main content
  • Skip to primary sidebar
  • Skip to footer
DIY Doctor
Open MenuClose Menu
  • DIY Doctor menu logo
  • Home
  • DIY Projects
    • All Projects
    • Brick, Block, Marsonary and Concrete
    • Damp, Condensation, Rot and Woodworm
    • Doors, Windows and Conservatories
    • Electrical
    • Fencing, Decking, Paving and Patios
    • Floors, Walls, Ceilings and Lofts
    • Garages, Sheds and Outbuildings
    • Gardening and Landscaping
    • General Building, Self Build and Renovation
    • General Repairs and Cleaning
    • Green Living and Eco DIY
    • Ground work, Foundations and Drainage
    • Heating, Central Heating and Boilers
    • Joinery and Carpentry
    • Materials, Fixings and Fixing
    • Painting, Decorating and Finishing
    • Planning Regs, Project Management and Safety
    • Plastering, Plasterboard and Rendering
    • Plumbing
    • Roofing and Gutters
    • Tiling and Tiles
    • Tools, Appliances and Access
    • DIY Tips
  • UK DIY Forums
  • DIY Videos
    • Bathroom DIY Videos
    • Building Foundation Videos
    • Building Videos
    • Carpentry and Woodworking Videos
    • Damp and Damproofing Videos
    • Decorating Videos
    • Electrical Videos
    • Fitting Blinds Videos
    • Flooring Videos
    • Gardening Videos
    • Green and Eco Friendly Videos
    • Hand and Power Tools Videos
    • Heating and Central Heating Videos
    • Kitchen Videos
    • Plastering and Drylining Videos
    • Plumbing Videos
    • Security Videos
  • Find Tradesmen
    • Find a Tradesman
    • Contract Download
    • Working with Tradesmen - Ultimate Guide
    • Home Improver Protection
    • Price Doctor
  • Tool Store
    • Tool Store
    • Bookstore
    • Tool Reviews and Product Reviews
  • Blog
    • Blog
    • DIY Competitions
  • About us
    • About DIY Doctor
    • What we do
    • Trade Shows and Exhibitions
    • Master Classes
    • Contact Us

Home > Search for DIY Projects by Trade Type > The Complete DIY Guide to all Aspects of Tiles and Tiling Including Easy to Follow Guides and Video Tutorials > The Different Types of Splashback and the Pros and Cons of the Materials Used – Including Special Focus on Fitting Glass and Acrylic Splashbacks

The Different Types of Splashback and the Pros and Cons of the Materials Used – Including Special Focus on Fitting Glass and Acrylic Splashbacks

The complete guide to splashbacks including how to fit both glass and acrylic splash backs in your kitchen. We give you specific information about how to work with acrylic safely and effectively so that you can cut and fix it to the wall to create a dramatic looking splashback behind your kitchen units.

  • DIY How to Project Covering the Best Ways of Cutting

    Acrylic - cutting and drilling - In this DIY guide learn all about acrylic and Perspex and the best ways of cutting acrylic and perspex, drilling acrylic and perspex and gluing acrylic and perspex


  • Installing an Acrylic Splashback

    Splashbacks - acrylic splashback installation - In this handy DIY guide you will learn how to install an acrylic splashback including information on fitting and fixing acrylic, perspex or plastic splashbacks in kitchens and bathrooms


  • Fitting a Glass Splashback

    Splashbacks - fitting glass splashbacks - Fitting a glass splash back - Find out all you need to know about fitting and Installing a glass splashback to walls in your kitchen or bathroom


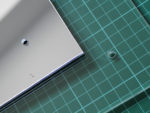
This section has projects that cover all aspects of glass and acrylic splashbacks. Cutting and drilling acrylic is particularly challenging if you want a neat finish, so we explain how you can do this, and then there are also tips and hints for fitting both glass and acrylic splash backs

A splashback is the tiled or covered area of a wall behind the worktop, hob and sink in a kitchen. It’s primary purpose is to protect the wall from splashes and stains as you prepare and cook food. Most commonly they are tiled, but a whole range of materials are now used – see below for more details on the different types of materials that can be used for splashbacks.

For information about tiled splashbacks we have a section all about Tiling and Tiles. This will give you all the information for choosing and laying the tiles for your splashback, including applying the grout

Because splashbacks are designed to protect the wall from splashes and stains, if you are going to create a tiles one then it is advisable to use non-porous tiles such as ceramic or porcelain tiles. We have a section dedicated to working with these types of tile, as they do have particular considerations that you need to consider.

Different Types of Material Used for Kitchen SplashBacks

In this section we focus on two of the most commonly used materials (Glass and Acrylic) as these are fantastic DIY projects and they make a dramatic alternative to tiles. There are a number of other materials that you might want to consider also:

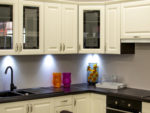
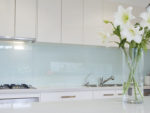
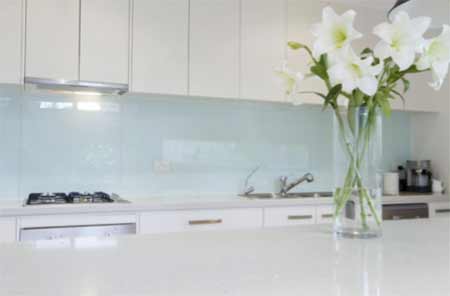
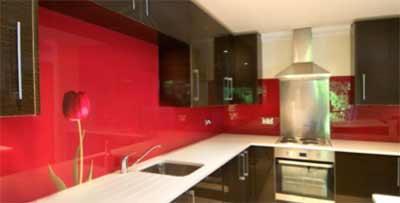
  1. Glass – These splash backs are sleek as they can be fitted in a single sheet with no joins along a single wall. They can be incredibly dramatic and varied in appearance; you could even get mirrored glass. They are durable, particularly with tempered glass, and easy to clean. Costs vary considerably but as they increase in popularity the cost are coming down. They are challenging to fit for a novice
  2. Glass splashback behind kitchen units
    Glass Slpashback (image: Wandsworth Sash Windows)
  3. Acrylic – The range of acrylic splashbacks available is amazing and they can make a real feature in your kitchen. They are very easy to clean and maintain. The big advantage is the price which can be very favourable, however they cannot be fitted behind the hob as they are not heat tolerant
  4. Acrylic splashback behind kitchen units
    Acrylic Splashback (image: Mardan Products Ltd)
  5. Stainless Steel – This creates an “industrial” and functional feel in your kitchen. It is very hard wearing and relatively in-expensive. While it is very easy to clean you might need to clean if frequently as smudges and finger prints are easily seen
  6. Stainless steel splashback
    Stainless Steel Splansback and worktops (image: MPM engineering)
  7. Natural Stone – Typically this would be granite or marble to match the worktop or set it off. It is one of the most expensive options, but will be unique, as natural stone will always vary. It is easy to clean, but remember that granite is porous so needs treating and maintenance. Marble is prone to staining
  8. Granite splashback
    A Granite Splashback (image: D & G Stone Services)
    Marble splashback
    A Marble splashback (Image: Kitchen Design Centre)
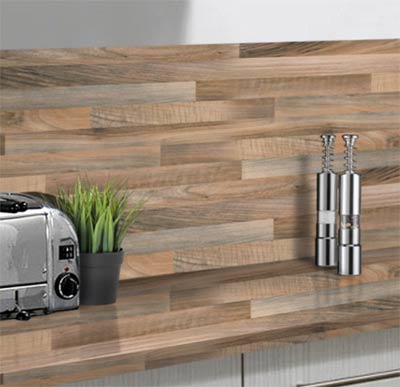
  9. Laminate – These can be hugely varied with effects from natural stone to wood. It is very easy to clean and maintain but it’s much, much cheaper that real natural stone but can be very realistic and effective. The big downside is that laminate cannot be used behind a hob
  10. Laminate splashback
    Laminate Wood Effect Splashback (image: Kitchens InStock)
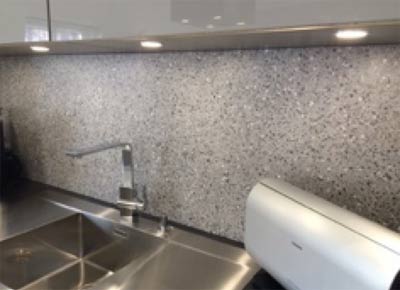
  11. Composites – There are a huge range of composite material, generally part natural stone and part resin. This makes then non-porous and very easy to clean and maintain, while retaining the feel and effect of natural stone. Because they might contain resins, you should check if they are suitable for installation behind hobs
  12. Composite splashback
    A composite or engineered stone splashback (image: houzz.co.uk)
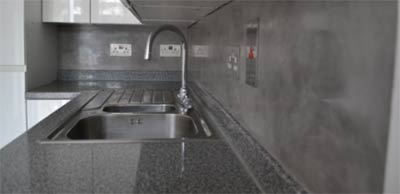
  13. Polished Plaster – The plaster behind the worktop can be treated and polished to create a very effective splashback. There are a range of effects that can be achieved while polishing and then complete it is easy to clean and maintain, although it is liable to chips which are not repairable
  14. Polished plaster splashback
    Polished plaster or venetian plaster splashback (image: Charing Plastering and Flooring)

As you can see there is a huge range of different types of splashback and materials that can be used to make them. They all have their pros and cons, but a little research and you could have a very dramatic feature in your kitchen.

Give us Some Feedback!
Was this page useful:
We read and respond to all feedback by email. To allow us to do so you will be added to our email list, however you can unsubscribe at any time using the links at the bottom of any of our emails. Find out more in our privacy policy. Any DIY questions should be posted to our Forum
Sign me up to the DIY Doctor Newsletter:

Primary Sidebar

DIY Doctor deal of the week

DIY Utility Kit:

Build your own work bench!

RRP Price: £49.99

Special Price: £39.95

Get it here now

See our other deals now!

Master Basic DIY - By DIY Doctor

Our Book - Master Basic DIY

Grab your copy now for all the DIY help you need right at your finger tips!

Buy it Here!

Signup for our Newsletter

Keep up to date with our DIY projects, tips and latest deals

Sign Me Up!

Our Sponsors

Find out about advertising on DIY Doctor

Advert

Footer

DIY Doctor

Site Menu

  • About Us
  • Contact Us
  • Blog
  • Media/Press
  • Community Work
  • DIY Projects
  • DIY Videos
  • Superstore
  • DIY Tips
  • DIY Suppliers
  • UK DIY Forum
  • DIY Webinars

Other Stuff

  • Advertise
  • Competitions
  • T and Cs
  • Privacy Policy
  • Cookies
  • NHIC
  • Sitemap

DIY Doctor Social Channels

Follow us on Facebook
Follow us on Twitter
Follow us on YouTube
Follow us on Pinterest
Follow us on Tumblr

DIY Doctor are members of:

© DIY Doctor Ltd 2021 All Rights Reserved