The use of coloured glass is a great way to improve the style of your kitchen and can create a real feature.
The Glass splashback can be placed behind cookers or sinks or (if you feeling adventurous) be used as an alternative to tiling or other finished surfaces between worktops and wall units.
Types of Glass Splashback Available
Glass splashbacks can be manufactured in multiple styles and varying colours (most bespoke glazing companies can match any wall paint colour to the glass splashback if required).
Glass surfaces can also now include digital printing where you can supply your own image which is copied onto the glass. It can be fun to have family portraits on the wall or, as we have seen once, pictures of the home owner doing the very DIY jobs on which the images were displayed.
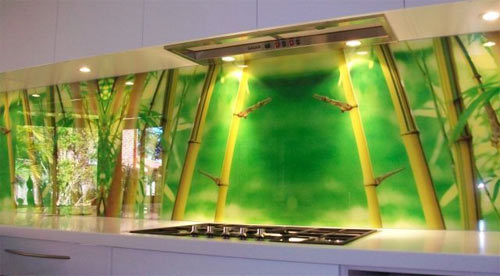
Digitally printed glass splashback – Image courtesy of decoglaze.com.au
Back lighting for your glass splashback can also be installed to create varying lighting moods or to highlight certain areas or your visual images.
The finish texture can be changed, with each panel being available in matt, gloss, frosted or metallic look. Bespoke manufactures can offer your glass splashback in any shape. Don’t get stuck with the idea of tiles having to be square or rectangular.
Frosted finish glass splashback – Image courtesy of southeastsplashbacks.co.uk
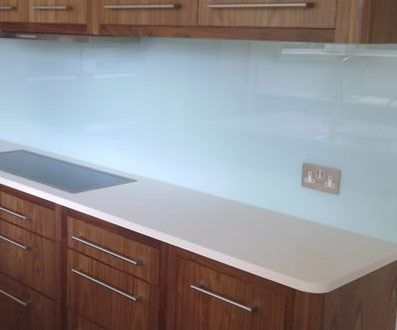
You could also consider increasing the size of your glass splashback to incorporate the entire length of your kitchen work tops (kitchen work tops can even be created in toughened glass).
If your Cooker or stove is free-standing, you will probably want your splashback to continue below the work surface height at the rear of your cooker / stove to give a clean visual finish to your splash back. You may have a gas / electric hob cut into your worktop surface then all you have to do is measure the width and height of the space you want your glass splash to fill.

Glass splashback over cooker and worktop
What Type of Glass will I Need to use?
With the use of glass as a splashback, you will need to use toughened glass. This will mean if you are fixing the splashback with screw fixings, the holes for the fixings will have to pre drilled by the glass splashback provider. Any "cut outs" for power sockets, TV points and telephone sockets will need to be made before the glass is toughened as this can’t be done after the toughening process has been completed.
Many people believe toughened glass is made in the same manner as normal glass and then any work that is needed such as cutting holes etc…. is carried out on the toughened glass. This is not true. All glass work is done to ordinary glass (be it laminated, plate, georgian glass etc….) and then the glass is toughened afterwards.
One final point here is that you should always check with your cooker or stove manufacture and splashback supplier whether there is a minimum distance that must exist between your glass splashback and the gas jets or electric heating elements.
Measuring for Size of Splashback Needed
You will firstly need to decide where your splashback it going to go and how much of the walls surface it is going to cover.
Once you have decided this, the best way to accurately record your measurements is to do so on a piece of paper. Draw out a plan of the whole wall (to scale if you can) that the splashback is going to cover, accurately recording any items that are on the wall such as cupboards, cooker hoods, sockets or switches, as in the image below, in their exact locations.
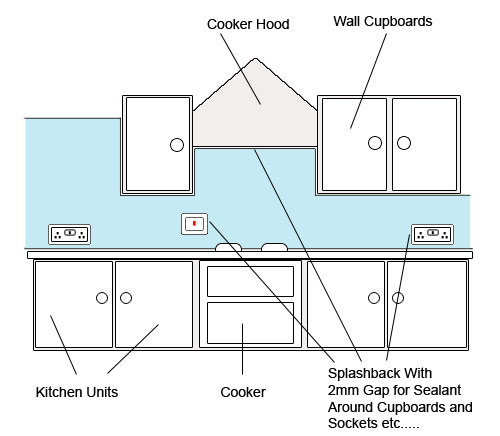
Wall area in kitchen to be filled with glass splashback
If you are going to use screw fixings then you will also need to accurately measure and mark where these are going to go on the plan that you submit to your splashback supplier.
Any cuts or holes that need to be made will have to be made by the supplier of your glass for the splashback before it is toughened, so these will also have to be accurately marked on your plan when you submit it. Once the glass is toughened it will then be almost impossible to make any adjustments.
If you are purchasing from a supplier then its well worth having one of their reps come out and measure up for you. This may cost a little extra but they will be very experienced in this job and if there are any discrepancies in the measurements then it will be up to them to correct where as if you supply your own plans and measurements then any mistakes will be down to you.
One final point to remember when measuring up is that you will have to allow for a 2mm gap all the way around so that you can apply some sealant and prevent any water or moisture ingress, unless your splashback is going to continue down behind your cooker as outlined above.
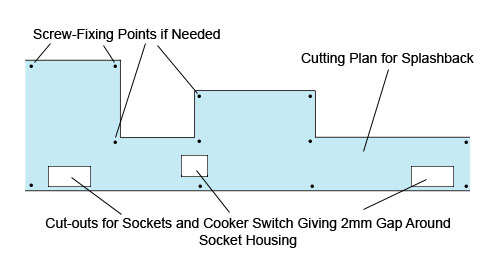
Cutting plan for splashback with cuts for sockets, cooker switch, cooker hoods and cupboards
Types of Splashback Fixings
There are two different methods of fixing a glass splashback to a wall:
- Screw fixings
- Adhesive fixing
Using adhesive is the easiest route to go down as essentially you just need to apply it to the rear of the splashback and push it into position on the wall and ensure its supported sufficiently until the adhesive cures. This method will also produce no visible fixing points and leave you with a nice seamless finish.
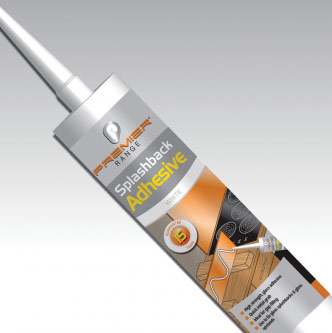
Adhesive used for fixing glass splashback to wall
Screw-fixing is slightly more tricky as you will have to screw a screw into the splashback itself and as the screw head pulls into the glass you will have to be very carefuly not to do it up too tight and crack the glass. You will also obviously be left with a screw head to cover up and as well as you disguise it, it will always be visible.
The fixings themselves come in a variety of different styles and if you have purchased your splashback as a ″kit″ they should be supplied along with it. Alternatively you can purchase your own from your local DIY store.
If purchasing your own, you will need some with internal threads in the head. This will then allow you to screw in a ″finishing cover″. These types of screw are often called mirror screws. See our project on types of screws for more information.
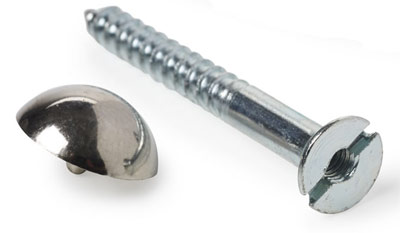
Splashback screw fixing or mirror fixing
Preparing the Surface of the Wall
Regardless of the fixing method you have chosen, there are several tasks that you must carry out before you actually secure the splashback to the wall:
Prepare the Wall and Check its Condition
The condition of the surface of the wall you are fixing to is of paramount importance! You will need to make sure that any and all wallpaper is removed, any flaking paint is scraped off and sanded down and that the surface itself is flat.
As glass does not bend the surface will need to be flat and any undulations will need to be smoothed out, with any major dips of holes filled with a suitable filler and then sanded down.
If the surface is too wavey then it may need replastering before you can fit your splashback.
Clean the Walls Surface
Once the surface has been prepared and all loose material removed give it a good wipe over with a suitable cleaning agent to remove any dust or grease.
If you are using adhesive to fix to a bare plastered or plasterboarded surface then you will need to seal it first. This will allow the adhesive to stick much better as the porous nature of both plaster and plasterboard won’t suck too much moisture from the adhesive and it will be allowed to dry out more naturally.
Seal Along Back of Worktops
Using a suitable silicone based sealer, seal along the back of any worktop surfaces (between the top of the worktop and the surface of the wall) that the splashback will be near.
This will work in conjunction with the sealant that is applied around the edge of the splashback as if any water or moisture penetrates this then it will not be allowed to travel down the back of any worktops and behind your units. If this happens over a long period of time then your units will begin to rot.
How to Install a Glass Splashback
Fixing Using Adhesive
Before applying adhesive its a good idea to position the glass in place to ensure that it fits nicely around any cupboards, cooker hoods or sockets.
Now that you have sized up the fit, remove the splashback and place it front down on to the worktop surface or another flat and stable surface. Make sure there’s no dirt or anything there before you do, you don’t want to scratch it!
If the splashback has nothing to rest the bottom edge on while the adhesive is drying then you will need to fit a batten to the wall to support its weight until the adhesive is fully set. The batten will need to be screwed to the wall to ensure that it doesn’t come off and risk your splashback coming crashing to the ground. Ensure that the batten is fixed at the correct height allowing for the required 2mm gap.
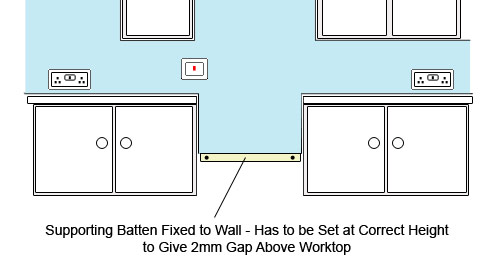
Batten fixed to wall supporting splashback until the adhesive has fully set
To give you your 2mm gap at the bottom of the splashback and above your worktop surfaces, you will need some 2mm chocks to rest the glass on. These will need to be removed once the adhesive has set. These will be included in with some kits.
Apply the adhesive to the rear of the glass in dollops. Each dollop will need to be roughly 20 – 30mm in size and they will need to be spaced about 80mm apart. Also ensure that the dollops around the edge of the glass are set in about 40mm as when it is pushed against the wall these will spread out and you don’t want them spilling out from around the edges.
In terms of adhesive, ask your splashback supplier what they recommend. They should also be able to supply this. In most cases you can also use a suitable construction adhesive such as Gripfill or No Nails or even adhesive pads. One thing you should check is that the adhesive is heat resistant.
With the adhesive applied, position the the splash back up to the wall and, using a clean cloth, rub gently over the surface applying a little pressure (but not too much, don’t crack it!). You may need another pair of hands to help you.
Using your cloth, rub over the surface feeling for any ″spongy″ areas and gaps in the adhesive where there is no support provided. If you find any, pull the glass back off of the wall and apply more adhesive in that area.
Once you have given the whole area a good going over and filled any gaps in the adhesive, make sure that the chocks at the base are in place and there is a nice uniform gap around any sockets, cupboards, cooker hoods or other items and leave the adhesive to set. Once set, remove the chocks ate the base and/or the supporting batten.
Fixing Using Screws
As with the adhesive method above, before you mark or drill any fixing points place the splashback up to the wall to make sure that it fits correctly around any cupboards, sockets etc…. and when in position there is a nice uniform gap around each.
Once you have confirmed the fit, place the glass back up to the wall and using a pencil, make a mark in the centre of all the fixing points on the wall so that you know where to drill them. Once this is done, remove the glass and store it in a safe place
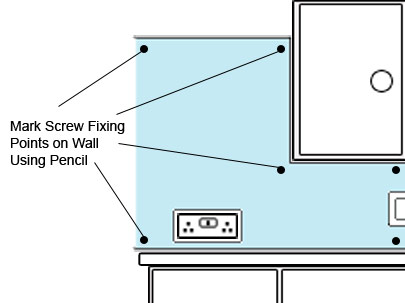
Mark all points that need drilling on the wall
Drill each fixing point using a suitable sized drill bit (normally 5 – 6mm) to the required depth. Place a wall plug in each hole ready to take the screw.
Now, put the splashback back up to the wall. You may need the help of a friend or family member to hold it in position while you fix it.
Starting at any edges (left edges first, then righ to hold it in position), screw in each fixing screw. You might be tempted to use an electric drill/driver to do this but please don’t as you can risk running the screws up too tight and cracking the glass. Use a hand-held screwdriver to tighten each screw. Tighten until the screw head is sitting snugly in the hole in the glass and there is no movement.
Once all screws have been fixed in position, add any finishing covers to disguise the screw heads and your done!
Seal Around Edges, Cupboards, Sockets etc.
The final job to complete, regardless of the fixings used is to apply a thin bead of sealant around all edges including the base and sockets using a suitable sealant (clear is best) and applicator gun.
Once applied, wet your finger and run it over each bead wiping off any excess. This will give you a nice, crisp edge and suitable professional look to the whole job.
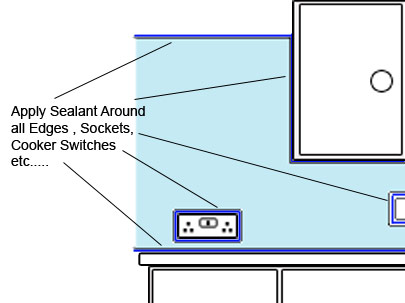
Apply a thin bead of sealant around all edges
Now that you have learnt all about fitting a glass splashback you may be interested to know that these same principles can be applied when fitting and acrylic splashback also. To find out more, see our project here.