If you want to keep bees, there is a lot of equipment you’ll need, but first and foremost you’ll need a beehive for them to live in! You can buy a beehive ready-made or flat-packed, or you can make one yourself. The plans below are for making what is called a ‘top bar beehive’ (also called a Warre hive), which is the simplest type of hive to build and deal with.
Tools and Materials for a Beehive
You will need the following to make your hive, along with basic DIY skills.
- Tape measure
- hand saw
- hammer
- screwdriver
- drill with pilot drill-bit
- square
- hand-plane
- wood chisel
- utility knife
- spirit level
- staplegun
Untreated pine will be fine for making your hive, though if you can get hold of cedar it will weather better. The timber should be 20mm-25mm (3/4” – 1”) thick, and 300mm (12”) wide. Planed shelving timber is suitable, and you’ll need 10-20 metres depending on how many levels you want your hive to have.
You’ll also need two pieces of exterior plywood for the roof, one 500mm x 420mm (20” x 16 ½”), and another piece 390mm x 350mm (15 ½” x 13 ¼”). Both should be about 12mm thick.
For the legs you’ll need four blocks of 50mm x 100mm (2” x 4”), 100mm (4”) tall.
For the top bars you’ll need some lengths of timber 10mm (3/8”) thick and 25mm (1”) wide. For each hive box you need ten pieces 300mm (12”) long.
You need nails or screws to hold the hive together of course – screws offer a better fixing, but it’s up to you. They should be about 50mm (2”) long, and will need to be galvanised or rust-proof.
The top level of the beehive is an insulating box, called a quilt. For this you will need a piece of cloth to cover the bottom of the box, such as cotton or canvas, about 500mm x 500mm (20” x 20”). You also need a natural insulating material – wood shavings, chopped straw or sawdust work well.
A second cloth needs to be placed between the top hive box and the quilt – it needs to be about 350mm (14”) square, and should be coated with a flour paste to stop the bees from eating it.
You need something to treat the finished hive with, to protect it from the elements – linseed oil is a good choice as it is non-toxic.
Constructing the Quilt
The quilt is a simple frame with the material attached to the bottom. Start by cutting the sides – you need two pieces 300mm x 100mm (12” x 4”), and two pieces 340mm x 100mm (13 ½” x 4”). Arrange the pieces of wood so that they form a frame, with the longer pieces overlapping the short pieces, so that it is square on the outside. Fix through the long pieces into the ends of the short pieces – if you are using screws, drill a pilot hole first. Two fixings in each end should suffice.
Once you have your frame, take the piece of cloth and lay it over the top of the frame. Use a staple gun to fix the cloth to the frame, putting a couple of staples on the front first, then stretching the cloth to the back and putting another couple of staples, then repeating this on the sides to ensure the cloth is evenly stretched. You can then go around and put more staples in to ensure that the cloth is secure all the way around. Trim the edges of the cloth so there are no bits left flapping around. Put your Quilt frame to one side.
Constructing the Floor
Cut two pieces of wood for two halves of the floor – 335mm x 170mm (13 ¼” x 6 ½”), and two small pieces 210mm x 30mm (8 ¼” x 1 ¼”). You also need a landing board, 400mm x 160mm (16” x 6 ½”).
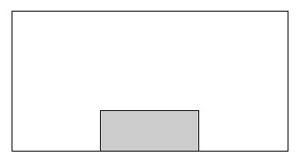
Beehive plan diagram 1
Take one of the floor halves and mark out a rectangle to cut out for your hive entrance – it needs to be central along the length, and tight on one side. The rectangle should measure 50mm x 120mm (2” x 9”). Cut out the rectangle by using a saw to cut down the sides, and a chisel to cut out the inside length. Sand the chisel cut smooth.
Beehive plan diagram 2
Place the two halves of the floor together with the opening facing out, and place your two small pieces of wood on either side, crossing the join between the halves of the floor. Nail the small pieces on, ensuring you use nails that won’t go all the way through the floor.
Next, place the landing board on the floor, positioned centrally so that it overlaps the entrance hole, and sits 10mm in from the back of the floor. Nail it securely into place.
For the legs, take your four 50mm x 100mm blocks, and cut four feet out of the 25mm thick planks – the feet should be 100mm x 100mm (4” x 4”) square. Nail a foot onto the bottom of each leg, then turn your floor over so that the landing board is on the bottom, and position it over the four legs – the legs should fit in the gaps between the landing board and the edge fixings, perhaps at an angle. Nail or screw through the floor to fix the legs into place.
Constructing the Hive Box
The beehive box is a square frame, with handles on the sides and top bars resting on brackets along the top. First cut out the sides of the frame – two long sides at 340mm x 210mm (13 ½” x 8 ¼”), and two short sides 300mm x 210mm (12” x 8 ¼”). Use screws or nails to fix the frame together in the same way you did the Quilt Box, with the long sides overlapping the short ones so that you and up with a square frame.
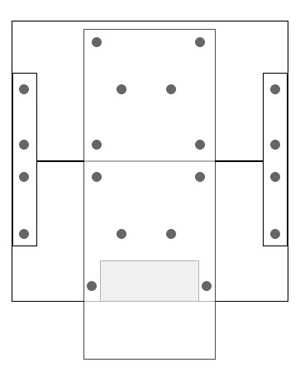
Beehive plan diagram 3
As mentioned in Materials, you need ten pieces of wood 10mm (3/8”) thick, 25mm (1”) wide and 300mm (12”) long. Use short nails or tacks to fix two of these to the sides of the frame, 10mm down from the top. These will form brackets for the eight top bars to sit on, and the bees will build their honeycombs onto these bars.
Cut two pieces of wood about 200mm x 50mm (8” x 2”), and fix them onto the outside of the box on opposite sides, to form handles so that you can easily lift the box.
Constructing the Roof
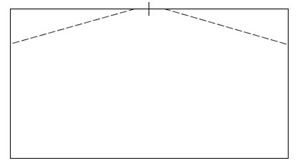
The roof is a gabled box which fits over the Quilt box. Start by taking your roof plywood (500mm x 420mm) and cut it in half, so you have two pieces 500mm x 210mm. Now cut pieces of plank for the sides, 350mm x 12mm (13 ¾” x 4 ¾”). Next, cut a ridge piece 500mm x 60mm (19 ¾” x 2 ½”), and two gable ends 390mm x 210mm (15 ½” x 8 ¼”). Take your gable ends and mark the centre along the longest length, then mark 20mm out on either side of the centre point. Now measure 160mm up from the bottom and make a mark on both sides of the gable. Draw two lines from the sides up to the outside-of-centre points, and cut along them so that you have a gable-shaped piece.
Build the main frame of the roof by fixing the gable ends to the short sides, the same way you did with the Quilt and Hive boxes. Take your other piece of ply, known as a cover board, lay it across the sides of the roof, and nail into place. Now take your roof panels and fix them onto the gables. They will overlap at each end. Now fix the ridge panel into place, and you have a finished roof.
Finishing and Installing the Beehive
Finish your hive by treating all of the pieces with linseed oil. You can use paint instead, but make sure it is non-toxic. Only treat the exterior of the hive, but make sure that the feet have a good coating as they will rot first, being in constant contact with the ground. You could fix some roofing felt to the bottom of the feet to protect them more, or stand the beehive on some bricks.
Find a suitable place for your hive – it should be partly shaded and a bit sheltered, out of the wind. It needs to be flat enough for the hive to sit level, and should be well-drained so that the feet don’t get too wet.
Build up your hive by placing the floor down first, then the hive box (ensure it overlaps the floor evenly all the way around). Put the top bars into place, making sure they are evenly-spaced, and place your flour-coated over it, sandwiching the cloth by sitting the quilt box on top. Place your insulating material in the quilt box, then sit the roof over the quilt box.
You should now have a finished beehive! Now you just need some bees to go into it. You can stack three or four hive boxes on top of one another to extend your hive and get more honey!