There are fewer and fewer suitable roosting places for bats these days, as barns get converted and towns spread out.
If you think there are bats in your area why not do your bit for conservation and invite them to stay in your garden by making a bat house for them using our easy to follow how to build a bat box guide below.
This is a fairly simple and fun project and a great one to get the kids involved with!
What is a Bat Box?
A Bat box is an artificial roost. It’s purpose is to attract bats into places where they would not otherwise roost.
Bat boxes can come in a number of designs and while ours (shown below) is a pretty general purpose type of Bat box, it is as well to remember that by doing a little research you may be able to build a larger or smaller Bat box as Bats species vary quite a bit.
With a little bit of home-work it may be that you can attract a particular species of Bat as each bat species needs are different and larger and smaller spaces are worth looking into.
Please remember that, once you have built your Bat box, it belongs to the Bats and it is illegal to open a Bat box (even the one you built) without a licence.
One of many Bat Boxes fixed in position in tree
Bats enter their boxes from underneath. They do not need a very big hole or slit to do so but creating a Bat ladder inside the back wall of the box allows them to hang on in there much more easily.
The box itself is made in a similar way to a birdbox, but instead of having a hole in the front, the entrance is in the bottom of the box.
When bats are looking for a new home, they aren’t particularly fussy, unless it’s a question of size for some species, so it is quite easy to make a bat house that will be appealing to them. Here are some simple rules that you should follow to make a house that any bat will be proud of:
- Rough-sawn wood is the best material to use for your bat box. The rough finish enables the bat to cling onto it. When purchasing timber to build your box, make sure it isn’t PAR (planed all round) or PSE (planed square edge)
- Make sure the wood is untreated – some treatment chemicals can be harmful to bats. There is a great deal of information about which timber treatments are OK to use near roosting Bats and there is also a Bat advice help line.
Why are Bats Important and why should I help them Roost?
Unlike birds, Bats do not construct their own nest or roost as they rely on existing openings and crevices such as a hollow tree or a nook in a cave etc. Building a Bat box really helps them out!
How do Bats Help us Humans?
Bats have a really important role to play in lots of global environments in that they help with pollenating plants and also help to control insect population simply by eating them!

Bats help biodiversity by pollinating plants – Image courtesy of bats.org.uk
Changes in a Bat population in any particular area give them vital clues as to how the variety and variability of (particularly) plant life is coping in any given area.
Bats play an important role in many environments around the world. Some plants depend partly or wholly on bats to pollinate their flowers or spread their seeds, while other bats also help control pests.
In the UK, some bats are “indicator species”, because changes to these bat populations can indicate changes in aspects of biodiversity. It is by studying Bat behaviour that scientists can quite often tell how our planet is coping with various stages of biodiversity.
Bats might suffer when there are problems with insect populations (because our bats feed on insects) or when habitats are destroyed or poorly managed (for example, some bats only live in large woodlands).
Tools you will Need to Build a Bat box
If you are an avid DIY’er, you should have pretty much all the tools you will need already in your tool kit. If not, you can click through on the below links to our store to find out more or purchase them:
- Decent wood saw: A good wood saw will make making a Bat box easy. Trying to saw timber using old, blunt saws leads to bad workmanship and a very frustrating time
- Tape measure: The oldest DIY saying in the book is Measure twice, cut once and this is every bit as true for a bat box as it is for hanging your lounge door!
- Carpenters combination square: The sides, front, back and roof of your Bat box are not going to fit together properly unless all sides are square. For the best job you do need the right tools!
- Drill Driver: There are not many woodworking (or other) jobs you can do round the house and garden without a decent drill driver. Well not without making each job very hard work indeed!
- Screw assortment: Almost every job requires a different screw so an assortment in the shed will help you with your Bat box
- Hook or eye bolt or both: You will need to fix your Bat box to a tree, garden wall, shed or anything that will give a solid home to the bats. The easiest way to do this is with a hook
Designing, Planning and Building the Bat box
If you don’t have enough spare pieces of rough, untreated wood lying around, you can buy a sawn plank roughly 1200mm long, 200mm wide and 20mm thick. This will be enough to make all the sides.
Use a pencil and ruler to mark out lines on the timber where you need to cut it. Use the carpenter’s combination square to make sure you do not waste any timber by cutting triangles instead of squares and rectangles!
The top and side pieces are 200mm wide, but the back and front are only 150mm so you’ll need to make an additional cut for those. Measure (twice, with a decent tape measure) and mark out the following dimensions:
Bat Box Dimensions
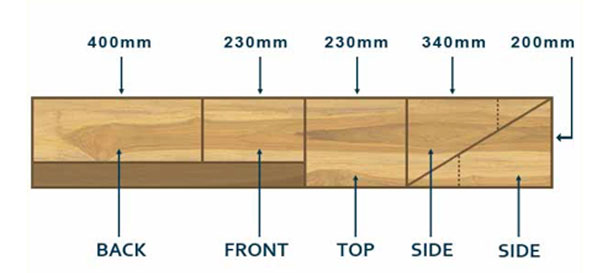
Obviously the size of box you want to build is entirely up to you, but for our box we are going to use the following dimensions. These can also be seen mapped out on our bat box plan image below:
- Back/rear of bat house: 400mm x 150mm
- Front of bat box: 230mm x 150mm
- Top/roof: 230mm x 200mm
- Sides/walls: 340mm x 100mm each, then draw a line diagonally from the top corner to approximately 100mm down the side so you can cut off the corner
For a deeper box, which might be preferred by some bats, you can make the sides out of full width (200mm) lengths, but remember that the base piece will need to be wider too.
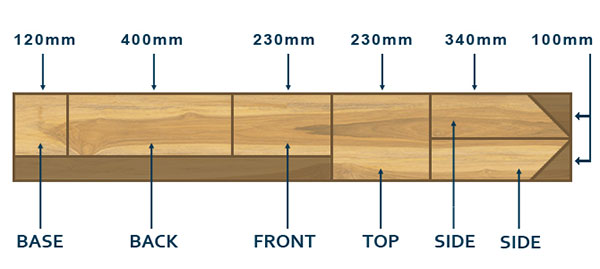
All the sizes, cuts and dimensions for a bat box
Step by Step Instructions for Putting the Bat House Together
Step 1 – Cut out Sections of Bat House
Cut out the pieces shown above and sand the sawn edges so that they will fit snugly together. Bats don’t like draughts, so you need to fit the pieces together well with no gaps.
This is why a sharp saw and combination square is important for this project. You may wish to glue the pieces to ensure a draught proof seal before screwing the box together.
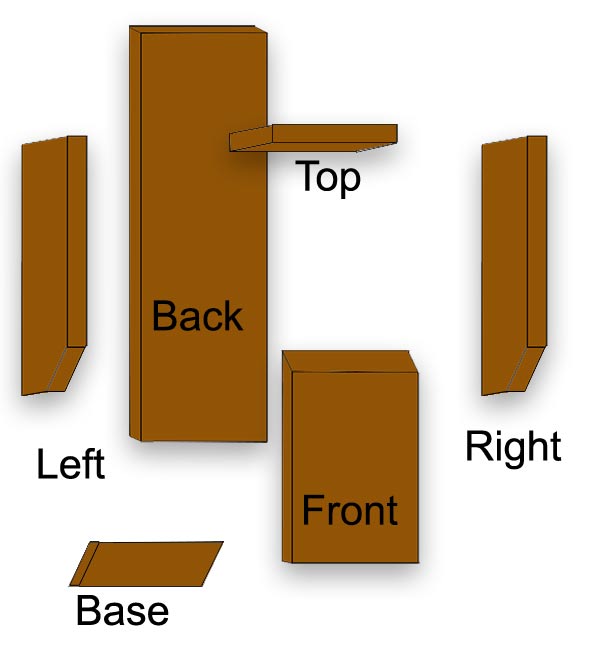
Bat box design and layout once all pieces have been cut out
Cut Ridges for Bat Ladder
With all of your individual sections sawn and ready, the next task is to cut some ridges for the ladder.
You need to cut ridges in the back piece to make a bat-ladder. This will give any bats a nice surface to land on and then make it easy for them to climb up into the box.
Another Bat Box design: A ladder makes it easy for the Bat to climb into the roost – Image courtesy of Ark Wildlife
Lay the back section on a flat surface, with the visible front section facing up towards you.
Using a pencil and tape measure, measure 5mm up from the bottom and put a pencil mark at either side of the timber section and then join the 2 points up across the timber-face with a pencil mark.
From the line you have just created, measure up around 5mm and again, mark either side and then join the points with a pencil line.
Repeat this process all the way up the back section and stop roughly a third of the total length from the top, so that the ladder extends on up into the house itself. This will help any bats climb up and also give them something to hold on to inside if they wish.
To cut the ladder slats themselves, place your hand saw blade onto each line and cut down into the timber to a depth of around 2mm.
This will allow any bats to get their fingers in far enough to enable them to easily climb.
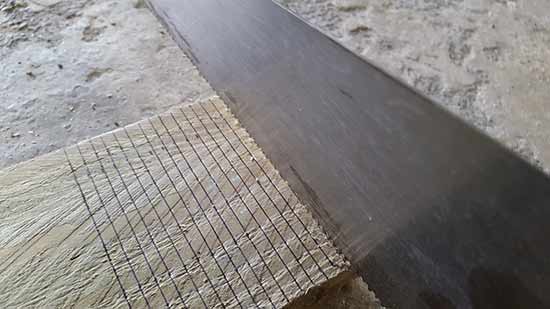
Cutting the slats in the back section to create the bat ladder
Cut Down Sides of Box
Next you need to take the points off the triangles for the sides (see dotted lines on plan image above) – this will create the slot at the bottom where the bats will enter the box.
Measure 125mm from the acute (sharp) angled end of the triangle, along the longest side; draw a line across to the second-longest side, so that you have a small triangle.
Cut the small triangle off and discard it. This will leave a gap that is large enough for the bats to enter but too small for predators.
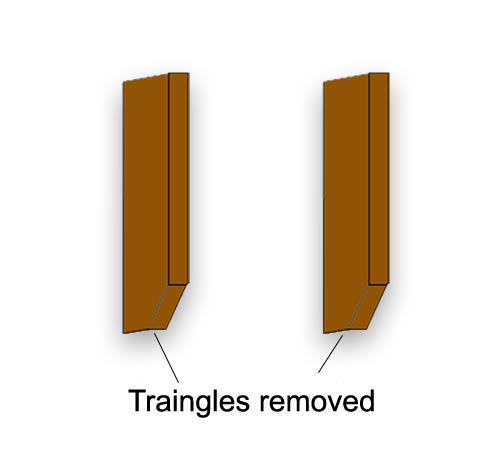
Top section of triangles removed from each side to allow space for bat to crawl in
Fix Your Bat Box Together
Now you’re ready to screw the pieces together. To do this use 40mm wood screws.
Screw the two sides to the front panel first, driving each screw through the face of the sides into the edges of the front. Use three screws in each side.

Screw the front section on to each side panel using 3 40mm screws for each side
If you are not used to using a screwdriver, the timbers can be nailed together but it is a much better, and longer-lasting job to use screws.
You might want to go over to our page on pilot holes and countersinking screw heads to find out how best to screw the boards together with the minimum of fuss.
With the sides and front fixed together, next comes the back section.
Take one side section and measure the length of it’s longest side. Now measure the length of the back section and deduct the measurement of the side section from it. Finally, divide this number by 2.
This should then give you the exact measurement from either the top or bottom of your back section to mark so that each side section is central to the back.
Measure and mark down from the top on each side of the back piece this measurement so that you know exactly where to place each side to make it central.
Place your already assembled front and sides section face down (with the front section laying flat on your work surface.)
Take your back section and place it on to the up-turned sides, with the marks that you previously created, positioned at the top of each side.
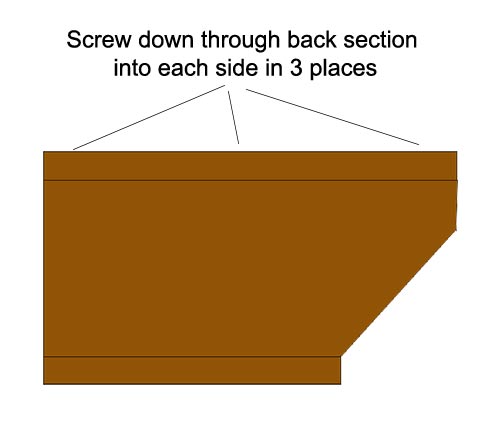
Screw the back of your bat box onto each side in 3 places
Screw down through the back into each side in 3 places top, middle and bottom. Repeat this for the other side also.
Your bat box should now be taking shape nicely with both sides and the front and back in place.
The next job is to fix the base on that will form teh opening to the box itself and allow the bats access.
Flip your box over so that it is lying down flat on the back.
There are 2 ways to fix the base on – The first is to simply screw it on and this is totally fine, but as you can see from the image this leaves a gap between it and the base of the front.
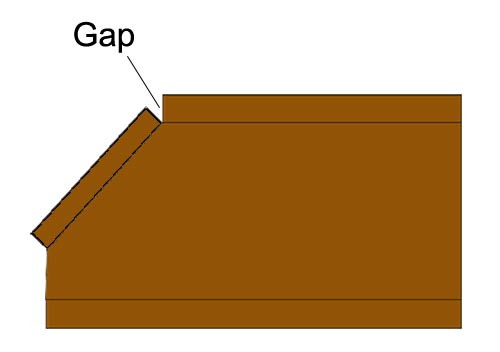
Gap between base of front and the base of the box
This gap can be sealed, but whatever you use, just make sure that it won’t harm the bats in anyway.
In most cases, as long as you ensure that the base is pushed up tightly to the bottom of the front, this should seal any air gaps and prevent any draughts.
The second option is to get a bit technical and cut a mitre onto the bottom of the base so that it butts up nicely and covers the gap fully (as seen in the mage below).
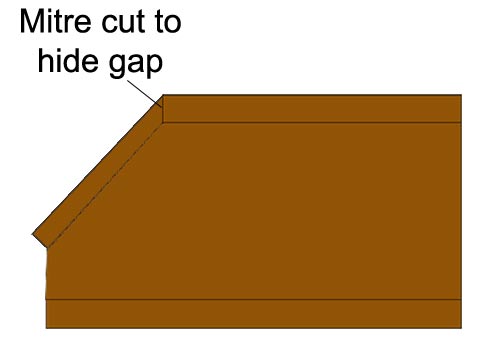
Mitre cut into base section to butt up to the front panel
To cut the mitre itself you will need to use a mitre saw, but before you can make our cut, you will need to figure out what angle the cut needs to be.
The tool for this job is the angled bevel (find out how to use angled bevels or sliding bevels in our project here).
Once you have the angled marked with your bevel, transfer this onto the base and then make your cut.
With the base now ready, pop it in position on your box and screw it up using 1 screw in each corner.
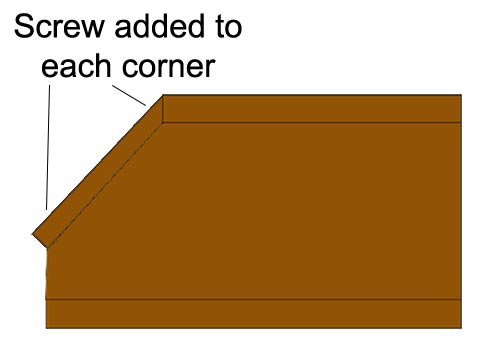
Screw the base of your box on using a screw in each corner
The final assembly job is to then screw the roof onto the top.
Position the top on top of the side sections making sure there is an equal overhang at either side and also ensure that it’s pushed back and touching the back section nice and tightly.
As with the base, screw the top on using a screw in each corner.
Once the top is fixed in place, you’re pretty much done, top job!!
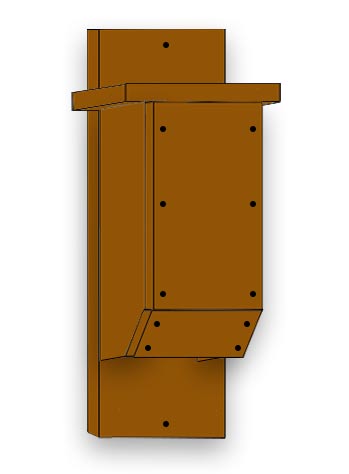
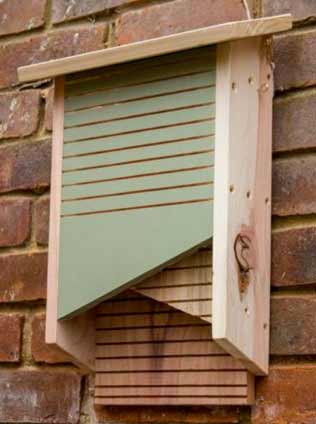
Bat box fully constructed and ready for installation
In order to fix your bat box in place, you can use either a hook/eyelet or screw it in place.
Find an eyelet or hook with a hole big enough to get a nail or screw through, and attach this to the top of the box so that you can fix the box to a tree, post or wall – position it centrally so that it doesn’t hang crookedly.
For a more secure fixing, drill 2 holes dead centre both top and bottom in the back section that you can the screw through and secure your box to your chosen location.
If using this method, make sure that you use a spirit level to make sure it’s horizontally level.
An Alternative Bat Box Design
This is a very similar design, but it is a little simpler so you might prefer it. It is made in exactly the same way as the design above, so you will see form the dimension below:
- Back/rear of bat house: 400mm x 150mm
- Front of bat box: 230mm x 150mm
- Top/roof: 230mm x 200mm
- Sides/walls: These are triangular, so mark a rectangle first 340mm x 200mm then draw a line diagonally from the top right corner to the bottom left corner
The simple Bat Box – the sizes, cuts and dimensions for a bat box
Position your Bat Box
Bats like to move roosts depending on the time of day and the season, so the best way to keep them happy is to make three boxes and attach them around a tree trunk, as high up as possible (at least 2m off the ground) and avoiding facing due west, as this is the direction that the most bad weather comes from.
Wherever you site your boxes, try to ensure that they are in a spot that is sheltered from wind and rain, but if possible make sure they get as much sun as possible so that they can warm up during the day.
Ideally the boxes should be close to a hedge or tree line as some bats use these for navigating, however make sure there aren’t too many branches obscuring the box, making it difficult for the bats to fly in.
Please be careful if you are using a step ladder, hop-up or anything else to reach up and fit your bat box. If you need further help on ladder safety see our project here.
Do not be tempted to try and peek in the boxes – it is illegal to disturb bats when they are roosting.
If you find an injured bat, don’t pick it up – you need a licence to handle them. In situations like these, contact your local wildlife trust and they will tell you what to do.
At DIY Doctor we love to look into people’s hobbies and interests and try to find ways of making them even more interesting. There are many ways you can combine a love of the countryside (and all things in it) with a love of DIY.
For more information about bats, bat boxes, bat habitat and how you can help conserve and protect them please look at the Bat Conservation Trust Website here.

A very cute bat – Image courtesy of Pinterest
If you have any good ideas (you may even have carried them out) about combining our natural environment with a DIY Project, be it a Hedgehog run or a bridge for a snake, please do let us know and if you have any pictures of your work, please do send them along.
We can be contacted by going to our feedback page, telling us about your idea. If you have pictures, let us know on this page and we can send you a special email address to send them to.
Now, we hope that you can relax and watch the evening draw in and the bats flitting back and forth from their newly build bat house eating mosquitoes and other bugs.
If you want to further your interest in bats, there are many bat clubs around the UK. A simple search will bring one up near you.