having a bird box in your garden is a fantastic way to attract birds and also teach young children about common garden birds and their breeding and nesting practices.
In this DIY guide, learn how to build your very own bird box for your garden.
The Importance of Bird Boxes for Nature
Bird boxes are valuable additions to gardens, providing tailored habitats to attract desired bird species.
For families, they offer a wonderful opportunity to introduce children to nature, teaching them about bird behavior, nesting, and survival skills.
In the UK’s often harsh weather conditions, bird boxes offer shelter, ensuring the survival of bird populations.
As traditional nesting sites diminish due to human activity, bird boxes serve as vital replacements, preserving nesting opportunities for birds.
Where and How to Position Your Bird Box
Choosing the right spot for your bird box is crucial for the safety of its inhabitants.
When looking for a location for your bird box, keep the following points in mind:
- Height Matters: Mount the box at least 1m above ground, ideally 3m, to keep birds safe from predatory threats and human interference.
- Accessible Entrance: Ensure easy access for birds to enter the box without obstacles.
- Space Between Boxes: Avoid placing multiple boxes too close together to prevent territorial conflicts among birds.
- Weather Protection: Angle the box downward to shield the entrance from rain and wind, preferably facing north to southeast.
- Entrance Shielding: Protect the entrance with nearby shrubs or climbing plants to prevent exposure.
- Predator Defence: Secure the box against predators like cats and squirrels using sturdy fixings and purpose-made metal entrance guards.
- Use Proper Fixings: Use rust-proof screws, such as stainless steel or galvanised for mounting to ensure longevity.
- Away from Feeding Areas: Position the box away from bird feeders and baths to minimise disturbance.
- Tree Mounting: If attaching to a tree, use wire or string, avoiding direct screwing to prevent tree damage. Also protect the trunk from any string or wire by laying some rubber between it and the string/wire
Choosing Bird Box Designs
When it comes to bird box designs, there’s no strict rule – you can get as creative or traditional as you like.
As long as it has the right-sized entrance for your target birds, uses sturdy, weather-resistant materials, and keeps the interior dry, it’ll suit your feathered visitors just fine.
For simplicity and effectiveness, many opt for a classic design like the one commonly seen in gardens nationwide, pictured below. These are often made from a single standard length of 6 x 1 inch timber, making them easy and economical to build.
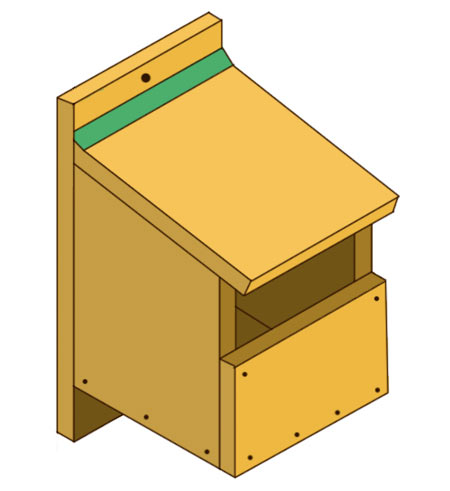
Example of a wooden bird box
Choosing Timber for Your Bird Box
When selecting timber for your bird box, opt for rough sawn and pressure-treated timber to withstand outdoor conditions effectively. This type of timber is widely available at DIY stores and builders’ merchants.
While softwoods like pine are common, they deteriorate quickly when exposed to the elements. For better durability, consider hardwoods such as beech or oak, which resist weathering more effectively.
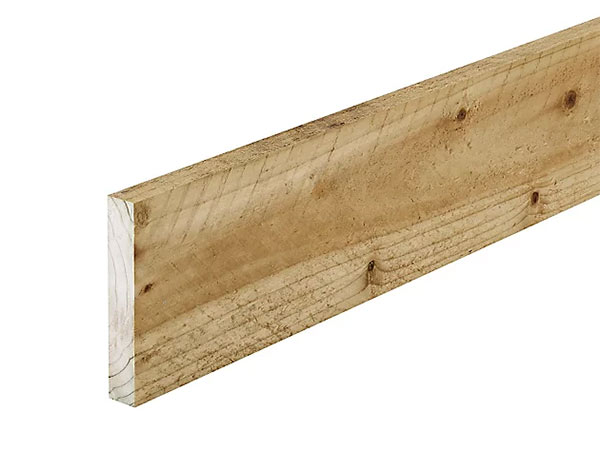
6×1 inch treated rough sawn timber
Checking Inside a Nest Box During Use
Many wonder if it’s okay to peek inside a bird box while it’s in use. Generally, it’s fine as long as you approach slowly and quietly and keep any visits to an absolute minimum!
If the entrance is large, you can peek in quickly from there. For smaller entrances, lift the lid swiftly for a peek.
Try timing your checks for when the mother bird is briefly away, often in the early morning. Regular monitoring can help you learn when these moments occur.
However, limit your checks to a minimum, and never reach inside or disturb the contents.
Types of Birds for Your Bird Box
UK gardens host a variety of birds that might use a nesting or bird box. Common visitors and potential occupants include:
- Marsh tit
- Nuthatch
- Willow tit
- Great tit
- Coal tit
- Blue tit
- Tree sparrow
- House sparrow
- Pied flycatcher
- Various finches
- Redstart
- Various woodpeckers
- Starlings
- Swift
- House martin
- Doves
- Pigeons
- Owls – several species
- Jackdaws
- Crows
- Blackbirds
- Wagtails
- Robins
This list includes common varieties, but there are additional species dotted around depending on location, such as urban or rural areas.
The size of the bird box and entrance determines which birds can use it. Below is a guide for hole sizes needed for different species. For larger birds, like owls, you can modify the box design by sawing the front section in half to create a bigger entrance.
Choosing Bird Box Hole Sizes
The size of the hole in your bird box determines which birds can enter. Here are recommended sizes for common garden birds:
| Bird | Entrance Hole Size |
| Blue Tit | 25mm |
| Great Tit | 28mm |
| Tree Sparrow | 28mm |
| House Sparrow | 32mm |
To attract specific birds, match the entrance hole size accordingly. For more details on bird sizes and habits, visit the British Trust for Ornithology website.
Tools and Products Needed for Building a Bird Box
In order to build your bird box you will need the following tools and products:
- 22 inch Jack saw
- Carpenters square
- Flat drill bit of required hole size (32mm in this example)
- 8mm wood bit
- 3mm wood bit
- Tape measure
- Pencil or marker
- Drill/driver
- 20 Number 8, 30mm wood screws
- 10 15mm galvanised felt nails
- Medium grit sandpaper
- Piece of rubber for hinge
- 1.5m length of 6 x 1 inch treated rough sawn timber
- Selection of hole saws and arbour
- Hammer
How to Build Your Bird Box
Now that you know about all the types of birds you are likely to get in your garden and which ones may like to utilise a bird box during breeding season, it’s time to go through exactly how to build your very own.
The following sections show you how to build a bird box and lists all of the wood you will need.
Step 1: Select and Purchase Timber
As we have stated above, ideally your timber needs to be at least treated rough sawn softwood, but for this example we are going to a hardwood as this can withstand the elements much more.
The timber we selected was 150mm wide x 15mm thick. Purchase a plank 1500mm long at minimum as this will supply all the timber needed for our planned box.
You will not use all of this but this length will allow you a mistake which most people usually make.
Although it will cost more, it’s worth the extra expense due to the longevity.
Step 2: Mark out Cuts for Your Bird Box
Once you have your timber, lay it out on a flat surface and mark out each cut line using a pencil or pen.
By using a pen, the marking will be slightly thicker and allow for the width of the saw blade and cut, whereas marking out in one go using a pencil or thin marker normally results in odd cuts as you tend to cut along the line, neglecting the width of saw blade and cut.
Measure and mark your cuts as follows and in accordance to the image below:
- Sides: The side panels will be slanted, 150mm wide by 200mm high at the front and 250mm high at the back
- Base: 115mm by 120mm
- Back: 150mm by 300mm
- Front: 150mm by 200mm
- Top: 220mm by 150mm
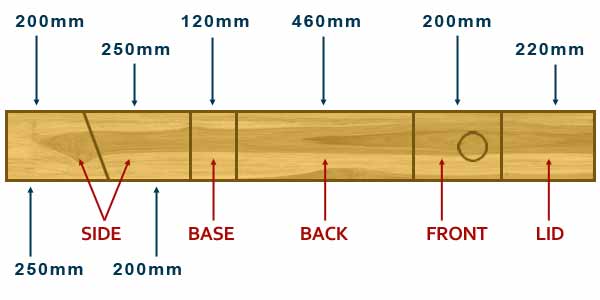
All cuts needed for a bird box marked on piece of timber
Step 3: Cut out Bird Box Pieces
The next job is to cut all of our sections out. If you have a circular saw or reciprocating mitre saw then you can use either of these to save a little time, however if not then a decent handsaw will suffice.
Lay your timber out on a solid sturdy surface such as a work bench and cut each piece out. For help with tis see our using a handsaw project. Once all sections cut out, sand all cut edges down to smooth them off.
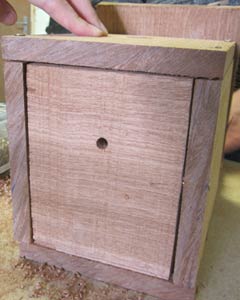
Next, use the flat wood drill bit to drill the hole in the centre of the front panel – the hole must be at least 125mm from the base of the box, so that small nestlings cant fall out.
Step 4: Assembling the Sides, Rear and Base
Once all cut out the next task is to then fix everything together.
Align all the pieces as shown in the diagram below, mark with a pencil and then drill out pilot holes for all the screws. Don’t forget to countersink the timber to accept the heads of the screws. More about pilot holes and countersinking can be seen in our project of the same name.
Do not be concerned if all the parts of your bird box do not fit together as if they were made in Ikea. Carpentry is a very specialised skill and trust us, the birds won’t mind if some of the joints do not line up perfectly!
Once all holes have been drilled it’s now a case of screwing everything together. Starting with the back and sides, use your 30mm wood screws to fix each side to the rear and then the same for the base and front section, ensuring that everything is aligned correctly.
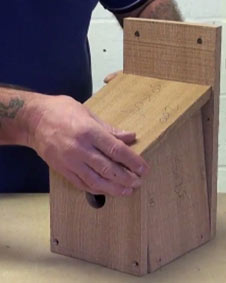
How to line up the sides of a bird box ready for assembly
Step 5: Fitting the Roof on to Your Box
The next job is to fit the roof and for this you will need to use a section of rubber as a hinge. You can of ourse use a propper hinge, however these tend to rust and fail whereas rubber will last much longer.
Cut the rubber to width, just around 150mm and then place it and the roof section on a flat surface. Use the 3mm drill bit to drill 4 or so pilot holes through the rubber and slightly into the timber, but not all the way.
Place a felt nail in each pilot hole and then hammer it into place. Position the roof on to the top of the bird box frame and repeat this for the rear to fix the roof in place.
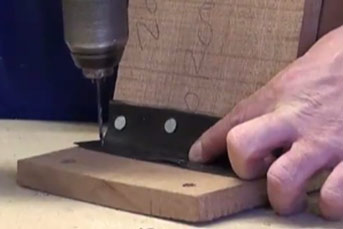
Drill pilot holes to fit the rubber hinge to stop the timber splitting
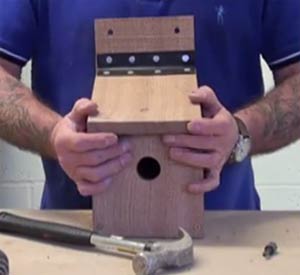
Step 6: Drill Fixing Holes
The penultimate job now is to drill an 8mm hole in the top corners of the back of the bird box. These holes will allow you to hang your bird box from a tree or fence. Also drill 2 x 8mm holes in the bottom of the bird box to allow any water to run out should it drive in through the hole at the front of through any of the joints.
1x 8mm drainage hole drilled into base of bird box
Step 7: Fixing Your Bird Box up in Your Garden
With everything now complete the final job now is to fix your bird box up in your garden.
As we have stated above, locating your bird box in the correct spot is critical in order to keep its occupants safe and secure.
Once you have found the ideal spot, either up on the eaves of a house (ideally) or in another location as equally isolated away from predators and other risks.
If you are fixing to the eaves area then simply screw the box in place to the timber using a suitable size wood screw through the fixing hole on the rear.
Do not be tempted to nail or screw your bird box directly to a tree, if this is the only location you have for your box. The tree will grow and stretch the screws which will eventually split the wood causing significant damage. Use the holes you have drilled in the back to tie some cord to the box and around the tree or object you are fixing the box to.
The holes in the back of the bird box can be used to tie cord or screw through
Cleaning and Maintaining Your Bird Box
During the colder winter months when your bird box is not in use it’s essential that you carry out any maintenance and cleaning that needs to be done.
If things have failed e.g. rot has set in or anything has failed, take the box down and make a new section and replace it to ensure it’s fit for the next coming breeding season.
Also the box can be fully cleaned out so any next and remainin egg shells can be removed and disposed of ready for any new inhabitants.
It’s an important point to note that the Bird Protection Laws prevent anyone removing opr cleaning a bird bo out between the months of the 1st of September and 31st of January, so stay away during these times.
Additionally, also be aware of the fact that some species of bird will have multiple broods, so just because one lot have grown and flown the nest, there may be more!
There you have it! You have now successfully learnt how to build and cite your very own bird box now you can sit back and wait for any potential new owners to move in. If you are newly inspired and now have a thirst for carpentry, why not build some more, they also make great presents!