Cladding is simply the covering or coating placed on an object. Cladding to buildings can be done in many ways. Buildings can be clad in tiles, usually 10 inch x 6 inch plain tiles either concrete or clay.
Cladding can be wood sheets, or boards, concrete sections, or many types of sheet material including steel. Timber framed buildings are very often clad in brickwork.
Cladding, in construction terms, is the external waterproof layer placed on the skeleton of the structure. The most common form of cladding these days is PVC. Also known as PVCu or uPVC. PVC stands for Poly Vinyl Chloride.
It is a form of plastic which, in its plasticised state, is very flexible and used for operations such as the insulation coating on electric wires and cables. In its unplasticised state it is hard (although generally still fairly flexible) and in this state it is called unplasticised or simply uPVC.
uPVC is rolled and pressed into many different profiles and as a waterproof covering it is extremely versatile, easy to cut and not too difficult to fix to a building.
Its uses include facia boards, soffit boards, internal and external cladding, gutters and guttering parts, windows doors and a host of other components of a modern building.
By making uPVC sheets thin and doubling them up with a void in between the uPVC remains flexible and strong yet very light for ease of installation. This project deals with uPVC cladding on a simple portacabin but the principles are exactly the same for a warehouse!
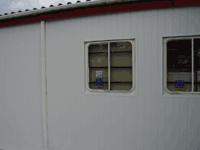
uPVC Cladding to building
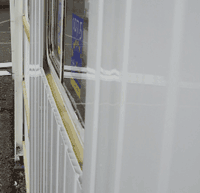
First, as with tile or steel cladding, a frame must be fixed to the building onto which the cladding sheets, or boards, are fixed. In this instance treated softwood battens were used.
The battens can be fixed at 400mm centres over the length of the building and to make sure you keep the batten courses straight we recommend the use of a chalk line. Fix the battens with the appropriate screws, again at 400mm centres and make sure each screw sinks just below the surface of the batten. This will allow the cladding to sit neatly on the face of the battens and not kick on "proud" screws.
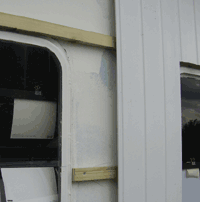
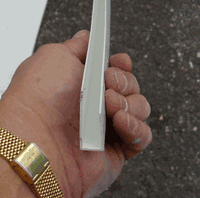
Battens should be fixed around each opening but kept 30mm back from the actual opening itself. This will allow you to cover the cut edges of the cladding with a special uPVC profile called an edge trim. The trim is slotted over the edge of the cladding to tidy up cut edges give a neat finish to the opening.
Battens fixed to building
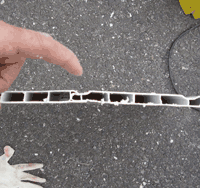
Profile
Insulation can be placed behind the cladding for warmth but if you do this make sure there are no gaps in the insulation which could cause interstitial condensation to form. Trickle vents can also be used in cladding to make sure a free flow of air circulates behind the cladding staving off condensation as air heats up in the void between cladding and building.
The cladding itself is hollow between two thin sheets and strengthening uPVC struts are included in the profile. Each section is joined to the next by clipping it into place forming a watertight joint. There are different types of board and sheet with different types of joint. Each different section or type of cladding is called a profile.
Battens around openings kept back 30mm
Window trim
Cut back round opening and cladding trim
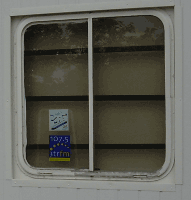
Trim around windows
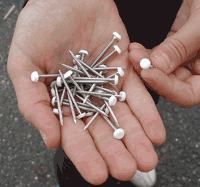
Poly Pins
Cladding, in this case, is fixed to the framed battens by means of special nails called Poly Pins. Their small heads are covered with uPVC to match the covering. Poly Pins come in different colours to match the uPVC.