Garage walls and most floors are usually not built to the same standards as living areas, so adjustments are needed to make them damp-proof.
This approach isn’t a shortcut, it’s a practical way to save time and money without meeting unnecessary building regulations, so read on below and find out how to damp proof your garage the right way.
Why do Garages get Damp?
Garages are particularly prone to damp because they are often built with minimal insulation and ventilation compared to the main house. Walls and floors may be in direct contact with the ground, allowing moisture to seep through. Without proper damp-proofing, this moisture can accumulate, causing wet walls, condensation, and even mould growth.
Another common cause of damp in garages is poor drainage. Rainwater can collect around the base of walls or under floors, especially if gutters, downpipes, or external landscaping do not direct water away. This trapped moisture gradually penetrates the brickwork or concrete, creating long-term damp issues.
Condensation also contributes to damp in garages. Vehicles, stored items and temperature fluctuations generate moisture in the air. If the garage is poorly ventilated, this moisture cannot escape and settles on cold surfaces, making walls, doors, and stored goods damp over time.
Finally, structural issues such as cracks in walls, damaged roof flashing or missing mortar can let rainwater in, compounding the problem. Even small gaps in doors or windows can allow moisture-laden air to enter and create damp patches inside.
Most Likely Areas for Damp to Get into a Garage
Damp can enter a garage through several weak points in its structure. The most common entry point is the walls. Many garage walls are built with single-skin brick or blockwork, which provides little resistance to driving rain or rising damp from the ground. If the wall has cracks or missing mortar joints, water can penetrate even more easily.
The garage floor is another vulnerable area. Without a proper damp-proof membrane, moisture from the ground can rise directly through the concrete slab. This often shows up as dark patches on the floor or a general feeling of dampness underfoot. In older garages, this problem is very common.
Doors and windows also let damp in. Gaps around the garage door, especially at the bottom where it meets the floor, allow rainwater to seep inside. Poorly sealed window frames or cracked glazing putty can also allow water and cold air to penetrate, leading to condensation on the inside walls.
The roof and guttering should not be overlooked. Damaged or blocked gutters can cause rainwater to overflow, soaking the wall beneath. Loose roof tiles or faulty flashing let water drip directly into the garage, which can quickly spread damp patches on ceilings and walls.
How to Prepare a Garage for Conversion – What Needs to Be Done?
Converting a garage into a liveable space is a popular way to add value and extra room to your home. Before you start, careful preparation is essential to avoid problems later. Here’s a clear step-by-step checklist to help you get your garage ready for conversion:
- Check Planning Permission and Building Regulations – In most cases, garage conversions fall under permitted development, but always check with your local council, however in some cases, full planning will be needed. Find out all you need to know on the . Building regulations approval is usually required for insulation, electrics, plumbing, and structural changes.
- Assess the Garage Structure – Inspect walls, roof and floor for cracks, damp or movement. Weak points need repairing before any conversion work begins.
- Damp-Proofing – Most garages lack a proper damp-proof course and in many cases may only be constructed using a single skin of bricks or blocks. You may need a new damp-proof membrane for the floor and extra protection on walls to stop moisture entering, see our damp proofing garage floors project for help.
- Insulation – Add floor, wall and roof insulation to meet energy efficiency standards and make the space comfortable all year round. This will also form part of the Building Regulations that will have to be met in order for the job to be signed off.
- Upgrade the Floor – Garage floors are usually lower than the rest of the house. You may need to raise, level, and insulate the floor before laying new coverings.
- Windows and Ventilation – Replace or add windows to provide natural light and fresh air. Good ventilation prevents condensation and damp in the converted room.
- Heating and Electrics – Plan electrical points, lighting, and heating early. This often involves rewiring and connecting to your home’s central heating or adding electric heaters.
- Plumbing (if needed) – If your conversion includes a bathroom, kitchen or utility space, plan pipe runs and drainage routes at the preparation stage.
- Garage Door Replacement – The existing garage door opening is usually replaced with a solid wall and window or patio-style doors. Proper foundations may be needed here.
- Soundproofing – If your garage faces a road or neighbours, consider acoustic insulation to reduce outside noise.
- Internal Finishes – Once the structure is sound, you can fix plasterboard to walls, install flooring and decorate just like any other room in the house.
Methods of Waterproofing a Garage for Conversion
Waterproofing is one of the most important steps when preparing a garage for conversion or habitation of any kind.
Unlike the main house, garages are rarely built with the same level of damp protection, which makes them vulnerable to leaks, condensation and rising damp. Without proper waterproofing, your new living space could suffer from mould and structural damage.
Below are the most effective methods to keep your garage dry and secure.
1. Damp Proof Membranes
Installing a damp proof membrane (DPM) beneath the garage floor is one of the most reliable solutions.
A heavy-duty plastic sheet is laid under or over the concrete slab, preventing ground moisture from seeping through.
In some cases, liquid-applied membranes can also be painted directly onto the surface for added protection.
2. Tanking Slurries and Sealants
Tanking involves applying a waterproof coating directly to the inside walls and floor.
Special cement-based slurries or bitumen sealants are brushed on to form a watertight barrier.
This is especially useful if your garage is partially below ground level or exposed to driving rain.
3. Cavity Drainage Systems
For garages that are prone to high moisture or where full tanking is impractical, a cavity drainage membrane can be fitted.
This system creates a gap between the wall and an inner lining, allowing any water to drain away safely to a sump pump or drain outlet.
To learn more, see our lining damp walls project for more help
4. Improving External Drainage
Stopping water before it gets inside is just as important. Check outside drainage, gutters and downpipes to ensure rainwater flows away from the garage walls.
Adding French drains or sloping the ground away from the building can also reduce damp problems.
5. Sealing Windows and Doors
Gaps around doors and windows are common entry points for damp. Use weatherproof sealants and ensure frames are properly fitted to block out rain and draughts.
For the garage door opening, replacing it with a solid wall or watertight frame makes a big difference.
How to Damp Proof a Garage for Conversion
As we have now looked at all the important aspects of garage damp such as why they get damp and what the most common causes are, it’s now time to look at exactly how a garage is fully damp proofed, ready for a conversion.
- Step 1: Inspect the garage for signs of damp – Look for dark patches on walls, flaking paint, musty smells, or condensation on windows. Identifying the source helps you choose the right solution.
- Step 2: Seal external cracks and gaps – Use exterior-grade fillers or mortar to repair cracks in brickwork. Replace damaged pointing and check seals around doors and windows to stop rainwater entering.
- Step 3: Construct cavity walls – If needed and the existing walls cannot be damp proofed/insulated sufficiently, a new wall may need to be constructed inside the existing garage shell to form a cavity wall. Your local building control officer will guide you on whether this will need to be done.
- Step 4: Install a Damp Proof Membrane (DPM) – Lay a heavy-duty plastic sheet beneath or over the concrete floor to block rising damp. This creates a barrier that stops ground moisture reaching your new living space.
- Step 5: Apply tanking slurry or waterproof coatings – Coat internal walls with a waterproof sealant to prevent penetrating damp. This is especially effective on single-skin brick garages that are more prone to leaks.
- Step 6: Consider a cavity drainage system – In garages with persistent damp problems, fit channels and a sump pump to divert water safely away. This is a professional-grade solution for high-risk conversions.
- Step 7: Fit cavity trays – If the structure abbuts the outside wall of an existing building you may need to install cavity trays and weep vents to prevent water running down the inside of the cavity creating damp issues
- Step 8: Upgrade insulation and ventilation – Insulate walls, ceilings, and floors to reduce condensation. Add trickle vents or mechanical ventilation to keep air moving and prevent moisture build-up.
- Step 9: Check doors and windows – Fit weather seals and ensure frames are properly aligned. A well-fitted door or window prevents draughts, rainwater, and condensation from entering the space.
- Step 10: Protect service entry points – Seal around pipes, cables, and conduits with waterproof sealant to stop water ingress through small gaps in the structure.
- Step 11: Use breathable finishes – When decorating, choose breathable paints or plasters to allow moisture to escape naturally, avoiding trapped damp behind walls.
- Step 12: Get professional advice if needed – If your garage shows severe damp or flooding, consult a damp proofing specialist to design a long-term solution that meets UK building regulations.
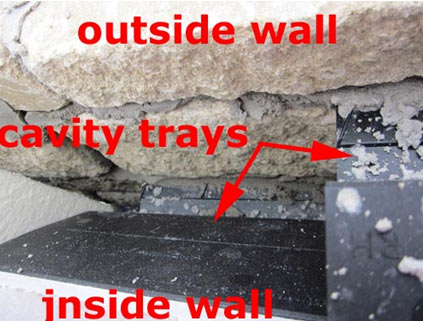
Cavity tray seen from inside cavity
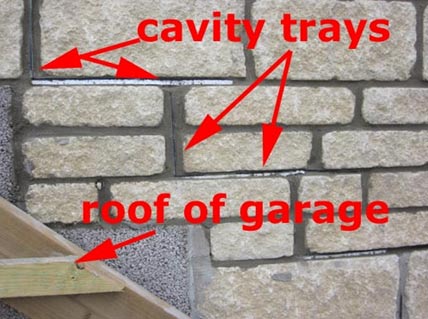
Cavity trays over garage roof
Wall Coverings and How to Keep Garage Walls Dry and Insulated
One of the biggest challenges in any garage conversion is keeping the walls both dry and properly insulated. Damp and cold walls not only damage finishes but also make the space uncomfortable. These problems usually come from two main sources:
- Cold external walls – Many garages are built with single-skin brick or block walls. These are prone to condensation and penetrating damp, so they must be treated before converting.
- Cold party wall with the house – Often exposed in parts, these walls may lack cavity trays or weep holes, making them vulnerable to damp. Installing cavity trays is usually the best solution.
The most effective way to protect garage walls is by fitting a damp proof membrane. Mesh membranes are fixed directly to the wall with special plugs and then plastered or dry-lined. This creates a waterproof layer with a built-in air gap, ensuring insulation can be added and finishes stay dry.
As well as keeping out moisture, the membrane also prevents salts in the masonry from causing efflorescence on your new wall surfaces.
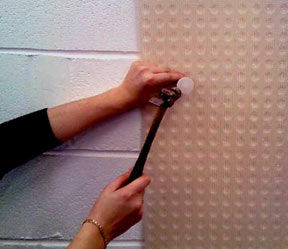
Damp walls can be plastered using a mesh membrane
Plastering Damp Garage Walls
Once you’ve stopped water from entering your garage, the next step is to plaster or dry-line the walls. Standard brickwork can take months to dry fully, but you don’t need to wait that long.
Special damp proof membranes and barrier systems can be applied directly to damp walls. These create a dry surface so you can safely plaster or dry-line without moisture causing damage.
For a detailed step-by-step guide on these methods, see our lining damp walls project.
Plastering a Damp-Treated Garage Wall
Important: Never use modern gypsum plaster on garage walls unless they are completely dry and free from salts. If you do, damp patches will almost certainly appear later.
When converting a garage, there are three proven methods for plastering over treated damp walls:
- Air Gap Membranes – These dimpled plastic sheets are fixed to the wall with sealed plugs. You can then plaster directly over, dot and dab plasterboard, or install battens with insulation for extra warmth. This method is one of the most reliable and flexible options.
- Sand and Cement Render – A traditional render mix creates a semi-waterproof barrier that stops damp and salts reaching the surface. It can be skimmed with finishing plaster and is cost-effective. To work properly, it must include an admixture such as Renderproof and be applied correctly. However, the wall may still feel cold and attract condensation.
- Stud Partition Walls – Ideal for uneven stone or unstable walls. A timber frame is built, usually on top of an air gap membrane, and fixed to the floor, ceiling, or walls. Insulation can be fitted between the studs, and plasterboard added on top to create a dry, warm finish.
After running through all of the above steps to prepare your garage for conversion into a habitable space, the next step is to then actually crack on with the conversion. For more help and advice on this, see our converting a garage project here.
In summary, to damp proof a garage, you must first tackle any damp walls and allow them to dry before adding plaster or finishes.
Different methods can be used depending on the wall type and your budget, but the goal is always the same, seal the walls against moisture so the garage can be safely converted into a warm, dry living space.