• Skip to primary navigation
  • Skip to main content
  • Skip to primary sidebar
  • Skip to footer
DIY Doctor

Main navigation

      • Project Type A - E
      • All Projects
      • Brick, Block, Masonry and Concrete
      • Damp, Condensation, Rot and Woodworm
      • Doors, Windows and Conservatories
      • Electrical
      • Project Type F - G
      • Fencing, Decking, Paving and Patios
      • Floors, Walls, Ceilings and Lofts
      • Garages, Sheds and Outbuildings
      • Gardening and Landscaping
      • General Building, Self Build and Renovation
      • Project Type G - J
      • General Repairs and Cleaning
      • Green Living and Eco DIY
      • Ground, Foundations and Drainage
      • Heating, Central Heating and Boilers
      • Joinery and Carpentry
      • Project Type M - P
      • Materials, Fixings and Fixing
      • Painting, Decorating and Finishing
      • Planning Regs, Project Management and Safety
      • Plastering, Plasterboard and Rendering
      • Plumbing
      • Project Type R - T
      • Roofing and Gutters
      • Tiling and Tiles
      • Tools, Appliances and Access
      • Useful Tips
      • DIY Tips
      • Find a Tradesman
      • Contract Download
      • Working With Tradesmen - Ultimate Guide
      • Home Improver Protection
      • Price Doctor
      • About DIY Doctor
      • What we do
      • Trade Shows and Exhibitions
      • Master Classes
      • Book Store
      • Contact Us
      • Feedback
      • DIY Competitions

Home > DIY How To Projects and Tutorial Guides > How to Build a Stud Wall Using Timber and Plasterboard

How to Build a Stud Wall Using Timber and Plasterboard

How to build a simple dividing wall or stud wall using a timber frame clad with plasterboard. Learn about the different sizes of plasterboard and how to space the timbers in your stud wall frame for each size.

TwitterFacebookPin ItBuffer

Don't want to do this job yourself? Let us help you find a tradesman local to you

Project Page Menu
  • How to Tutorial
  • Video
  • Find Tradesmen
  • Help

Building a partition or non load-bearing wall is great way of dividing space. These are also called stud walls. The easiest way to build a partition wall is to make a timber frame and put plasterboard on the face.

Side View of a Partition Wall

Side View of Partition Wall

There are two thicknesses of plasterboard, 9.5mm and 12.5mm. If using 12.5mm the studs must be placed no further apart than 600mm and if using 9.5mm then 400mm is the maximum (if using plasterboard on a ceiling always use 12.5mm as it will not sag). These two distances will allow you to move the studs very slightly so that a piece of plasterboard (usually 1.22m wide) can be fitted into the centre of a stud if a join is necessary.

The timbers used can be either 100mm x 50mm or 75mm x 50mm. This is personal choice and largely based on the space you have. Using 100mm timbers with 12.5mm plasterboard and 3mm of skim plaster, the final thickness of the wall is 131mm. (a little over 5 inches). Sawn timber can be used, there is no need to use prepared timber.

Internal timber door frames, or liners as they are known, can be bought in kit form from the builders merchants. They are available at 105mm (4 ¼ ) wide or 131mm (5¼) wide. The liners can be assembled to fit standard door widths of 2ft 3ind and 2ft 6ins.

Plasterboard should be joined on a stud or noggin, and we advise that Drywall screws are used rather than nails. Use a battery operated screwdriver to fix the screws at no more than 400mm centres in both horizontal and vertical planes.

Cables for switches and sockets can be “built in” to the wall void by drilling the correct sized hole through the studs and noggins. Special plasterboard switch and socket boxes can be used. These clip to the plasterboard and do not need to be fixed to a stud or noggin. Insulation can also be packed into the void to a) keep heat in a room and b) to dull any sound. This is particularly useful if you are partitioning off for a bathroom. Insulation must not be placed around cables.

Socket Housing in Wall

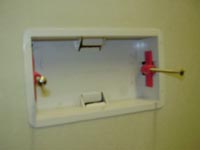
Socket Housing Inserted into Wall

Timber studs can be notched out, or holes drilled for pipes when fitting concealed showers. Advice on notching studs can be found in our projects section under notching joists.

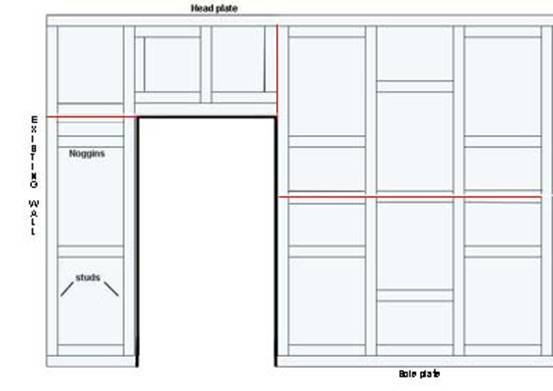
The first timber to be positioned is the head timber. It can be fixed up through the ceiling into the ceiling joists if the joists are running the right way. That is, at 90 degrees to the wall. If the joists are running in the same direction as the new stud wall, then we advise marking the position of the head timber on the ceiling, and then cutting the plasterboard out between the lines to insert timber noggins at 400mm centres between the joists to fix the head timber to. Use a pad saw to cut the plasterboard and be mindful of cables and pipes in the floor void as you cut.

Once the head timber is in position, a plumb line can be clipped to the side of it. Mark the position of the sole plate on the floor in 3 places along its length. Fix the sole plate using number 8 screws (3 inch) to a wooden floor or 4inch to a concrete floor. See our project on Fixing to Masonry for instructions on this. The screws should be no more than 600mm apart.

The two end studs can now be fixed to existing walls using the same methods.

The vertical studs are cut to length and fitted tightly in between the head and sole plates. They can either be screwed into the two plates with the screws at an angle (side fixing), or (as shown in the diagram below) a noggin can be inserted between the studs. The bottom noggin serves two purposes. It keeps the studs secure and allows a larger area for skirting boards to be fixed. 100mm number 8 screws should be used when screwing studs and noggins to each other.

Putting Joint Tape Over the Joints

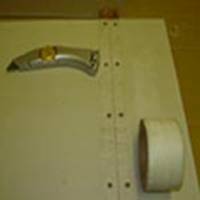
Putting Joint Tape Over Joints

Plasterboard is cut in as few places as possible and screwed onto studs and noggins.

Take care to measure your room and plan the partition wall first. You will then be able to work out how much timber and board you need as well as knowing where your studs and noggins are going to fit. The joints of the board are covered using a special plasterboard tape which is a very fine mesh. It is called “Scrim” and comes in a self adhesive roll for ease of use. The Scrim is taped over the joints, as shown in the diagrams below, allowing the joints to be plastered over without fear of cracking.

The door can be hung as shown in our how to hang a door project.

If you are thinking of building a stud partition wall then you may also want to check out our project on how to build a steel partition wall for information on using steel studwork.

All project content written and produced by Mike Edwards, founder of DIY Doctor and industry expert in building technology.

TwitterFacebookPin ItBuffer

Video

Back to the Top

Find a Reliable Local Tradesman

Back to the Top
Don't fancy doing this project yourself? We work with the industries best to ensure that we recommend only reliable and trustworthy tradesmen.
Let DIY Doctor help you find a tradesman

Find a tradesman now!


More Help

Back to the Top
Related Projects That May Help You:
  • How to Fill Plasterboard Joints for Decorating
  • Drylining and Plasterboarding – How to Dry line a Wall
  • The Best Ways to Cut and Fix Plasterboard
  • How to Use a Stud Finder
  • How to Fix to Plasterboard and Use Plasterboard Fixings
Give us Some Feedback!

We love feedback on our DIY tutorials it helps us to make them the best they possibly can be so if you have any comments you would like to share with us, click the button below and let us know.

Primary Sidebar

Master Basic DIY - By DIY Doctor

Our Book - Master Basic DIY

Grab your copy now for all the DIY help you need right at your finger tips!

Buy it Here!

Signup for our Newsletter

Keep up to date with our DIY projects, tips and latest deals

Sign Me Up!

Our Sponsors

Find out about advertising on DIY Doctor

Advertisments

Other Similar Projects
  • How To Cut And Fix Plasterboard
  • How To Decorate Plasterboard
  • How To Erect Plasterboard In Your Home
  • How To Find Joists And Timber Behind Plasterboard
  • What Plasterboard Fixings Are Available And How To Use Them

Footer

DIY Doctor company logo

Here at DIY Doctor, we offer completely free DIY and construction help and advice to any and all, from professional tradesmen, exactly as they would do it.

We have hundreds of DIY project tutorials covering all aspects of building and DIY that provide step by step instructions on how to complete your given task.

If you need a little help then we also have an active question and answer forum and a find a trademan service and much more.

Site Menu

  • DIY Doctor Ltd,
    The Workshop,
    Newbury Works, Somerset,
    BA3 5RX

  • 0845 6342 179

  • Contact Us

  • Company Number: 05863375
  • VAT Number: 811134774

Other Stuff

  • About DIY Doctor
  • Contact DIY Doctor
  • Media and Press
  • DIY Projects
  • UK DIY Forum
  • DIY Doctor Suppliers
  • DIY Webinars

DIY Doctor Social Channels

  • Advertise
  • Competitions
  • Terms and Conditions
  • Privacy Policy
  • Cookie Information
  • NHIC
  • Sitemap

DIY Doctor are members of:

© DIY Doctor Ltd 2025 All Rights Reserved