When a wall sits below ground level, it’s more likely to suffer from damp problems. These include salt deposits from groundwater and damage caused by freeze-thaw cycles, where trapped moisture expands as it freezes, slowly breaking the wall apart.
In this how-to guide will show you how to spot and fix damp problems that occur below the damp proof course (DPC) for good so that they don’t come back.
What are Issues Below the Damp Proof Course?
In the UK, homes are typically built with a Damp Proof Course (DPC) which is a protective barrier installed near the base of a wall to stop rising damp. However, when parts of your wall sit below ground level, such as in basements, cellars or sloping plots, they can fall beneath this barrier. This makes them especially vulnerable to moisture problems, even if your DPC is working properly as the damp can travel around it.
One of the most common problems is penetrating damp, where water seeps in through walls due to poor drainage or surrounding soil retaining moisture. This can cause huge issues including cold, damp internal walls, peeling paint, and damage to plasterwork.
Over time, this moisture can also draw salts from the ground into the wall, causing white, powdery patches known as efflorescence. These salts can damage plaster and masonry, even if the wall appears dry.
Another major issue is freeze-thaw damage. In colder months, water trapped in tiny cracks and gaps in the brick or stone can freeze. As it freezes, it expands, gradually forcing the surface to crumble or flake away. This cycle can seriously weaken the wall’s structure over time if left untreated.
Ventilation is often limited below the DPC, which increases the risk of condensation and mould growth. This is especially true in poorly ventilated basements or where external air bricks are blocked or missing. Musty smells, black mould patches and damp air are common signs of this problem.
What Are the Consequences of Damp Issues Below the DPC?
Damp problems below the Damp Proof Course (DPC) can lead to serious and costly consequences if left untreated. Unlike damp above ground level, moisture below the DPC often goes unnoticed until visible damage or health problems start to appear. Because these areas are more exposed to soil moisture, rain runoff and poor drainage, the risks are much higher.
One of the biggest issues is structural damage. Persistent moisture can weaken bricks, mortar and plaster, causing them to crack, flake or crumble. Over time, this can compromise the stability of walls, especially in older properties or those with solid walls rather than cavity construction. If frost gets into damp walls during winter, freeze-thaw cycles can worsen the damage, expanding cracks and breaking down the wall’s surface layer.
Internally, damp below the DPC often leads to rising damp, where moisture travels upwards through capillary action. This brings ground salts with it, which can contaminate plaster and paint, leading to bubbling, peeling or staining. These salt deposits don’t just ruin décor, they also draw in further moisture, creating a continuous cycle of damp damage.
The potentially significant health impacts shouldn’t be overlooked either. Damp conditions create the perfect environment for mould and mildew, which release spores into the air. These spores can trigger respiratory problems, allergies and worsen conditions like asthma, especially in children or older adults. Affected areas can also develop persistent musty smells and feel colder due to excess moisture in the air.
Finally, damp below the DPC can lower your home’s value and increase heating bills, as damp and wet walls lose heat much faster.
Insurance claims may also be affected if damp issues are linked to poor maintenance and lack of care, so you may be left on your own to sort them out.
How to Test for Damp Below the DPC
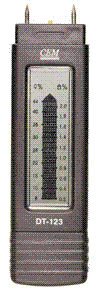
One of the quickest and easiest ways to test for damp on a DIY basis is to purchase a basic damp meter (as seen in the image below).
To use it, simply stick the 2 metal prongs on the base into the surface you suspect of being damp and the meter will indicate the moisture levels on the read out on the front of the tool.
A reasonable quality damp meter can be purchased for little money these days and they’re handy to have laying about so they’re well worth purchasing.
A cheaper, easier and much less expensive, but slightly less accurate method is a visual and manual inspection.
Look for tell-tale signs like peeling paint, bubbling plaster, salt marks (white powdery residue), or discolouration along the lower section of internal or external walls.
A musty smell near skirting boards or flooring can also suggest hidden damp. If you notice any of these signs, it’s likely that moisture is rising from below ground level.
Finally, touch the back of your hand on to any suspected damp areas, and if they are indeed damp you will be able to feel this.
Another tip: check the outside ground level. If soil, paving or garden beds are higher than the internal floor level, this can allow moisture to bypass the DPC and enter your wall. In these cases, damp is almost guaranteed unless corrected.
Use this simple checklist when checking for damp below your damp proof course (DPC):
- Tip 1 – A fully damp concrete floor makes it hard to find the moisture source. As the floor dries, damp patches will shrink towards the entry point. Speed this up by either ventilating and heating the room or closing doors and windows and using a dehumidifier.
- Tip 2 – Check if your floor level is lower than the outside ground or DPC. If it is, damp can seep in sideways. In this case, tank the overlapping area and seal the wall-to-floor joint to block lateral moisture penetration.

Damp Detection Meter
Diagnosing Causes for Damp Below a DPC and How to Fix Them
If you have confirmed that you do indeed have a damp issue below your DPC then the next job is to identify what’s causing it before you can then fix it.
In the majority of cases the cause of such damp issues can be pinned down to one or more of several different causes, the most common of which are as follows:
- Isolated damp spots on concrete floor
- Damp areas coming from edges of a concrete floor
- Fluffy white salts and blowing plaster
- Low level damp patches down to skirting
- Damp patches around chimney breast base
Once you have identified the type of damp issue you have from the common causes above you can now read on below to find out how to fix your damp issue for good.
Isolated Damp Spots on Concrete Floor
The first issue we will look at is isolated damp spots appearing on a concrete floor. We will first look at the symptoms of this issue and then the method of fixing it so that it doesn’t come back.
Signs of Isolated Damp Patches on Concrete Floors
Small, isolated damp spots in the middle of a concrete floor, away from walls, usually mean the damp proof membrane (typically 1200 gauge Visqueen) has been punctured and is no longer effective. This often happens when the membrane is laid directly over sharp hardcore without a protective sand layer.
Without this sand cushion, sharp stones can pierce the membrane, letting in moisture from the ground. A hidden water leak may also be the cause, so it’s important to rule this out using the steps below:
- Ask your local water board to test your main supply pipe for leaks and check nearby homes, especially if you’re on a slope.
- If standing water is visible, request that your water board test and identify its source.
- To test your drains, block the manhole flow, fill a sink with water, leave it overnight, and check if the level drops.
- Use drain dye: pour it into the drain with water, then inspect the area at night—any escaping water will glow visibly.
Any of these water sources can lead to damp and mould problems if not resolved.
How to Fix Isolated Damp Spots on Concrete Floors
If you’re dealing with damp patches on a concrete floor, there are two main solutions; one major, one more manageable.
1. Full Floor Replacement: This involves removing the entire floor, installing a new DPC membrane, then relaying the concrete slab and screed. Although costly and disruptive, it’s the belt and braces fix and the most permanent. It also gives you the chance to add insulation if your current floor lacks it.
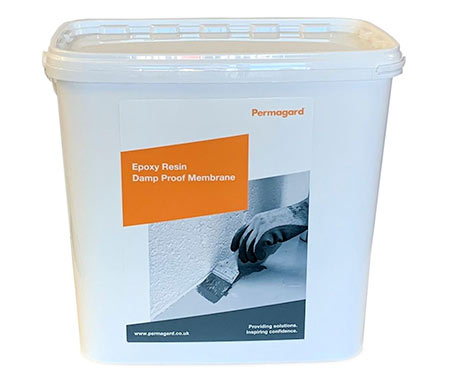
2. Apply an Epoxy Damp Proof Membrane: This quicker and less invasive method is ideal for most cases. First, thoroughly clean and prepare the surface. Then apply a high-quality epoxy DPM (such as Permaguard or Watco) to block moisture from rising through the concrete.

Permaguard epoxy damp proof membrane applied to a concrete floor
3. Use an Air Gap Membrane: For damp caused by salts, an air gap membrane is another effective fix. Though often used on walls, the same technique applies to floors. Once laid, it can be screeded (minimum 50mm) or overlaid with 18mm chipboard to create a floating floor.

Tanking Slurry Powder – brush on to waterproof walls and floors

Wall and floor Membranes – cavity drain ‘tanking’ for floors and walls
Damp Areas Coming From Edges of a Concrete Floor
Next up on the list is damp that comes in from the edge of a concrete floor. Here we will look the symptoms of this issue and how to resolve them for good.
Symptoms of Damp at the Edges of Concrete Floors
Damp appearing around the edges of a concrete floor is often caused by poor sealing where the floor meets the wall. This usually happens when the DPC (damp proof course) membrane isn’t properly integrated or tied into the first few courses of brickwork.
In a correct installation, the plastic DPC membrane should be lapped into the wall to block rising moisture. If this seal is missing or faulty, water can seep in from the ground and travel across the floor edge into your home.
Leaks from nearby pipes or drains can make the issue worse, so it’s important to follow a leak testing check list (see the one mentioned above).
The Remedy for Damp at the Edges of Concrete Floors
To stop damp rising where the floor meets the wall, the joint needs to be properly sealed to block moisture entering the slab.
Start by carefully exposing the wall-to-floor joint using a hammer and bolster. Look for the plastic DPC membrane and avoid damaging it.
Chisel out a U-shaped channel around the room, approximately 25mm deep and wide (1 inch x 1 inch).
Vacuum the channel thoroughly to remove all dust and debris. Then apply two coats of SBR (Styrene-Butadiene Rubber, a builder’s PVA alternative) to seal the surfaces.
Next, fill the channel with a 4:1 sand and cement mix, using a 50/50 blend of water and SBR to create a waterproof mortar. Allow it to fully cure.
This barrier effectively blocks moisture from rising at the wall-floor junction, protecting your interior from future damp problems.
This version is designed to rank strongly for users looking for actionable, easy-to-follow repair advice for edge-of-floor damp issues.
Fluffy White Salts and Blowing Plaster
Some forms of damp issues can cause the formation of fluffy white salts to develop on your walls that can cause serious damage to plaster. Find out below what causes this and how to resolve it.
Symptoms of Fluffy Salt on Walls
Noticing white, fluffy deposits on your walls? This is likely efflorescence — a salt residue that often causes plaster to bubble, crack, or crumble. Find out more about efflorescence here.
Efflorescence forms when moisture draws salts to the surface of walls. The most common trigger is a hidden water source, often from leaks or rising damp.
To fix the problem, trace and stop the moisture source. Use the leak detection checklist mentioned earlier to identify any plumbing or drainage issues.
Fixing White Fluffy Deposits on Walls
White, fluffy salt deposits (efflorescence) often causes serious damage to plaster. The longer it’s left untreated, the worse the damage becomes.
Salt Neutralisers can treat mild cases by breaking down the salts. However, if the plaster is soft, flaky, or badly affected, it must be completely removed and replaced.
Before replastering, apply a salt neutraliser to the bare wall to destroy the alts for good. Avoid using lightweight gypsum plaster, as it’s highly susceptible to future salt damage.
For severe cases, install a damp-proof membrane after stripping the wall. This barrier protects the new plaster from any lingering salts in the masonry.
For a step-by-step guide on diagnosing and fixing efflorescence, visit our efflorescence project here.
Low Level Damp Patches Down to Skirting
If you are seeing low-level damp patches close to the skirting boards in a room or rooms in your home this could be the result of hygroscopic salts. Read on to find out how to confirm and resolve this.
The Symptoms of Low Level Damp Patches
If you see damp patches near skirting boards or notice rotting wood at low level, hygroscopic salts are more than likely the cause.
These salts absorb moisture from the air, especially in humid conditions, creating damp spots on walls and surfaces. When the air is dry, these patches then disappear making it look like it’s resolved, but then return when humidity increases.
This cycle of damp appearing and disappearing is a key sign of hygroscopic salt contamination, not a plumbing leak or rising damp.

Hygrometer for detecting hygroscopic salts
Remedy for Low Level Damp Patches
Low-level damp is often caused by hygroscopic salts, usually due to a bridged damp proof course (DPC), from high external ground levels, plaster below the DPC, or cavity wall debris.
Step 1: Using a hammer and bolster, clear the wall-to-floor joint until the plastic DPC membrane is visible. Cut a U-shaped channel around the room, at least 25mm x 25mm deep.
Step 2: Clean the channel thoroughly to remove all dust and debris.
Step 3: Tank the wall below DPC level (minimum 150mm or 6 inches above outside ground) down into the newly cut channel to block moisture.
Step 4: Prime the channel using SBR (50/50 SBR and water), then fill it with a 4:1 sand-cement mix, also using the same SBR mix as a bonding agent.
Step 5: If your DPC is damaged or missing, inject a new chemical DPC at the correct level using a high-quality DPC cream.
Step 6: Remove any salt-contaminated or crumbling plaster up to at least 100mm above the damage. Replaster only once the wall has fully dried.
Damp Patches Around Chimney Breast Base
Occasionally you will have damp spots and patches appearing on and around a chimney breast. Find out what causes this and how to get it fixed for good below.
Causes of Damp Patches on Chimney Breasts
If you’re seeing yellow or brown stains on paint or wallpaper near the base of a chimney breast, it’s likely due to hygroscopic chimney salts.
These salts absorb moisture from the air, just like standard hygroscopic salts, but can also draw through tar, soot, and chemicals left behind from burning coal or wood. Over time, this leads to visible staining and damp patches on internal walls.
How to Fix Damp Patches Around Chimney Breasts
Hygroscopic chimney salts are hard to block, even with perfect replastering and salt neutralisers. Over time, they often seep back through plaster, causing stains and damp patches to reappear.
The most effective long-term solution is to install a mesh-backed damp proof membrane over the affected area. This creates a barrier between the salts and the new plaster, allowing you to safely redecorate without the risk of recurring damage.
Finding damp below the damp proof course can feel overwhelming and expensive to fix. But with the right tools, information and a bit of time, it’s usually a simple and affordable job you can tackle yourself.

