Damp walls are especially vulnerable to condensation and black mould, this is a common problem in many UK homes.
Walls built with a single layer of brick or block, without a cavity, or those below the damp proof course, partially underground, or earth-retaining, tend to stay cold and attract moisture.
In this DIY guide we look at how to cure issues with damp walls using a specialist lining membrane, read on below to find out all you need to know.
What’s the Problem With Damp Walls?
Damp walls aren’t just unsightly, they’re a sign that moisture is getting into your home where it you really don’t want it to. Left untreated, damp can damage plaster, paint, and wallpaper, and even affect the structure of your walls over time.
One of the biggest issues with damp is how it creates the perfect environment for black mould and mildew to grow. These can not only ruin your home’s appearance but also pose serious health risks, especially for those with asthma or allergies.
Damp also makes walls colder, which can lead to higher heating bills as your home loses warmth faster. In properties with solid walls or no cavity insulation, this problem can be even worse, especially in older UK homes.
To fix damp walls properly, you need to find and fix the source of moisture. This could range from anything including a broken gutter to rising damp or condensation build-up. Tackling the root cause is the only way to stop the damage and prevent it from coming back.
What Causes Damp Walls?
Damp walls are usually caused by unwanted moisture entering or staying trapped inside your home. The source can vary, but the signs such as wet patches, peeling paint, mould or that musty smell are always a warning that action is needed.
Penetrating damp
Very common in UK homes and typically comes from outside. Damaged brickwork, cracked render, missing roof tiles or faulty guttering can all allow rainwater to seep into walls. Over time, this water soaks through and causes visible staining or mould indoors.
Rising damp
Tends to happen when moisture travels up from the ground through brick or stone walls. If your property has no damp proof course, or the existing one has failed, groundwater can rise into the wall and leave behind telltale white salt marks and damage at the base of interior walls.
Condensation
This is another major cause, especially in colder months. Everyday activities like cooking, showering, or drying clothes indoors add moisture to the air. If there’s poor ventilation, that moisture settles on cold walls, leading to black spot mould and mildew growth.
Identifying the exact cause of damp is essential before starting and form of treatment or fix to the visual signs (mould, peeling paint etc.). Fixing the symptoms alone won’t stop the problem from coming back, you have to resolve it at the root.
Can you Tank Damp Walls to Fix Them?
Yes, you can tank damp walls to fix them, if it’s done correctly and the source of the moisture has been dealt with first so that you won’t get any repeat future issues.
Tanking is a method of applying a waterproof barrier directly to internal walls to stop moisture penetrating through them. It’s especially useful for basements, cellars, or any below-ground rooms that are prone to persistent damp.
However, tanking is not a cure-all solution. If water is still entering the wall from outside, due to damaged brickwork, cracked mortar, poor drainage or rising damp, the tanking may fail over time.
It is for this reason that it’s essential that any leaks are fully repaired and that you also improve ventilation, and resolve the underlying cause of the damp before applying any tanking slurry or membrane system.
In terms of the types of tanking, there are essentially two main types: liquid waterproof slurry, which is painted directly onto brick or render, and the one that we will be dealing with in this guide, tanking membrane systems, which create a physical barrier and can be plastered or boarded over.
Both methods can be effective, but they must be installed properly to work long term.
How Do Damp Wall Lining Membranes Work?
In terms of how damp membranes actually work, once installed, these membranes act as a physical barrier between damp masonry and surfaces and internal finishes, helping to prevent mould, peeling paint, or unpleasant smells caused by rising or penetrating damp.
A damp wall lining membrane is a type of plastic sheeting, often made from high-density polyethylene (HDPE), which is fixed directly over the affected area.
Once installed, using special waterproof fixings and sealing tape, the membrane forms a waterproof layer. Any moisture within the wall is trapped behind the membrane, unable to pass through to the room.
The air gap created by the dimples allows the wall to ‘breathe’ behind the membrane. Over time, the dampness either evaporates or drains harmlessly down to the floor, where it can be managed by a drainage system if necessary and any delicate finished surfaces such as plaster or plasterboard are protected.
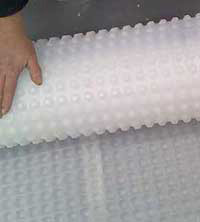
Air gap or damp proof membrane lining
Lining Damp and Cold Walls – Which Method Should You Use?
There are three main ways to line cold or damp walls. Each method has pros and cons depending on your wall type, budget, and the level of damp involved. These methods are as follows:
- Batten and Board – Timber battens fixed directly to brick, block or stone, with plasterboard attached over them. This method is quick but risky on older damp walls, as it can rot without proper treatment or ventilation.
- Inner Block Walls – A second wall is built inside an existing structure, leaving an air gap or insulation between the original and new walls. Common in barn conversions and larger properties where space concerns aren’t a factor. However, it doesn’t stop damp or salt transfer from the original wall over time.
- Damp Proof Membranes – Modern plastic membranes with air gaps (dimples) create a sealed barrier. Fixed with plugs to the wall, they prevent moisture reaching your interior finish. They’re ideal for single-skin or solid walls and can be finished with battens or plasterboard.
Note: If you opt for the batten and board method, you can combine this along with also using a membrane. As batten and board will, in most cases, eventually allow damp to reach and penetrate it, if you also install a membrane between the wall and boarding, this will prevent this issue occurring.
Mesh Membrane – install as a barrier then you can either plaster directly over or plasterboard on top
Kontract Membrane – install as a barrier then you can fix battens and then plasterboard over the top
Tools and Products Needed to Install Damp Proof Membranes
In order to correctly install a damp proof membrane and resolve any damp issues you may be having in your home, you will need the following tools and products:
- Your desired choice of wall membrane system – either membrane kit, battens and boards or suitable blocks to construct wall
- Sand, cement etc. if building wall
- Trowels
- Drill/driver
- Wall plugs and screws, if installing batten and board
- Scissors/utility knife to cut membrane if needed
- Hammer
- Tape measure
- Pen for marking membrane
How to Install Air Gap Membranes, Damp Proof Membranes and Plastic Lining Membranes
After looking at the various systems available and how they work, it’s now time to look at how to install a standard damp proof membrane that can then be battened and boarded or plastered, depending on the type of kit you have.
Step 1: Prepare the Wall
Start by removing any loose plaster, paint or dust from the wall. All loose and flaky dust and debris should be fully removed.
Next, check whether you have any water or moisture actively seeping through the wall. If you find active water or moisture or even signs of flooding, you will need to install a suitable drainage solution such as a traditional drain or a sump and pump system to deal with and safely remove all water and moisture.
Finally, if the wall is very uneven or there are many dips and holes, these willed to be patched to help the membrane sit flat.
Step 2: Select Your Desired System
Once the wall is fully prepared, it’s now time to install your chosen system. As stated above, if you are choosing battens and plasterboard, you will also want to install a membrane over the wall area to prevent future damp issues and damage.
If you’re plastering or adding dot and dab plasterboard, use a mesh-faced membrane. The mesh surface allows you to either plaster directly over it or apply adhesive to fix plasterboard without extra preparation, but as we are concentrating on installing a membrane in this guide, these other methods are felt with in separate guides.
Additionally, if you are dealing with active pooling/flowing water (no matter how little), you will potentially need to install a floor membrane that is then sealed to the wall membrane to create what’s known as a ‘sealed system’, to ensure no water or moisture can penetrate it. Any water or moisture that forms behind the barrier is then delta with by a suitable drainage solution or sump and pump that should be installed.
Step 3: Cut the Membrane to Size
As we are installing a membrane system, as the membrane is generally supplied on a roll or as a large sheet, the next step is to measure and cut the membrane to the correct size to cover the surface you are working on.
First of all, take a tape measure and measure the size of the area you need to cover.
Roll out the membrane and cut it to the height of your wall, leaving a small overlap if you’re covering a large area as all joints will need to be joined and sealed. Most air gap membranes come in rolls and can be trimmed with a sharp utility knife or heavy-duty scissors.
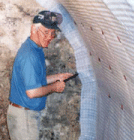
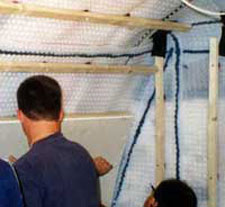
Step 4: Fix the Membrane to the Wall
In order to fix damp proof membranes to a surface, you will need to use specialist fixings and these should be provided by the manufacturer with your kit. If not, contact them and confirm what you will need to use.
Once you have cut your membrane to size, position the membrane with the dimples facing the wall and use the special plastic plugs (often called membrane fixing plugs) to secure it into brick, block or stone.
Drill holes through the membrane into the wall, then hammer in the plugs. Space them roughly every 250–300mm for a secure hold.
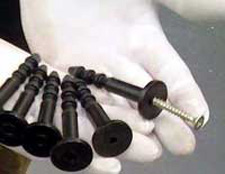
Specialist pre-formed fixing plugs for air gap or damp membrane fixing
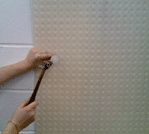
Step 5: Seal the Joints
As stated, to ensure that no water or moisture is allowed access to your finished inner surfaces and and all joints will need to overlap and be fully sealed.
The overlap any joins between sheets should be at least 100mm. Use the correct waterproof tape that should be supplied with your kit to seal the joints and around the edges and ensure any moisture is kept behind the membrane at all times.
Air gap or damp proof membrane fixed to walls
Step 6: Monitor and Add Your Finishing Layer
Before any form of finishing up takes place, it’s essential that once everything is installed correctly you leave everything to settle for a good few days, ideally longer and monitor for any leaks or moisture penetrating.
This is an absolutely essential step as the slightest pin-prick gap could over time cause huge amounts of damage and repair costs.
Once the membrane is fixed and sealed, it’s up to you how you decide to finish it. You can either attach timber battens and plasterboard, or use a membrane that features a mesh surface which will allow you to plaster straight over it.
Both methods provide a clean, dry surface ready for your final decoration e.g. paint, wallpaper etc.
Other Useful Products for Fixing Damp Problems
Aside from the actual membrane itself there are a select few other products that can be used in conjunction with a membrane system to resolve additional damp-related issues:
- Salt Neutraliser – A clear liquid that stops salts in plaster, render or brick from causing future damp or staining. Apply two coats, wetting the surface in between. It’s ideal before replastering, as it helps prevent damage from salts reappearing later on.
- Chemical and Cream Damp Proof Courses – These are injected into walls to create a new damp proof course (DPC) when the original has failed. They’re easy to apply and offer a long-lasting fix. Learn how to install one here.
Damp and cold walls can lead to mould, staining, and structural issues. Thankfully, with modern solutions like air gap membranes and DPC products, you can treat the problem yourself and protect your home for the long term.