In the past, installing extensive damp proof courses was costly and difficult, especially for thick walls or large projects, due to high-pressure injection challenges.
Expensive equipment, fluid leaks, blowbacks and crumbling masonry often made the process tricky, even for professionals.
Previously, the only option was hiring a damp proofing company and paying for costly replastering.
This guide explains modern damp proof injection techniques that you can safely do yourself. Keep reading to learn more.
What is a Damp Proof Course?
Damp in homes often results from a faulty damp proof course (DPC). A DPC is a protective barrier, usually made from plastic or bitumen, installed between the ground and your walls, typically about 6 inches above ground level.
This barrier stops moisture from rising through the walls, preventing damp patches, plaster damage and other interior issues.
Over time, DPCs can fail due to wear, damage or punctures, allowing water to travel up walls and cause costly problems.
Traditionally, fixing a DPC required removing bricks and replacing the barrier, a hugely time-consuming and expensive process. Today, injectable damp proof courses offer a simpler, cost-effective DIY solution.
Damp Problems from a Faulty Damp Proof Course
A failing damp proof course (DPC) lets ground moisture rise through your walls, causing visible damp patches, peeling paint, wallpaper damage and weakened plaster.
If left untreated, this moisture can compromise the mortar and bricks and in severe cases, even damage your home’s foundation.
Faulty DPCs also encourage mould and mildew growth. These fungi thrive in damp conditions, spreading quickly, affecting health by causing respiratory issues and allergies and damaging furniture, clothing and creating a musty smell.

Damp issues cause by failed damp proof course
How to Identify a Failed Damp Proof Course
Spotting a failed damp proof course (DPC) early is key to protecting your home and avoiding costly repairs.
Common signs include damp patches near floor level. These areas may feel wet, cause paint to bubble or make wallpaper peel. Tide marks up to a meter above the floor show how high moisture has risen.
Mould and mildew are another warning. Look for black, green or white spots on walls, floors and furniture, as these fungi thrive in damp conditions.
Efflorescence is a white, powdery residue on walls caused by salts left behind when water evaporates. It can damage plaster and wall coverings over time.
Musty odours and a persistent damp smell in rooms often indicate trapped moisture inside walls, making spaces uncomfortable and unhealthy.

Tide mark on wall indicating a failed damp proof course
What is Damp Proof Course Injection?
Damp proof course (DPC) injection is a modern, cost-effective way to stop rising damp in walls. Rising damp happens when moisture from the ground travels up masonry, causing mould, structural damage and potential health issues.
This method involves drilling small holes along the base of affected walls and injecting a special silicone-based fluid. The fluid spreads through the masonry, creating a waterproof barrier that stops further moisture from rising. Once complete, the holes are sealed and the walls gradually dry out.
DPC injection is minimally invasive, avoiding major structural work or excavation. It is quick to carry out, often within a few days depending on the area and works effectively on both old and new buildings.
Modern injection fluids penetrate deeply, offering a long-lasting solution that is far more affordable than traditional damp proofing methods. However, correct application is crucial. Poorly applied injections may fail, leaving walls damp.
If you are unsure about doing it yourself, professional damp proofing specialists can accurately assess the problem and apply the treatment safely and effectively.

Injecting DPC cream into wall
Does Damp Proof Course Injection Work?
Yes, modern damp proof course (DPC) injection is highly effective at repairing or replacing damaged or failing DPCs. When applied correctly, it stops moisture rising through walls, protecting plaster, paint and interior surfaces.
Success depends entirely on proper installation. Uneven or incomplete injection leaves gaps where moisture can continue to rise, causing damp and damage.
For a reliable and long-lasting fix, ensure the injection is done correctly. If you’re unsure, it’s best to hire a professional damp proofing specialist to achieve the best results.
Main Features and Benefits of Cream DPC Damp Proof Injection
Modern injectable DPC creams have many advantages, here are the most common:
- Fast and Simple: Just drill holes, clear dust, and inject the cream for a quick application.
- Minimal Waste: Apply cream with a hand pump, making bulk usage cost-effective.
- Safe and Eco-Friendly: Many creams are non-toxic, with no health warnings.
- Clean Application: Creams won’t leak or stain, keeping the process tidy.
- Easy Hand Pump Control: Precise dosing without cords or recharging.
- Advanced 2nd Generation Formula: Efficiently penetrates masonry for long-lasting protection.
How to Check for Damp Using a Damp Meter
As we have mentioned above, one of the key tell-tale signs of a failed damp prof course are damp patches appearing on the interior walls of your home and aside from testing to confirm damp by using the palm or back of your hand, another method is to use a damp meter.
These relatively cheap and effective tools can be purchased from pretty much every DIY store for as little as £10 – £15.
To use them, they feature a set of prongs on the base and you simply poke the prongs into the wall where the damp exits and leave it for a set amount of time and it will produce a read out on the LCD display indicating the volume of damp present.
You may also find a damp meter useful, for checking the location, extent and pattern of dampness.
These factors can affect the remedial work that is necessary – with your own meter and some technical advice you can minimise any costs involved in successfully injecting a new DPC.
Damp meter for checking the moisture content of objects
Another very handy tool is the Hygrometer. This tool is essential for measuring air temperature and relative humidity, crucial for addressing condensation and black mould issues.
Once positioned in a room, the metre will measure the relative humidity and on the LCD display, indicate this along with (in most cases) air temperature and percentage of moisture present.
This is another good indicator of whether damp is present in your room and to what levels.

Hygrometer for testing the moisture content in a room space
What not to do When Injecting a Damp Proof Course
As we have mentioned several times in the above information, the key to success with this project is getting it absolutely correct to ensure a full and even barrier is created, so with this in mind, here’s some pointers to keep in mind:
- Do not inject the solution into the bricks or blocks, it should be injected into the mortar course.
- If there is already an existing working damp proof course, do not inject a chemical one!
- Do not be tempted to use any pre-drilled or existing holes, always make your own to the correct specifications.
- Do not be tempted to insert a chemical damp proof course into poof quality, crumbling existing mortar
- If there are bridged cavities present, injecting a new DPC simply won’t work!
Damp Proof Course Injection: Required Tools and Products
Modern DIY damp proof course (DPC) injection is easier than ever with readily available kits and individual products. To complete the job, you’ll need:
- Cream or chemical DPC solution.
- Hand-operated injection pump.
- Drilling template for accurate hole placement.
- Masonry drill bit (typically 12mm, or as per manufacturer).
- Drill suitable for masonry, usually an SDS drill.
- Vacuum cleaner to clear dust from holes.
DPC cream injection system with quick hand pump – no special tools required
How to Inject a Damp Proof Course
Injecting a damp proof course (DPC) is straightforward once you have the right tools and understand your wall type. The injection method depends on the construction of your wall:
- Thin Solid Stone Wall: If the wall is thin and the DPC solution penetrates fully, inject from either the inside or outside only.
- Thick Solid Stone Wall: For thicker walls, inject from both inside and outside to ensure full coverage.
- Cavity Wall: Inject from both sides to treat each part of the cavity effectively.
Step 1 – Prepare the Area
Start by clearing the area around your walls. Remove furniture, plant pots, moss and any debris to give full access.
For external walls, brush off dirt and ensure the surface is clean and dry before starting.
Step 2 – Apply the Drilling Template and Drill Holes
With walls cleared, attach the drilling template provided with your DPC kit. If your kit lacks a template, check the manufacturer’s instructions for correct hole height and spacing.
Mark each hole using a pen or drill directly through the template. Drill each hole to the depth specified by the manufacturer, then clear debris with a vacuum or by blowing out the dust.
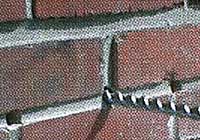
Drilling a 12mm hole for DPC injection
Typical hole spacing and depth (confirm with your product instructions):
- Holes spaced 4.5 inches apart
- Drill depth 3 inches
- Drill all holes before starting DPC injection
DPC Injection made easy with a drilling template – the correct level every time
Step 3 – Inject the Damp Proof Course
Fill the applicator gun or system with your DPC cream as per the manufacturer’s instructions.
Inject each hole one at a time, inserting the nozzle fully and applying the cream slowly to ensure the hole is completely filled before moving to the next.
Step 4 – Fill the Holes
After injecting all the holes, seal each one. Most systems use a sand and cement mortar, while some may use silicone. Mortar is generally the most durable and reliable option.
Mix the mortar as instructed, fill each hole completely and level it with the wall surface. Once dry, it can be painted for a seamless finish.
Step 5 – Leave to Cure
Next, allow the injected DPC cream and mortar-filled holes to fully cure. This ensures the waterproof barrier and repairs set properly.
For best results, leave to dry for at least 24 hours before painting or touching the wall.
Step 6 – Complete Repairs
Once the DPC and mortar have fully cured, carry out any final repairs. This may include replacing exterior render, replastering, repainting or re-hanging wallpaper.
Early intervention can make repairs simple, often just cosmetic, saving time and expense.
Fixing a failed damp proof course is essential. Ignoring it can lead to more severe damage, higher costs, and extra hassle. If you suspect DPC problems, address them promptly to protect your home.