Extending a Property with Underground Basements and Cellars
In these days of soaring house prices, more and more home owners are looking to extend their properties and make as much use as possible of existing space. This includes waterproofing basements and cellars to make either additional living rooms or extra storage space.
Although as you might imagine, this is not a small job and in many cases not cheap to do but compared to the cost of upgrading to property with an extra room or rooms (a very rough countrywide estimate being an additional £30,000) e.g. moving from a three bed semi to a four bed detached, the cost of converting an existing basement to gain extra usable space is pretty reasonable.
A good way of thinking about this type of job is comparing it to a loft conversion. In most situations there going to be a fair amount of work to do to the existing structure and layout but once completed you will have a beautiful new usable space for much less than moving to a new property.
Waterproofing Basement and Cellar Walls using Cemetitious Tanking Systems
The way these tanking systems work is by applying a waterproof coating directly to the inside of the porous cellar walls to prevent moisture from seeping in. They do not remove the water, they simply create a barrier between it and what will be your new room.
There is a huge range of tanking systems and options available from cementitious coatings, bituminous coatings, membranes, paints and sealants, each with their own particular features and plus sides.
The generally accepted method of actually tanking a surface is to apply a mix of “tanking slurry” or cement mixed with a rubberised liquid to form a waterproof coating on the inside of the basement or cellar wall. The slurry can be applied in one, two or three coats depending on the amount of hydrostatic pressure (the amount of pressure) the external water level is putting on the wall.
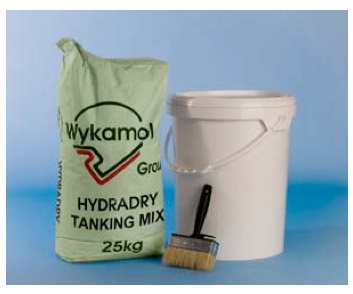
Wykamol HydraDRY tanking mix
The HydraDRY tanking mix, in the image above is one example of the base constituents required to form a tanking slurry. It, as all slurries should, waterproofs cellars and basements, is suitable for brick, stone, block and concrete walls and resists pressure at the bottom of a 5m high wall. We have used this ourselves on several jobs and have found it produce great results.
This height is called the hydrostatic pressure head and it means that if your cellar is 5m under the ground, the external pressure of water against the external wall will be much greater than that of only 2m underground. With this in mind it is important that you select the correct covering for the job, depending on how deep your basement it. Check with the manufacturers usage guidelines for confirmation.
Additionally, when selecting a suitable tanking slurry, it should be easily brushed on to a walls surface, even to saturated surfaces and it should also have been approved by the British Board of Agreement (BBA) to ensure that it has passed all the requirements needed to make it a certified product that is safe for use.
Finally, to ensure a a long lasting barrier between moisture and your new space, you should ensure that the slurry not only forms a skin over the surface of the wall being tanked (a physical bond), but is should also form a chemical bond (a bond at an atomic level).
Over time, physical bonds can be broken through general wear and tear and deterioration of materials but with a chemical bond, this is much longer lasting.
Preparing Cellar and Basement Walls for Tanking
For a tanking system to work well the walls that the tanking product is being applied to must provide a good, solid “key”. All tanking systems also require the brickwork of the house to be stable due to the fact that tanked walls need to resist water pressure that will inevitably build up.
In older homes, preparing walls to take whatever coating is being used can be quite time-consuming and generally involves hacking off all existing old plaster, raking out all the old mortar, repointing and then applying salt-neutralising products.
Salt neutralisers will prevent the the naturally occuring salts in water, moisture, bricks and other materials from seeping through and out of the walls surface and damaging the tanking layer which could cause it to fail.
To ensure a great physical and chemical bond between wall and tanking membrane we recommend the following steps are taken:
Prepare the Walls Surface
Prepare the wall by removing every loose particle from its surface including cutting back joints where mortar could be unstable. This preparation is vital and where a wall is particularly unstable a needle gun should be used to ensure a really good, solid key for the tanking slurry. All traces of any Gypsum based products (plaster etc….) must also be removed.

Hilti electric needle gun
A needle gun is a tool driven by either electricity of air, which looks a little like a small breaker for concrete. Instead of a blade or chisel in the end however, it has a bunch of very tough, tungsten tipped needles sticking out of the end.
On starting, the needles are vibrated and pushed up and down very quickly. The result is, once the needles are placed on the surface of the wall they are indented thousands of times per minute with the very sharp needles. This quickly removes any type of covering from almost all surfaces and works on paint, render, old mortar, crumbling bricks, concrete and blocks. A neede gun will also work on metal if you want to strip paint off.
Find any Holes or Deep Joints
Having stripped the wall back to a nice sound base you need to look for any holes or deep joints. The wall must be perfectly flat in order for the tanking not to be compromised and the holes therefore need to be filled. This is done with a mix of clean, washed sharp sand and sulphate resistant cement, mixed to a 4 to 1 ratio. See our project on mixing mortar.
Are There Salt Stains Present on the Existing Surface?
If there are a lot of cloudy stains on the wall, there is a good chance the water is washing through the salts present in either the ground or the masonry. If this is the case, the wall joints need to be raked out to a minimum of 25mm deep and filled with a mix of sulphate resisting cement and SBR mixed with washed soft and sharp sand (mixed 50/50) at a mix of 4 sand to 1 cement.
Are There Cracks Present?
If the walls or floor is cracked in any way it is advised that work be delayed until it can be deterined whether there is any movement in the building taking place. For help determining if there is, see our project on settlement and subsidence cracks.
Sort Joints Between Walls and Floors
The joints between walls and floors are particularly vulnerable areas and care should be taken to ensure these joints are dealt with and sealed to ensure that no water or moisture can penetrate them.
Mix some good quality sharp sand with sulphate resistant cement at 3 sand to 1 cement using an SBR /water mix at 1 – 1. Form a 50mm fillet along the floor/wall joint and push well into the surfaces. Then, using the base of a bottle, push the fillet further in forming a curved fillet joint, using the curvature of the base of teh bottle to do so. As soon as this fillet has set.
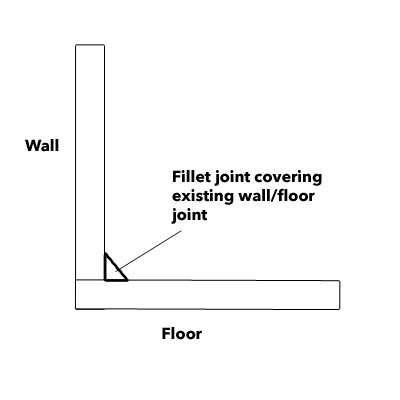
An example of a fillet joint between a wall and a floor
Just before we do start to apply the slurry to the entire wall we need to pay a little more attention to our floor/wall joints. To provide an additional layer of waterproofing it is sensible to mix some SBR at 1 SBR to 2 cement ratio and paint this on the floor and wall 200mm in each direction across the joints and then leave this to set.
Apply the Slurry to the Walls
Once all joints are dealt with, we are now ready to start applying the tanking slurry. The first strip of slurry should be applied across the wall/floor joint reaching at least 200mm up the wall and 200mm across the floor – leave this to set. The next coat of slurry should be applied as usual, all over the walls and floor (if it does indeed need applying to the floor).
If all of the wall is underground then it should all be tanked. Water will work its way in even a quarter of the way on its journey downwards, it will not wait until it gets to the bottom and come in at the lowest level. If the ground level is below the ceiling in the room you are tanking, then it is important the tanking finishes at least 50mm above this ground level.
Check any Timbers Joists Present
Always check the stability of any timber joists that have an end built into the wall to be tanked. This is a very vulnerable place if it falls below the outside ground level and unless the joists are removed, the holes filled and a bearer fixed to the wall to support the joist, it is almost certain the wall will allow water ingress in these areas. The timber joists themselves may also be rotten, so check these thoroughly
Holes and joints can be filled with either the sand/cement mix described above, or with HydraPLUG which, from Wykamol, forms a firm putty which will bond with sound walls in a way that keeps the integrity of the wall while giving a suitable base for the slurry.
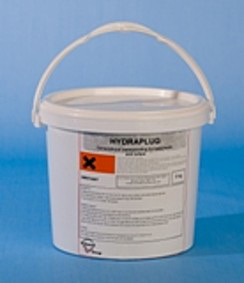
Hydraplug is a quick setting compound for plugging holes and joints prior to tanking – Find out more here
Waterproofing Basement Floors
Most tanking slurries, including HydraDRY (see above) will act as a damp proof membrane to the floor of any basement or cellar conversion. Ensure however that the same preparation process is applied to the floor as for the walls. There must be no holes or gaps and certainly no cracks!
One point to note here is that before tanking with a slurry, make sure the walls and the floor have reached a temperature of at least 5° and use warm water for mixing the constituents of your slurry.
Further Information on Mixing and Applying the Tanking Slurry
The HydraDRY and other tanking slurries is mixed at 4 parts powder to 1 part water (20% of the total volume) and mixed only in quantities that can be applied in 2 minutes. The walls should be coated with water immediately prior to application such that they are damp but with no running water.
The tanking slurry, in the case of HydraDRY, should be applied with a stiff brush or even a broom (should be washed frequently to avoid clogging) at a thickness of 1.5mm per coat. The first coat must be almost forced onto the surface to ensure a good bond with the wall.
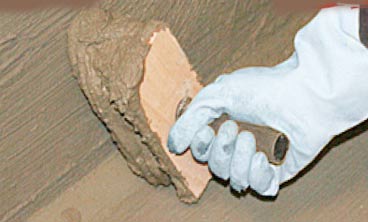
Applying a tanking slurry to a basement wall
The second coat is applied as soon as the first coat has formed a skin hard enough not to move when the second coat is applied. This will take between 2 and 16 hours depending on the temperature in the room. If the temperature falls below 10 degrees centigrade, it will take the full period so if possible keep the room warm.
A trowel can be used to apply the second coat, but not the first. Reduce the water quantity slightly to get a thicker past and take care not to puncture the first coat with the corners of the trowel. When finished, stipple the surface of the towelled coat with a stiff brush to give a good key for the plaster.
Both coats of the tanking slurry should not exceed 4mm thick and where a complete coat cannot be finished in one day, at least 50mm overlap should be made on the first area, by the second area to avoid the possibility of each application not meeting properly.
Where a tanked external wall meets a non tanked internal wall, the joint should be overlapped onto the internal wall. Tanking should not stop at corners.
Using Cavity Membranes for Tanking Basements and Cellars
Tanking a wall is a way of stopping the water getting into the building all together, howver another way of getting a dry, warm and usable underground space in a basement or cellar, is to allow the water in and manage it carefully and automatically when it arrives. Cavity membranes are the way to do this.
As an overview, a waterproof membrane is fixed a little way off the wall, over it’s whole surface. The plaster and other room finishes are applied to this membrane.
The water entering the wall is allowed to run down the wall behind the membrane and is collected in a series of drains and gullies to a sump hole from where it is pumped out of the building.
Joints are sealed using special joint tape and the walls are typically dry lined for a good internal finish. While the positioning of the membranes, pumps and drains is not a DIY Job, the finishing can be.
Water management is an extremely effective way of waterproofing cellars and basements as there can be no leaks as such but it has to be done by someone that knows what they are doing and has the necessary skills and knowledge to ensure that no water can find its way into your finished room space.
When a tanking surface breaks down (usually as a result of poor preperation of application) it is a very expensive process to find and mend any leaks or faults.
With a water management system however, the only thing that can break down is the pump and these are easily replaced.
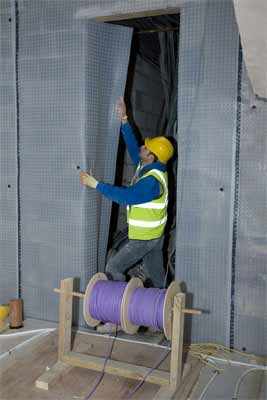
Fixing high density polyethylene waterproofing membrane to interior surface walls
The cavity or space between the membrane and the wall can be ventilated if appropriate, or sealed with the water running behind the walls to a new sump position where it can be pumped away. The new surface can be plastered or decorated over as normal.
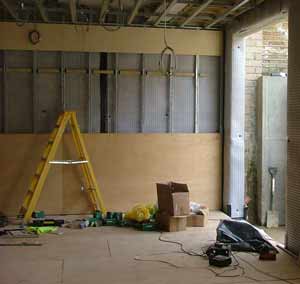
Boarding over high density polyethylene waterproofing membrane once fixed to wall

