A DPC or damp proof course is an integral parts of your homes’ defence system against water and moisture and prevents such substances from finding their way into property and causing wide-spread damage and even significant risks to health.
In this DIY guide we look at DPC’s and how they work and also how you can create a DPC through injection, find out more below.
What is a Damp Proof Course (DPC)?
A Damp Proof Course, often called a DPC, is a protective barrier built into the base of the walls of your home to stop moisture rising from the ground and up into walls above, causing untold damp issues and damage.
It’s a legal requirement in all new UK buildings and plays a vital role in preventing damp-related problems such as mould, peeling paint, and rotting timbers.
Typically installed just above ground level (about 6 inches or 150mm), a DPC is designed to block moisture from travelling up through porous materials like bricks or concrete. Without it, water from the soil can be drawn upwards by a process known as capillary action, leading to what’s known as rising damp.
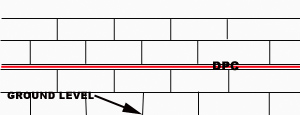
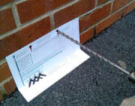
Damp Proof Course indicating DPC and ground level
DPC’s can also be found around the various openings in your home, such as windows and doors, known as a vertical DPC and are used to close these areas off and prevent water, moisture and draughts from finding their way in.
There are different types of DPC depending on the age and construction of the property. In modern homes, the DPC is usually a plastic or rubber sheet built into the wall. Older properties may rely on a slate layer or even a bitumen coating. If your home was built before the 1950s, it’s worth checking if a proper DPC was ever installed.
Damp Proof Course
In cases where the original DPC has failed or is missing altogether, today it’s possible to inject a chemical DPC into the wall to create a new barrier. This modern method is often used during renovations or damp-proofing treatments.
Where Should a DPC be Placed?
In the UK, a Damp Proof Course (DPC) should be installed at least 150mm or 6 inches (about two bricks) above external ground level. This height helps prevent rain splash-back and surface water from bridging the DPC, which could otherwise lead to rising damp inside your home.
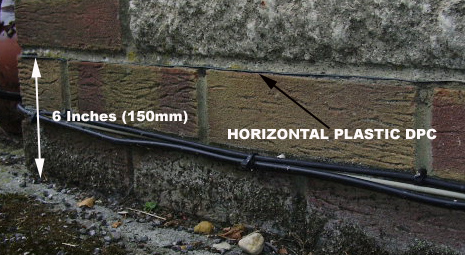
Damp Proof Course indicating 6 inches from damp proof course to ground level
For cavity wall construction, the DPC must be built into both the inner and outer leaves of the wall at the same level. This creates a continuous moisture barrier across the full width of the wall. It’s especially important that the DPC on the inner leaf is unbroken to prevent damp reaching your internal walls.
If you’re working with solid walls (often found in older homes), the DPC will run through the full thickness of the wall. In some cases, particularly in retrofits, a chemical DPC may be injected slightly above the skirting board height, normally around 100 – 150mm above floor level, this then matches the protective abilities of a traditional DPC.
Vertical DPCs are also needed where door and window openings interrupt the wall structure. These are installed around any reveals to stop water from moving sideways through the masonry and reaching the internal surface.
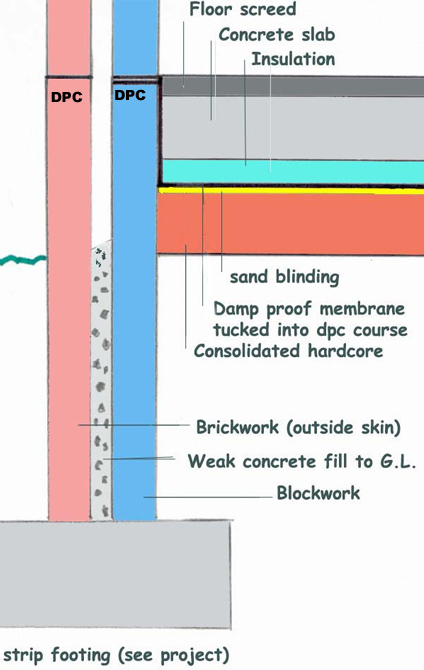
Damp Proof Course Cross Section indicating ground floor slab and inner and outer cavity wall DPC’s
Why do DPC’s Fail?
One of the most common reasons for DPC failure is bridging. This happens when external ground levels such as driveways, extensions or patios are raised above the DPC line. When this occurs, moisture can bypass the DPC and seep into your home, causing many damp issues and often, significant damage.
Another factor is simple age and physical deterioration, especially in older properties where the original DPC may have been made from slate bitumen or non-porous materials. Over time, these materials can crack, degrade or become less effective at repelling moisture.
In modern homes, even chemical DPCs can lose performance if not installed correctly or if the wall remains too damp for the chemical to cure properly.
Unfortunately as is often the case with cowboys and general sub-standard work, construction defects and improper installation are also a common cause.
On some occasions a DPC might not be faulty at all, but still appear to have failed due to other moisture problems such as plumbing leaks, condensation or water ingress from blocked gutters, defective pointing or cracked mortar or render. These issues often mimic rising damp, leading to misdiagnosis, so it’s essential to investigate fully to discover the true cause.
DPC Injection made easy with modern techniques and drilling templates – Image courtesy of Property Repair Systems
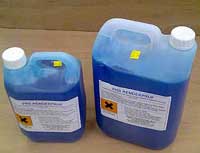
What are Modern Chemical DPC’s?
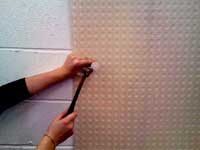
Modern chemical DPCs (Damp Proof Courses) are a widely used solution for treating rising damp in both old and new buildings. Instead of using traditional physical barriers like slate or bitumen that’s inserted between brick courses, chemical DPCs work by creating a waterproof layer inside the wall structure itself. They are an excellent retrofit solution when an existing DPC has failed or was never installed.
Chemical DPCs usually come in the form of a cream, gel or liquid that is injected into a series of small holes that are drilled along a mortar joint, at the base of a problematic wall, around 6 inches (150mm) above ground level. The injection is generally done using a skeleton/caulking gun.
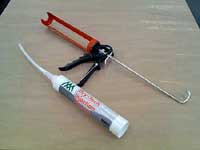
DPC injection cream cartridge with skeleton gun
Once injected, the chemical seeps into the brickwork or masonry and reacts with moisture in the wall to form a water-repellent barrier. This stops moisture from rising any further up the wall through capillary action.
These modern systems are quick to install, non-invasive ad considerably cheaper when compared to full wall replacements and ideal for domestic properties. They are commonly used in the UK due to their effectiveness, affordability, and suitability for retrofit applications, especially in older homes without a functional damp proof course.
One of the key advantages of chemical DPCs is their long-lasting protection. When applied correctly by following the manufacturer’s instructions, or preferably by a professional, some can last for decades, with some companies guaranteeing up to 30 years.
For a complete lasting repair, DPC injection is often used in conjunction with other damp treatments such as salt neutralisers, tanking, wall membranes and specialist replastering.
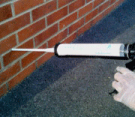
Modern DPC Injection Cream – no special tools, no smell and can be installed by anyone
Do Chemical DPC’s Actually Work?
The question over whether chemically injected DPC’s actually work has divided opinion since they’re emergence onto the market quite a few years ago and to answer this, on the whole, yes they certainly do, as long as a genuine, quality product is used and, more importantly, as long as it is installed correctly and the root cause of any damp issues are properly fixed.
Chemical DPCs work by forming a water-repellent barrier within the wall itself. Once injected into pre-drilled holes, the cream or liquid spreads through the masonry and cures, blocking moisture from rising through its natural capillary action.
This process is backed by years of research, testing, and widespread use in both residential and commercial properties.
That being said, chemical DPCs are not a miracle fix. If other damp-related issues, such as high external ground levels (bridging), faulty gutters or poor ventilation are left untreated, moisture may still find a way in.
Likewise, if the wall is too wet when the product is applied, or if the drill pattern and injection depth are incorrect, the treatment might not be fully effective.
To maximise success, it’s vital to follow the manufacturer’s instructions carefully or, even better, hire a professional damp specialist.
A reputable installer will also make sure your walls are prepared properly, including removing old plaster contaminated with salts that attract moisture by applying self neutralisers and other such processes. Most will also offer a guarantee for their work, so be sure to check this and what it covers.
Advantages and Disadvantages of Modern DPC Injection
As with all objects, everything has its advantages and disadvantages and DPC injection products are no different, so if you are currently mulling over whether to take the plunge and use such a kit to cure your damp issues, we have summarised the main advantages and disadvantages below:
Advantages of DPC Injection
- Cost-effective: Compared to traditional physical DPC installation, chemical injection is far more affordable. It requires less labour and causes minimal disruption to your home.
- Non-invasive: The procedure involves drilling small holes in the wall and injecting a damp-proof cream or fluid. There’s no need to lift floors or strip out entire walls.
- Low hazard – not even rated as irritant
- Quick and efficient: Most injections can be completed in a day, depending on the size of the area. Drying times vary, but the installation itself is fast.
- Suitable for most masonry types: Modern DPC products are designed to work in various brick, stone, or block constructions commonly found in UK homes.
- DIY-friendly: For confident homeowners, DIY DPC kits are widely available, with detailed instructions and support. This can significantly reduce costs further.
Disadvantages of DPC Injection
- Not a standalone fix: Chemical DPCs only stop rising damp. If the root cause is poor drainage, leaking pipes, or high external ground levels, these must be resolved separately for the treatment to be effective.
- Requires proper preparation: If walls are too wet or contaminated with hygroscopic salts, the treatment may fail. Pre-treatment and post-treatment steps (like removing old plaster) are essential.
- Effectiveness varies: Poor installation, wrong drilling pattern, incorrect depth, or low-quality product can lead to failure. It’s best done by experienced professionals.
- Slow drying time: Even after successful injection, walls can take several months to dry fully. Plastering or decorating too soon may trap moisture and cause damage.
What Depth Should Chemical Damp Proof be Injected?
The depth that the chemical damp proof should be injected is dependent on the thickness of the wall, the type of product and who manufactured it.
All DIY kits will come with full instructions that will state the exact depths that you should drill to and the exact spacings for each hole, however in most cases, the following guideline depths should be there or there abouts:
- For 115 mm walls (half brick thick) the holes should be 100mm deep
- 230mm walls (1 brick thick) the holes should be 210mm deep
- 345mm wall should have 320mm deep holes
- 460mm walls should have 430mm deep holes
What not to do When Injecting a Damp Proof Course
As we have mentioned several times in the above information, the key to success with this project is getting it absolutely correct to ensure a full and even barrier is created, so with this in mind, here’s some pointers to keep in mind:
- Do not inject the solution into the bricks or blocks, it should be injected into the mortar course.
- If there is already an existing working damp proof course, do not inject a chemical one!
- Do not be tempted to use any pre-drilled or existing holes, always make your own to the correct specifications
- Do not be tempted to insert a chemical damp proof course into poof quality, crumbling existing mortar
- If there are bridged cavities present, injecting a new DPC simply won’t work!
What Tools and Products are Needed to Inject a Damp Proof Course?
In order to inject your own DPC barrier into the wall of your home to resolve a broken, damaged or bridges DPC you will nee the following tools and products:
- DPC injection cream kit – There are quite a few available on the market today, a simple online search will reveal a selection. Some of the best are generally Permaguard, Dryzone and the similar
- Skeleton Gun – either a 400cc or professional 1000cc
- 12mm masonry bit
- Electric hammer drill
- Eye protection, gloves, face mask, old clothes and other PPE kit
- Drilling template – should come with kit
- Correct substance to fill drilled holes – should be stated in kit instructions. Normally cement or specialist filler
- Trowel
- Tape measure
- Pen/pencil capable of marking mortar
- Vacuum for clearing holes
How to Install an Injectable Damp Proof Course
Now that we have looked at all the different aspects of injectable DPC kits and how they can be used to resolve damaged or non-existant DPC’s in buildings and properties, it’s time to look now at how to actually install one.
Each specific DPC injection kit will come with it’s own manufacturers instructions, so these should be followed to the letter, however, the following should be the basic steps involved in installation.
- Step 1 – Choose the right product: Use a good-quality DPC injection cream or liquid kit. Creams are easier for DIY use, while liquids may require professional tools. Do your research thoroughly for the right product. Generally reputable manufacturers are Permaguard, Dryzone and the similar
- Step 2 – Gather your tools: You’ll need: a drill with a 12mm masonry bit, caulking gun (for cream) or injection pump (for liquid), tape measure, safety goggles, dust mask, gloves, and a vacuum or blower. For a complete breakdown, see the list above.
- Step 3 – Locate the correct height for your DPC: Most kits will include a drilling template so that all holes are drilled at the correct height and spacing. If not, contact your kits manufacturer and confirm the correct spacing. Once done, measure and mark each hole out at the correct height and correct distance apart.
- Step 4 – Drill the holes: Drill (usually) 12mm holes into or the correct size stated in your kits instructions in the mortar joint (not the brick) for the type of wall you are working with e.g. cavity, solid etc. at the correct intervals. Each hole should be correctly marked out in step 3 above, or use your kits drilling template.
- Step 5 – Clear out the dust: This step is absolutely essential to ensure that the injected liquid fills the hole and can spread and absorb correctly! Remove dust from each hole using a vacuum or blower. Ensure the hole has been fully cleared.
- Step 6 – Inject the DPC cream or fluid: Insert the nozzle of the injection tube into the hole to the correct amount stated in the instructions. Fill each hole slowly and steadily with the product, again, following the manufacturer’s instructions. Avoid overfilling and ensure a consistent line of treatment.
- Step 7 – Plug or seal the holes (optional): Some systems require you to plug the holes with plastic caps or mortar. Others may be left open to dry. Follow the product instructions for what the manufacturer suggests.
- Step 8 – Remove any damp or salt-damaged plaster: Where plaster is also damaged by damp or the presence of salts of other contaminants, strip plaster up to at least 1 metre above the DPC line.
- Step 9 – Let the wall dry out completely: Depending on conditions, drying may take 6 – 12 weeks or even longer depending on drying conditions and time of year. Use dehumidifiers and keep the area well ventilated as this will help the drying process.
- Step 10 – Replaster and redecorate: Once fully dry, replaster using breathable materials and avoid vinyl paints or wallpaper that trap moisture. Use a salt-resistant plaster or damp-proof render when reapplying
Tip: If you are in any way unsure about wall structure, damp source or how to inject your new DPC correctly, always consider consulting a qualified damp specialist for advice or to do the job for you!
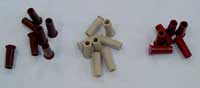
Plastic tapered plugs for filling drill holes after injecting DPC cream
How to Check Walls and Skirting Boards for Damp
Always inspect your walls and skirting boards when tackling damp. The easiest way to do this is with a damp meter, this is a simple tool that measures the moisture content of objects such as walls, timber, plaster and other similar objects.
If damp is found, make sure you’ve fixed any underlying issues, like installing a new chemical DPC, before moving on. Once the area has dried out completely you are then free to replace any damaged skirting boards, architraves or timber fittings.
For affected plaster, remove and replaster up to at least 1.2 metres in hight. To prevent future damage from salt deposits, mix in a salt neutraliser additive when replastering.
Salt-resistant plaster additive – Image courtesy of Property Repair Systems
Replastering is a vital step after installing a chemical DPC. Follow our full replastering guide here to do the job properly.
In some cases, it’s better to use an air gap membrane instead of traditional plaster. These membranes offer extra protection against future damp. Learn how to install a damp-proof membrane here.
Air gap membrane can be used in place of plaster and is simply fixed with plastic plugs
Injecting a damp proof course (DPC) may seem extremely daunting, especially if you’ve never done anything like this before, however most modern kits include clear instructions and many come with warranties for peace of mind.
If you’d like a step-by-step overview before starting, check out our full guide on how damp proof injection works.