If you are filling gaps in your floorboards you may also be interested to see our replacing a timber floor project, our sanding a timber floor project and timber floor finishes project.
Filling or sealing gaps in floorboards is a very popular topic on Diydoctor and although there are several ways to do this it must always be remembered that, unless you are painting the floor, or are staining it with some very dark stain, the filling method you use will always show up.
When you apply your oil, wax or varnish finish to the floor your filler will not take the application in the same way as the timber does. However faint, the line will show. This of course will wear down in time and with several applications but in the first instance, whatever we show you here will show up when the floor is finished so please do not write in telling us so.
We have also seen a suggestion, on another website, to use expanding spray foam to fill boards, Do not do this. It will cost you a fortune and you will be forever cleaning up the mess. Unless you have a special foam applicator gun the flow of this stuff is impossible to control in the precise way needed to fill gaps this small.
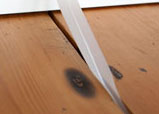
Using PVA Glue and Sawdust
If you are in the process of sanding and re-finishing your floor, after the initial sanding (you should save as much sawdust as possible in a container) you can apply a layer of PVA adhesive to the gap. This will only work with tongue and groove flooring where the PVA can "sit" on the tongue. Then sprinkle sawdust over the PVA.
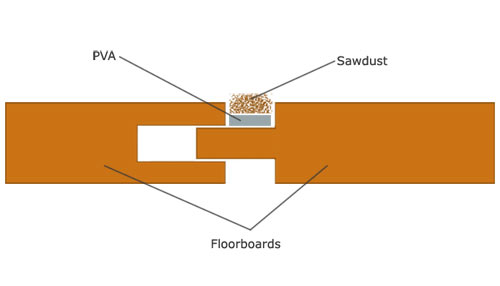
Diagram of a filled floorboard
Push the sawdust down into the PVA so it is level with the top of the board. Use the handle of a screwdriver or scraper for this. Leave until PVA is dry and then go over the joint with a small electric sander. The joint will sand down and look very similar to the board surface but because of the PVA content, will not stain in the same way.
Wooden Strips
This will need to be done before you sand your floor!
This method, although a little tricky and time consuming is probably the best and if done with care can give an amazing finish.
What you have to do is cut strips of wood ever so slightly larger than the width of the gap between each of the floorboards and the same depth and then apply some glue (wood glue or similar) to each of the insides of the boards.
Now using a soft mallet, hit the strip of wood down into the gap to create a air and dust tight seal.
Continue this process for the whole of your floor until all of the gaps have been filled and then leave for an hour or so for all of the glue to dry.
Once the glue has dried you can now sand over your floor and take off any high spots that may be left due to any wooden strips sticking above floorboard level leaving you with a smooth and gap free floor.
As you may have guessed, how well the joints blend in with the rest of your floor will depend on the colour and shade of the wood that you use. If you have dark floorboards and use a light wood for the strips then they will stand out even if you stain the boards and the joints afterwards so this is something to be aware of, but if done carefully can give a fantastic effect.
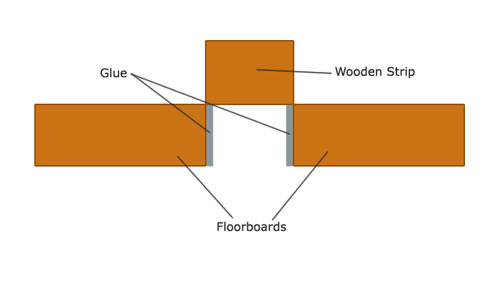
Wooden strip knocked down between floorboards
Flooring Filler or Decorators Caulk
Another method is to fill the gap with either flooring filler, which comes in a light tan finish and will blend in quite well with the lighter stains and varnishes, or you can use decorators caulk to fill the gap. Decorators caulk does accept stain and it will darken down from its original colour when stain/varnish is applied.
The above two types of filler also have the additional advantage of remaining fairly flexible so they move a little with the floor and do not over emphasize any further movement. They can also be applied to boards with no tongues or grooves as you apply the sealant to the edge of the board and build it up until it fills the gap.
Although these options do have the advantage of being quite flexible, over time they will in most cases separate from the edge of the boards and eventually fall through the gap.
A sealant tool can then be used to smooth the filler out to finish flush with the boards.
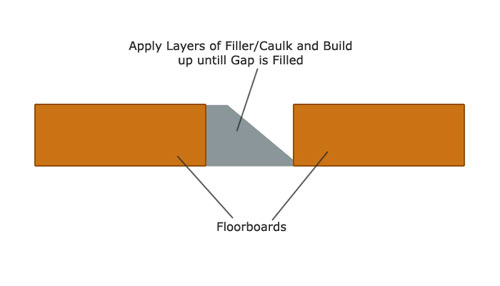
Caulk or filler used to build up layers until gap is filled
Draughtex and Stopgap
Draughtex is soft and squidgy and comes in the form of a roll available in differing thicknesses for different sized gaps.
Pushing DraughtEx down into gaps in floor
It’s specially formulated colour "Shadow" has been designed to mimic the natural shadows created between floorboards complimenting the overall finish.
Timber floors contract and expand throughout the course of their life. These movements cause alternative floorboard sealants such as papier-mâché and in some cases also (especially over time) wood filler and silicon to become ineffective and lose their sealant value. DraughtEx will mimic the movement pattern of the timber and therefore remain in place retaining insulation.
Once your floorboards have been sanded and finished with your chosen varnish or lacquer, you should allow the floorboards to completely dry and for the finish to reach maximum hardness, which is typically 48 hours. Once dried, you can fill the gaps with DraughtEx with minimum effort and with no need to sand and finish them again.
Simply select the required thickness and using a credit card, blunt knife or similar tool push the Draughtex down into the gap ensuring that the full width of the gap has been filled and then trim any ends as required.
Stopgap works on a similar basis but instead of being a soft, squidgy sausage it comes in the form of a thin "V" shape, fairly springy plastic. Application is very similar to the above in that you push it down into the gap using a credit card or blunt knife.
Due to it’s springy nature and "V" shape it will naturally spring outwards and fill the entire width of the gap and hold itself in place. It only comes in one size which makes things quite a bit simpler also. The only trimming that’s required is cutting it to length.
Stopgap floorboard gap filler
An additional advantage of Stopgap is that once it has been fitted the natural shadow of the gap itself will make it almost invisible to the eye ensuring that the natural finish of your floor is not in any way compromised.
Papier Mâché
We have heard many other suggestions for filling floorboard gaps and have tried most of them. Papier Mache for example sounds like a great idea but you may have to take a couple of months off work to do it! Although a very time consuming job, it can be done quite cheaply as all you need is some wallpaper adhesive and some old news papers.
As you might imagine, this does not give a great finish and due to this would not be suitable for room spaces where you want to show off your flooring but it can be used in rooms where you are going to cover the floors with carpet or lino etc….