This is a major problem in many houses and yet many people think there is an “easy” quick fix. To do this job properly will take some time and may involve the removal and reinstatement, even renewal, of some of the floor. Set aside plenty of time.
Common Reasons for Creaking Floorbaords and Stairs
The most common reason for floors creaking are:
- The use of incorrect nails holding the floor down to the joists. In the case of chipboard floors these nails should be annular ring shank nails. These nails (usually 2 inches long) have serrations all round the shaft and are slightly screw like in appearance. There may also have been an insufficient quantity of nails used
- The floor joists need to be absolutely solid and of the correct size to prevent movement across the span they are bridging. There is a table of joist sizes required for any given span in our load bearing walls project . It is also vital that the joists are fixed very solidly at either end, are spaced at the correct centres (usually 400mm) and cannot move in their wall sockets or joist hangers. The tail of the hanger should be firmly built into the wall and the joist firmly fixed into the hanger. If the joists are built into the wall this should be done in a way which prevents both rotting and movement.
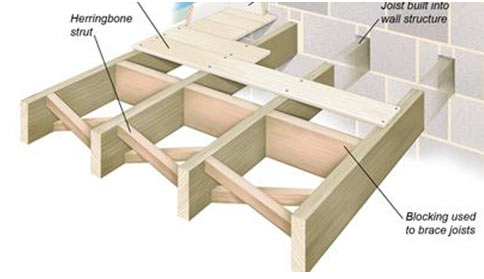
- Timbers from merchants are very rarely straight. To ensure no twist in the floor, which can also lead to movement along the joist itself when downward pressure is applied, there needs to be timber spacers or ″noggins″ at regular intervals across the floor. This is sometimes done in a ″Herringbone″ fashion using battens but more often these days is done using solid timber the same size as the joists themselves (see image above)
- It is also a very good idea (and required on all other floor levels) to strap the first three joists on either side with a restraining bar (called a joist strap) which is fixed to the wall by means of plugs and screws or resin fixings when doing a loft conversion. This is not often done in a loft conversion in all fairness but is never a ″bad″ idea (see image below)
- Sometimes too many, or too large holes are drilled through the joists to accommodate pipes and cables. This also applies to notches which are taken out of the top of the joists and pipes/cables are set into these notches. These can weaken the joist allowing it to move. Rules for notching joists can be found on this page
- Having made sure the joists themselves cannot move the floor needs to be securely fixed to them using screws which penetrate the joist by at least the same depth of the floor itself. These should be fixed at 400mm centres in both directions. 18mm is the usual depth of a floor but if particularly weighty objects are to be placed in the roof 25mm is the next option
- A little known ″Trick of the trade″ is the fact that sometimes the floor is absolutely solid and what is making the squeaking noises is the nails and/or screws used to hold the ″sole-plate″ of the new stud walls to the floor. If the floor moves at all, even a tiny bit (which of course it shouldn’t, but sometimes does) the friction between the wall and the floor it stands on can sometimes cause a squeak which is impossible to locate unless you know this. The only retrospective remedy here is to drive timber wedges between the wall and floor to take up any possible slack but if this wedge needs to be more than 12mm at its widest end then the floor has not been put down properly.
Cross section of joists built into a wall
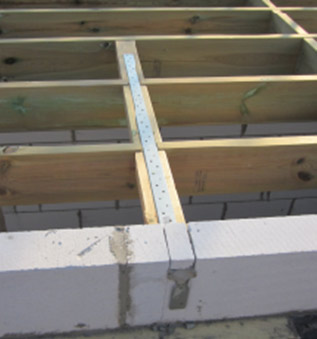
Joist strap or joist restraining bar
Other reasons for floors creaking are because a joint in the floor is not supported properly on a joist. A timber and plasterboard wall placed on top of the floor is not securely fixed to the floor, and any floor movement is causing the fixings to squeak. The floor joists themselves are not properly secured and are bowing or twisting under the floor.
How to Fix Creaking Floorboards
Add Additional Screws
The first step is to add chipboard screws to the floor to secure it to the joists. These screws must be no longer than the nails used and must be placed next to the existing nails.
Drill a pilot hole and countersink it for each screw. The screw heads can be covered with wood filler as in point 6 in the diagram below. Make sure you check for cables and pipes before drilling and screwing. Use additional screws if there is any more than 300mm in between the existing nails along the line of the joists.
Check Joints in Floorboards for Support
Check each joint for adequate support. Joints should not spring and must be firm. If you feel a joint is not supported, remove one of the boards forming that joint and fix a new joist extension to support it as ″1″ in the diagram.
To remove a board or boards it will be necessary to cut the tongue from the board using a sharp chisel or a power saw. Once the tongue of the board is cut, careful prising of the board upward, should lift the nails with it, allowing them to be removed. There is always a danger here of damaging the board (even the pros do) so be prepared to get a new board or two.
Tongue and Groove Chipboard Flooring
With a tongue and groove chipboard floor, the joint along the long edge of the board is not normally supported, the tongue and groove give it the strength when supported along this length by the joists. The long joint should always run at right angles to the joists.
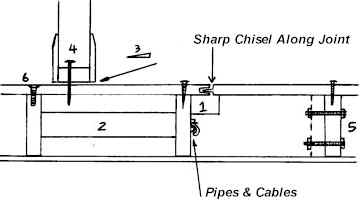
Floorboard Cross Section
Timber and Plasterboard Stud Walls
Number "4" shows a timber and plasterboard wall that has been built on top of the floor, this is standard, but all fixings for the bottom timber (soleplate) of this wall should go into a joist or purpose made timber “noggin”.
In the diagram, the nail holding the soleplate to the floor is only secured into the floor board. This will work loose and is sometimes the cause of the creaking noise. This can be diagnosed quite easily because it will generally leave a gap between the underside of the skirting and the floor. This can sometimes be cured by tapping in small timber wedges,"3", and filling the remaining gap with gap filling adhesive or even the careful application of spray foam.
Undersized Joists and Incorrectly Supported Joists
The most devastating reason for a creaking floor is that the joists themselves are either not man enough for the job of supporting the floor and are either undersized or they are not properly supported in, or on the walls that should secure the ends.
They may also be twisting within the floor void. Number "5" shows a joist added and bolted to the existing to strengthen the floor, while 2 shows a noggin fixed in between the floor joists to stop the twist. Check the ends of the joists are fixed to the wall. If they are loose they must be fixed securely.
How to Fix Creaking Stairs
If you are lucky enough to have access to the underside of your stairs, you may find a typical staircase construction along the lines of the diagram below:
- 2 = Holding blocks, glued and screwed to the back of the riser and underside of the tread. If these blocks have come loose, or even split, glue, tighten or replace them
- 3 = Timber wedges that are inserted between the stair "string" and the wedge plates. Again these may have worked loose and need to be tapped into position and glued
If you cannot get to the back of the stairs, your only option is to drill pilot holes into the tread, where it is directly over the riser, and screw down into the riser, 1. These holes should be countersunk and the screw heads covered with filler.
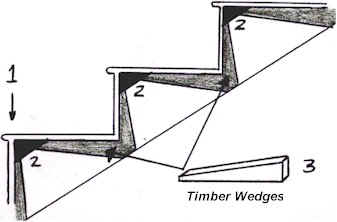
Cross Section of Stairs